Blog
October 30, 2024

Load testing best practices assume that you should run load tests early and often. They indicate that the best way of getting your load test executed is integrating it into your CI/CD. Github Actions is a built-in solution that allows for running custom actions like Unit Tests, Integration Tests, and Performance Tests which can automatically mark a build as failed if anything fails.
In this blog, you will improve your JMeter + GitHub testing skills by learning how to run a JMeter load test from Github Actions.
GitHub Actions Overview
GitHub Actions is a CI/CD service that allows automating software development workflows directly within a GitHub repository.
It enables users to create custom workflows that trigger on various events — such as commits or pull requests — and can run tasks like building, testing, and deploying code.
GitHub Actions uses YAML configuration files to define these workflows. This makes it easy to set up, read and understand. Also, the YAML file defining the Github Actions workflow lives under GitHub repository so it is versioned and points to the current state of the current branch.
Back to topRunning JMeter in GitHub Actions
There are multiple ways of running a JMeter test. The most popular is command-line non-GUI mode where you can simply run your test as:
jmeter -n -t /path/to/your/test.jmx -l /path/to/result.jtlIt is the fastest and easiest way, but it has one major drawback when it comes to CI/CD: If a request or assertion fails somewhere, there is no automated way to fail the build because the majority of CI/CD solutions look at exit status code and JMeter always returns 0 (success) even if there are failures in the test.
One possible option that does not require any extra configuration is using the Taurus framework, which returns non-zero code if there are failed requests. It also provides flexible and powerful Pass-Fail Criteria subsystem where you can configure your very own failure conditions.
GitHub Actions runners are essentially “empty” and they come only with basic software installed. This means that installation of JMeter is up to you, while Taurus has a JMeter Auto Installation feature.
If you are interested in Taurus framework details in-depth, BlazeMeter University provides a free Taurus course that guides you through the main features and use cases.
Back to topPreparing Your JMeter Test Script
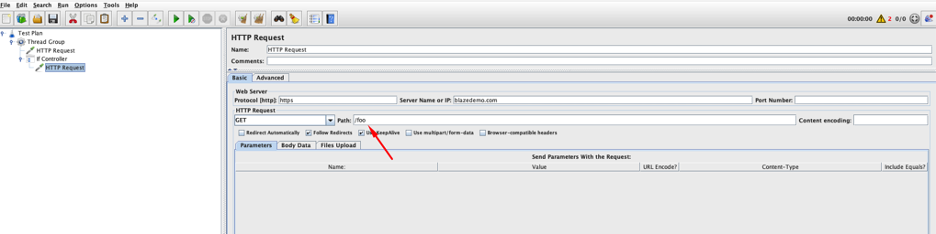
The test structure will be very basic and simple. We will configure JMeter to send a simple single GET request to the https://blazedemo.com website (you are welcome to experiment with it for JMeter and BlazeMeter load testing).

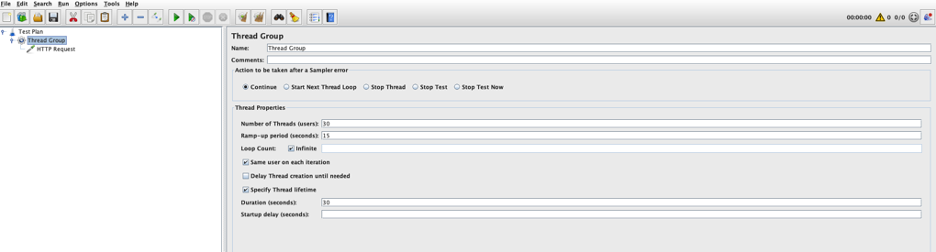
Thread Group settings would be very basic:
Save it as test.jmx file in the root of your Github Repository. The file contents will look something like:
<?xml version="1.0" encoding="UTF-8"?>
<jmeterTestPlan version="1.2" properties="5.0" jmeter="5.6.3">
 <hashTree>
   <TestPlan guiclass="TestPlanGui" testclass="TestPlan" testname="Test Plan">
     <elementProp name="TestPlan.user_defined_variables" elementType="Arguments" guiclass="ArgumentsPanel" testclass="Arguments" testname="User Defined Variables">
       <collectionProp name="Arguments.arguments"/>
     </elementProp>
   </TestPlan>
   <hashTree>
     <ThreadGroup guiclass="ThreadGroupGui" testclass="ThreadGroup" testname="Thread Group">
       <intProp name="ThreadGroup.num_threads">30</intProp>
       <intProp name="ThreadGroup.ramp_time">15</intProp>
       <longProp name="ThreadGroup.duration">30</longProp>
       <boolProp name="ThreadGroup.same_user_on_next_iteration">true</boolProp>
       <boolProp name="ThreadGroup.scheduler">true</boolProp>
       <stringProp name="ThreadGroup.on_sample_error">continue</stringProp>
       <elementProp name="ThreadGroup.main_controller" elementType="LoopController" guiclass="LoopControlPanel" testclass="LoopController" testname="Loop Controller">
         <intProp name="LoopController.loops">-1</intProp>
         <boolProp name="LoopController.continue_forever">false</boolProp>
       </elementProp>
     </ThreadGroup>
     <hashTree>
       <HTTPSamplerProxy guiclass="HttpTestSampleGui" testclass="HTTPSamplerProxy" testname="HTTP Request">
         <stringProp name="HTTPSampler.domain">blazedemo.com</stringProp>
         <stringProp name="HTTPSampler.protocol">https</stringProp>
         <boolProp name="HTTPSampler.follow_redirects">true</boolProp>
         <stringProp name="HTTPSampler.method">GET</stringProp>
         <boolProp name="HTTPSampler.use_keepalive">true</boolProp>
         <boolProp name="HTTPSampler.postBodyRaw">false</boolProp>
         <elementProp name="HTTPsampler.Arguments" elementType="Arguments" guiclass="HTTPArgumentsPanel" testclass="Arguments" testname="User Defined Variables">
           <collectionProp name="Arguments.arguments"/>
         </elementProp>
       </HTTPSamplerProxy>
       <hashTree/>
     </hashTree>
   </hashTree>
 </hashTree>
</jmeterTestPlan>Preparing GitHub Actions Workflow YAML file
- Create .github folder in the root of your repository
- Create workflows folder under .github folder
- Add an empty jmeter.yml file under the workflows folder
Use your favorite text editor or an IDE to populate jmeter.yml file as follows:
name: Run JMeter Test

# Controls when the workflow will run
on:
 # Triggers the workflow on push or pull request events but only for the "master" branch
 push:
   branches: [ "master" ]
 pull_request:
   branches: [ "master" ]

 # Allows you to run this workflow manually from the Actions tab
 workflow_dispatch:

# A workflow run is made up of one or more jobs that can run sequentially or in parallel
jobs:
 # This workflow contains a single job called "jmeter-test"
 jmeter-test:
   # The type of runner that the job will run on
   runs-on: ubuntu-latest

   # Steps represent a sequence of tasks that will be executed as part of the job
   steps:
     # Checks-out your repository under $GITHUB_WORKSPACE, so your job can access it
     - uses: actions/checkout@v4

     # Runs a set of commands using the runners shell
     - name: Install Python, Java Runtime and Taurus
       run: |
         sudo apt update
         sudo apt install python3 default-jre-headless python3-tk python3-pip python3-dev libxml2-dev libxslt-dev zlib1g-dev net-tools
         sudo python3 -m pip install bzt

     # Runs a single command using the runners shell
     - name: Run JMeter Test
       run: bzt test.jmx
Your repository should look like this:
.
├── .github
│ └── workflows
│ └── jmeter.yml
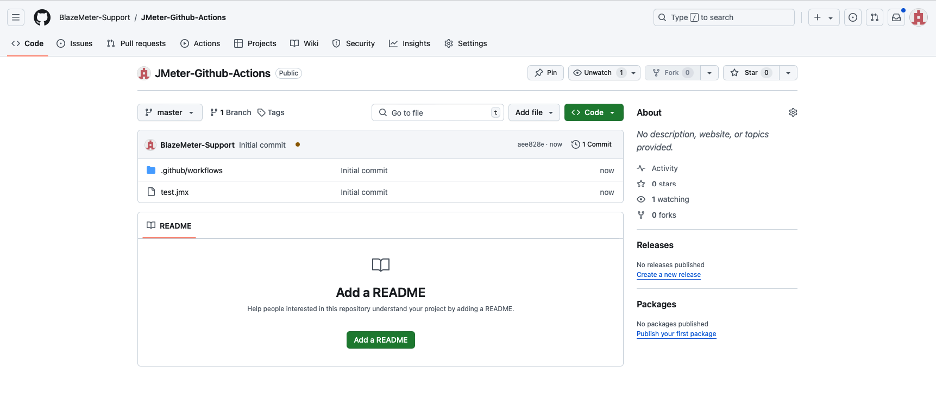
└── test.jmxOnce you commit the files to GitHub, you should see that your repository contains the latest changes and the files are there:
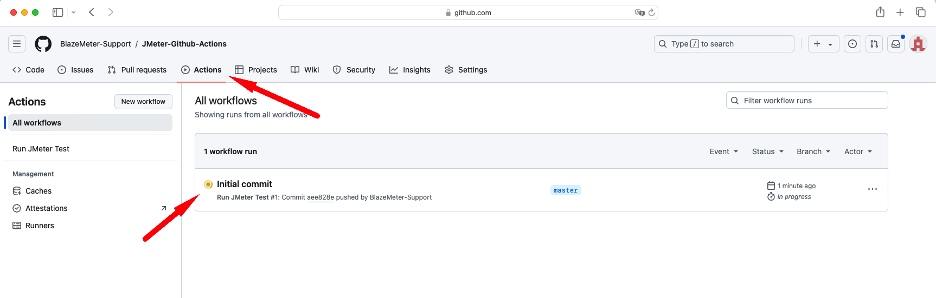
If you switch to the “Actions” tab, you will see that the workflow is running:
It is possible to click at the workflow and see the console output from each step:
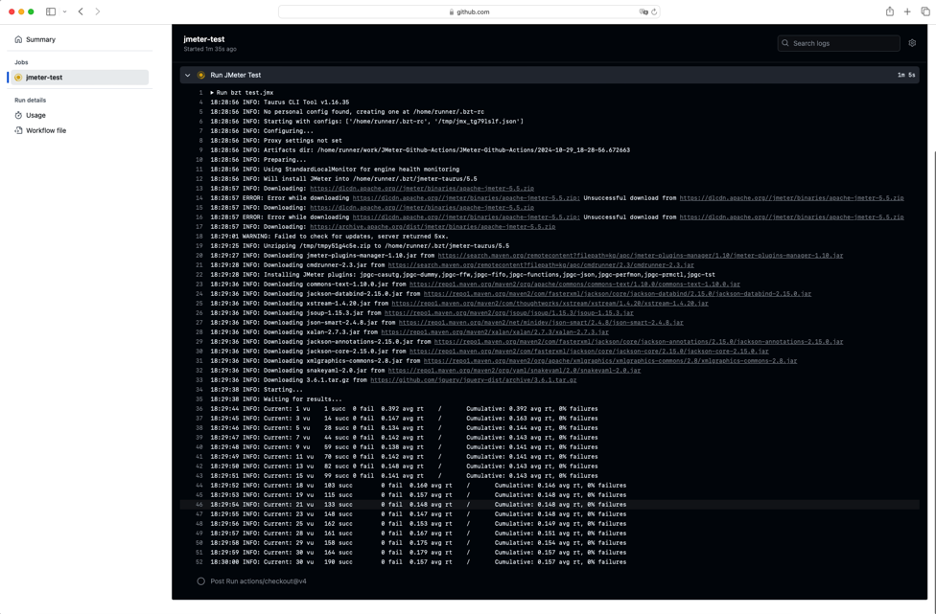
In the above case, you can see Taurus executing the test and printing some interim KPIs to the console.
At the end of the test execution, Taurus will print the test summary and exit status code.
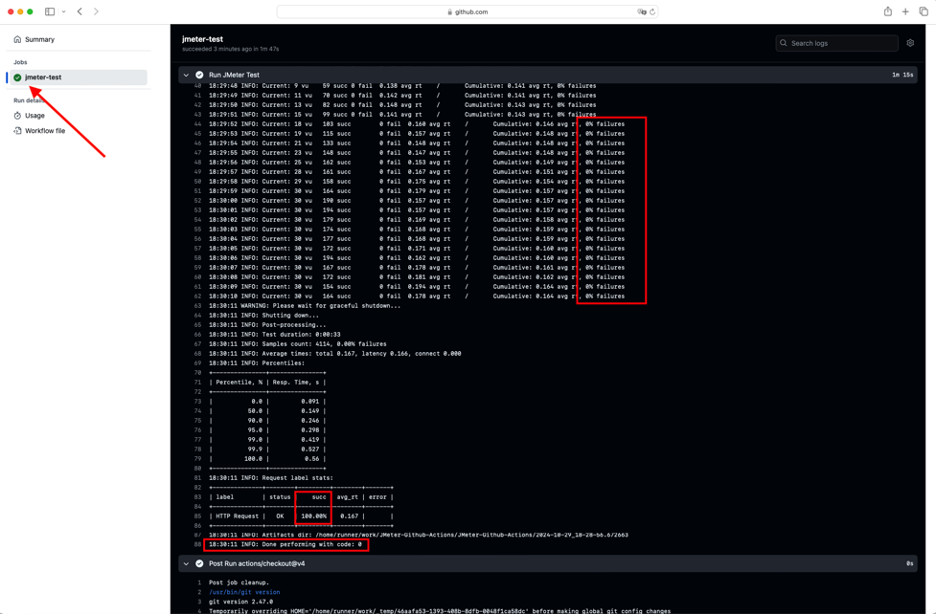
With the workflow status passed, it is indicated by the green checkmark in the upper-left corner of the sidebar.
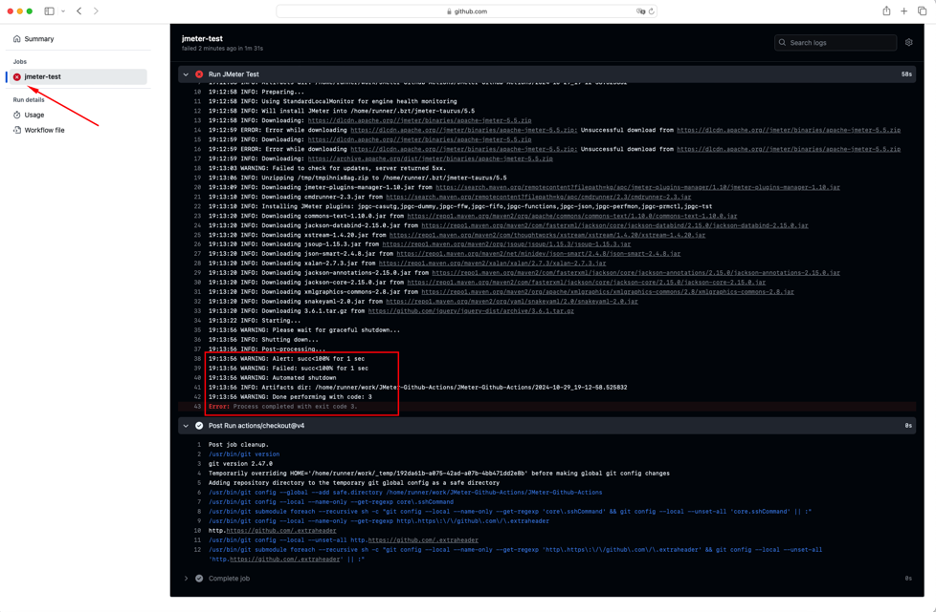
Now let’s add some artificial failures such as a request that returns a HTTP 404 error:
To enable Taurus to return non-zero exit status code on any failure, change this line:
run: bzt test.jmxTo this:
run: |
 bzt test.jmx -o reporting='[{"module": "passfail", "criteria": ["succ<100%,stop as failed"]}]'
Now when you run the workflow, Taurus will detect failed requests and return status code 3 — which means that the step has failed for the GitHub Actions.
Now you have a basic overview for how you can run your JMeter scripts in GitHub actions.
Back to topBottom Line
Now that you have a firm grasp on how to set up and execute JMeter Github testing, the testing world is your oyster. BlazeMeter offers unparalleled flexibility when it comes to testing with other frameworks and tools.
To experience all that BlazeMeter has to offer, you can get started JMeter + GitHub testing for FREE today!