Blog
April 26, 2021

REST is a software architecture style, commonly used for web services. Due to its popularity, you will probably need to load test RESTful APIs at some point. REST API testing can be done with Apache JMeter™. Read this blog post to find out how.
Back to top
What Is REST API Testing?
Back to topREST API Testing is a type of web automation testing that tests RESTful APIs for web applications by sending various HTTP/S requests. When we say RESTful APIs, we are referring to the web services implementation of REST architecture.
REST and RESTful APIs: An Introduction
REST (Representational State Transfer) is a software design pattern typically used for web applications. We can think about REST as a software architecture style. The basic idea of REST is treating objects on the server-side (e.g rows in a database table) as resources that can be created or destroyed. When we say RESTful APIs we are referring to the web services implementation of REST architecture.
The most basic way of thinking about RESTful is as a way of formatting the URLs of your web applications. For example, if your resource was called "articles", then:
- /articles - How a user accesses ALL posts.
- /articles/:id -How a user accesses and views an individual post which was retrieved based on their unique id.
- /articles/new How a form for creating a new post is displayed.
RESTful API defines a set of functions that developers can use to perform requests and receive responses via HTTP protocol, such as GET, POST, PUT and DELETE.
- Sending a GET request to /users would retrieve the users from the database level.
- Sending a POST request to /users would create a new user on the database level.
- Sending a PUT request to /users/:id would update the attributes of a given user, again identified by a unique id.
- Sending a DELETE request to /users/:id would delete a given user, again identified by a unique id.
Back to top
JMeter API Testing: How to Load Test RESTful APIs with JMeter
There are multiple ways to do RESTful API testing, such as with a Spring Cloud Feign Client. But for our purposes here, we will focus on API testing with JMeter.
JMeter REST API testing can be done with the HTTP Request Sampler.
Our working environment:
- Ubuntu 16.04
- JMeter 3.2
- RESTful API available at jsonplaceholder.typicode.com. It’s very simple, but it’s enough for our work and for practicing. If you need to load test you need to add your own server’s name.
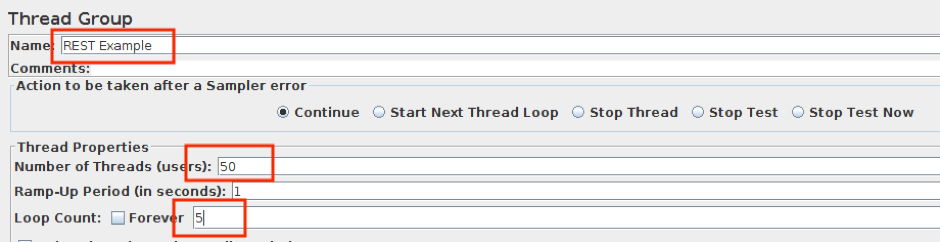
1. Add a Thread Group
Right Click -> Add- > Thread Group
Here we defined “Number of Threads = 50” and “Loop Count = 5”. This allows us to simulate 50 different requests for 5 times. I named the Thread Group “REST Example”.
2. Add an HTTP Request.
Right Click on REST Example -> Add -> Sampler -> HTTP Request.

3. Fill in the necessary values:
- Name - the name of the current sampler
- Protocol - by default this is HTTP, but it can also be HTTPS or FILE
- Server - the IP address or domain name of the server. This field is required
- Port - the web server the port listens to. By default: 80
- Method - GET, POST, PUT, DELETE, etc. This field is required
- Path - the path to the resource. If this requires string parameters in the query, add them below in the “Send Parameters With the Request” section
- Content encoding - if you are using POST, PUT, PATCH or FILE, there is a character encoding to be used
POST Content Encoding
We will post data as a JSON object. JSON, or JavaScript Object Notation, is a way to store information in an organized, easy-to-access manner. In a nutshell, JSON gives us a human-readable collection of data that we can access in a logical manner.
4. Set a Content-Type header.
Right click on Test Plan -> Add -> Config element -> HTTP Header Manager
5. Add a “Content-Type” field equal to “application/json”, as shown in the picture below:
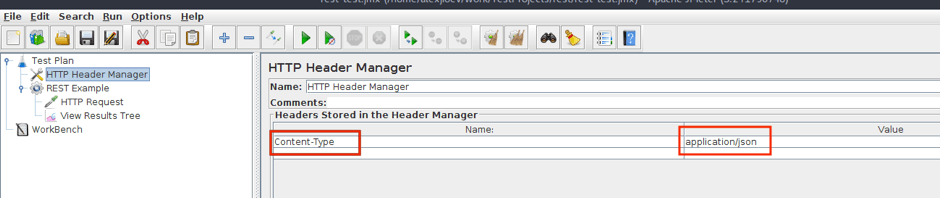
Important! Our RESTful API in this blog post is so simple that we do not need to send headers, and you can skip this step. But in other cases, this step is necessary.
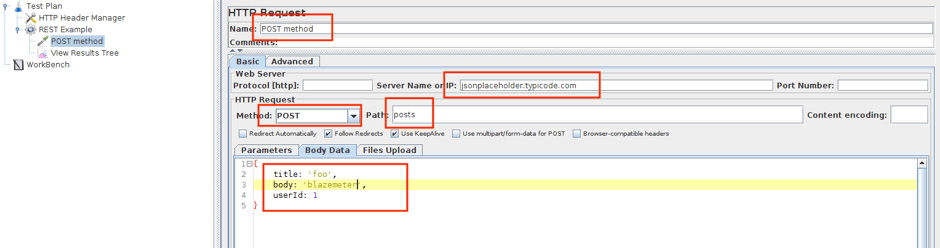
5. Add a HTTP Request Sampler to our REST Example thread group.
Right click on REST Example -> Add -> Sampler -> HTTP Request
6. Fill in the relevant fields:
- Name - POST method
- Server - jsonplaceholder.typicode.com
- Method - POST
- Path - “/articles”
- Parameters-Post Body - add the body request
{
    title: 'foo',
    body: 'blazemeter',
    userId: 1
}
You should now see this window:
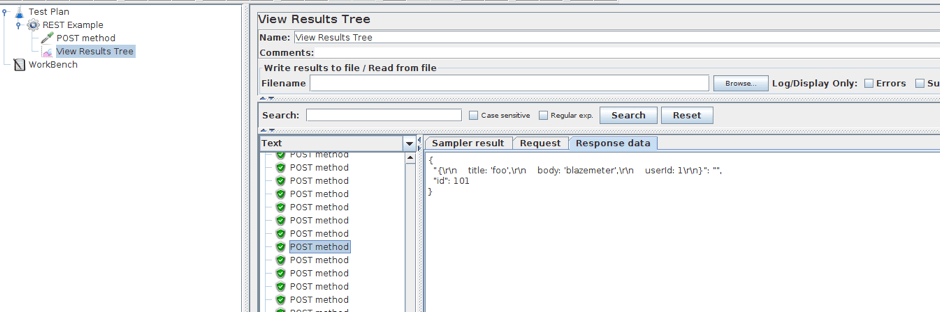
7. Add a Listener to see the Request response.
Right Click on REST Example -> Add -> Listener -> View Results Tree
It will look like this:
GET Content Encoding
8. To check the GET method let’s create a new HTTP Request sampler and fill in following credentials:
- Name - GET method
- Server - jsonplaceholder.typicode.com
- Method - GET
- Path - “/articles”

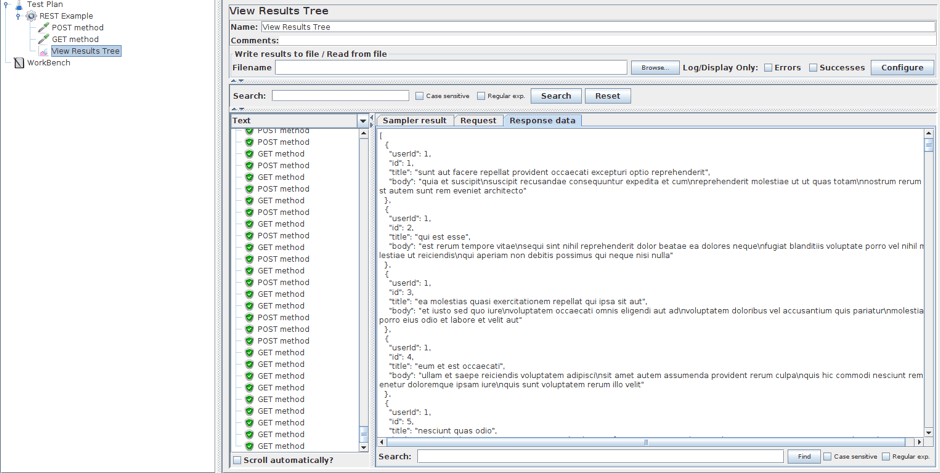
9. In the View Results Tree you can see all the posts received by the GET method:
Response Assertions in REST JMeter API Testing
10. If you need to verify that the post is presented in your received response as part of your REST API testing, use the Response Assertion.
Right Click on GET method -> Add -> Assertions -> Response Assertion
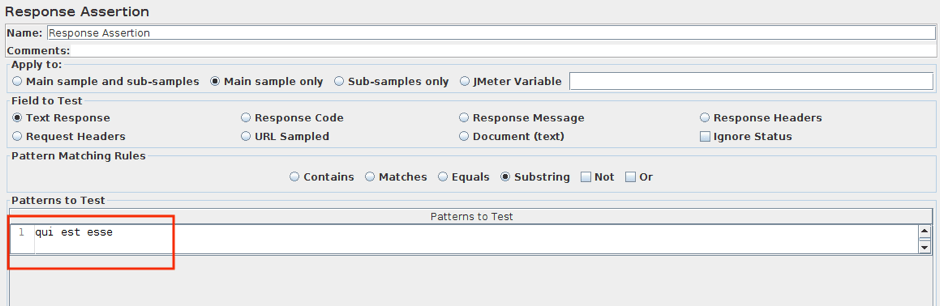
11. Leave this window’s settings as default. You only need to configure the “Patterns to Test” field, like below, according to the response you want to test.
How Does the Response Assertion Work?
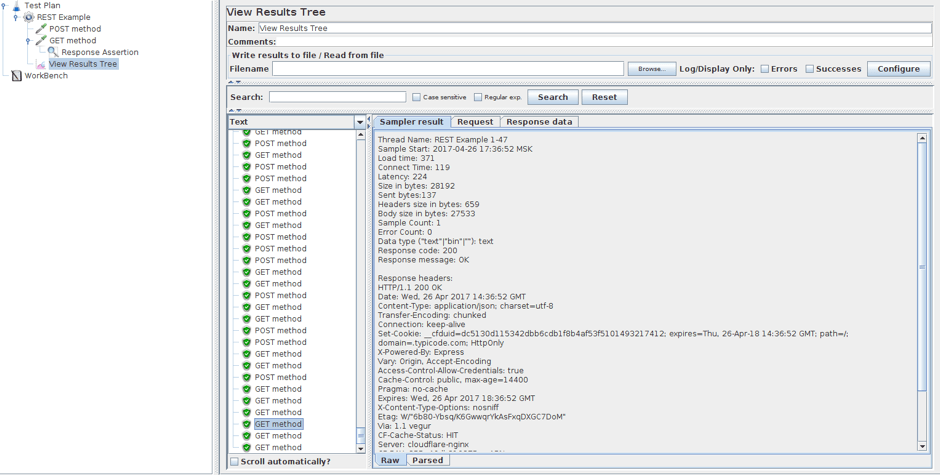
In responses, different posts have different ids, titles, and bodies. The response assertion looks through the whole response and looks for matches between the patterns you wrote down and what the response contains. If there is a match, the test will pass. If not - the test will not pass.
In this example I’ve taken the title of a post at our server. It is equal to “qui est esse”. Since there is a match, the test passes.
But, if we change our pattern to “blazemeter title”:
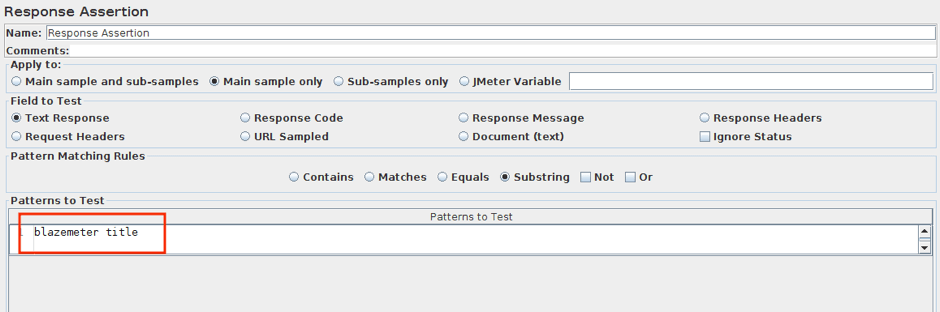
Then you can see, that our GET method tests do not pass.
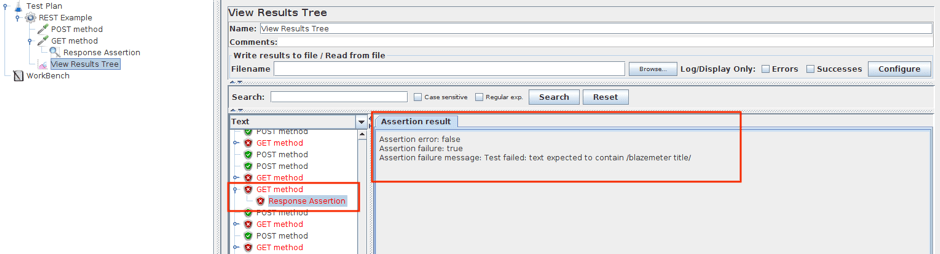
The Assertion failure message: Test failed: text expected to contain /blazemeter title/
That’s it! You have now learned all the necessary information to do your own REST API testing. Get started today.