Blog
August 24, 2020

BDD (Behavior-Driven Development) is a way of developing code based on the expected behavior of the code as experienced by the users. When testing APIs for BDD tests, it’s important to configure BDD correctly and to keep the count of BDDs to a minimum. This blog post will show best practices to configuring the execution of BDD tests through open-source Cucumber API testing. To run the tests yourselves, you can find the source code here - blazedemo.
Back to topOverview of BDD
BDD is a type of software development process where the specification and design of an application are determined according to what its behavior should look like to users. BDD is also known as acceptance tests.
There are two sides of the coin when it comes to BDD: on the one hand, it enables non-techie people in the company to contribute directly to test automation. This can be done even in the project’s source code, by giving them a place where they can directly write their criteria. On the other hand, it is very difficult to maintain and support.
Back to topHow to Set Up Cucumber API Testing
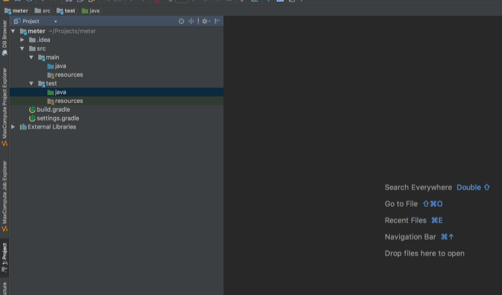
1. Create a new empty Java project on Intellij IDEA. For more details on how to do that, take a look at this BlazeMeter blog (step 1).
2. Now that we have a project, we need to setup the dependencies. You can use these dependencies, since they are public.
To do that, double click on your build.gradle file and add the following Gradle configuration file:
group 'blazemeter'
version '1.0-SNAPSHOT'

buildscript {
   repositories {
       jcenter()
       mavenCentral()
       maven { url "http://repo.spring.io/libs-snapshot" }
   }
   dependencies {
       classpath("org.springframework.boot:spring-boot-gradle-plugin:1.5.2.RELEASE")
   }
}

apply plugin: 'java'
apply plugin: 'idea'
apply plugin: 'io.spring.dependency-management'
apply plugin: 'org.springframework.boot'

sourceSets {
   main.java.srcDir "src/main/java"
   main.resources.srcDir "src/main/resources"
   test.java.srcDir "src/test/java"
   test.resources.srcDir "src/test/resources"
}

jar {
   baseName = 'blaze-demo-api'
   version =  '1.0'
}

bootRepackage {
   mainClass = 'com.demo.BlazeMeterApi'
}

dependencyManagement {
   imports {
       mavenBom 'io.spring.platform:platform-bom:Brussels-SR2'
   }
}

repositories {
   mavenCentral()
   jcenter()
   maven { url "http://repo.spring.io/libs-snapshot" }
}

sourceCompatibility = 1.8
targetCompatibility = 1.8

dependencies {

   compile group: 'org.springframework', name: 'spring-core'
   compile group: 'org.springframework.boot', name: 'spring-boot-starter-jdbc'
   compile group: 'org.springframework.boot', name: 'spring-boot-starter-web'
   compile group: 'org.springframework.boot', name: 'spring-boot-starter-actuator'
   compile group: 'org.springframework.boot', name: 'spring-boot-starter-security'
   compile group: 'org.springframework.boot', name: 'spring-boot-starter-data-jpa'
   compile group: 'org.springframework.security.oauth', name: 'spring-security-oauth2'
   compile group: 'com.fasterxml.jackson.datatype', name: 'jackson-datatype-hibernate4'
   compile group: 'mysql', name: 'mysql-connector-java'
   compile group: 'io.rest-assured', name: 'rest-assured', version: '3.0.3'
   compile group: 'io.rest-assured', name: 'json-schema-validator', version: '3.0.3'

   compile group: 'info.cukes', name: 'cucumber-spring', version: '1.2.5'
   compile group: 'info.cukes', name: 'cucumber-junit', version: '1.2.5'

   testCompile group: 'org.springframework.boot', name: 'spring-boot-starter-test'
   testCompile group: 'org.springframework.security', name: 'spring-security-test'
   testCompile group: 'junit', name: 'junit'
   testCompile group: 'org.hsqldb', name: 'hsqldb'
}
In this script, there are only two dependencies for Cucumber itself:
compile group: 'info.cukes', name: 'cucumber-spring', version: '1.2.5'
compile group: 'info.cukes', name: 'cucumber-junit', version: '1.2.5'
All the rest are libs/dependencies for the API project itself (including unit and REST assure testing).
3. Install a Cucumber plugin. The plugin can be installed directly from Intellij by going to Preferences -> Plugins -> Install JetBrains plugin.
The Cucumber plugin will create/generate/auto-create the JAVA CODE. This plugin gives us two main benefits: code completion in a feature file as well as implementing methods of the feature steps directly from the feature file.
📕 Related Resource: Learn more about Selenium Vs. Cucumber: Which One is Right for You?
Back to top3 Tips For Cucumber API Testing
Tip #1 - Keep Your Feature File as Short as Possible
The features file is the place for non-techies to write criteria/tests. Keep is as small as possible, with meaningful input only, and include all the steps in it. This is important for making technical maintenance and support as efficient as possible.
Here is an example of a short features file:
Feature: API BDDs

 @FirstScenario
 Scenario: Receive single arrival
   Given Arrival rest endpoint is up
   When User gets one arrival by id 1
   Then Returned JSON object is not null

 Scenario: Receive single departure
   Given Departure rest endpoint is up
   When User gets one departure by id 1
   Then Returned JSON object is not null

 Scenario: Receive single flight
   Given Flight rest endpoint is up
   When User gets one flight by id 1
   Then Returned JSON object is not null

 @LastScenario
 Scenario: Receive single user
   Given Users rest endpoint is up
   When User gets one user by id 1
   Then Returned JSON object is not null
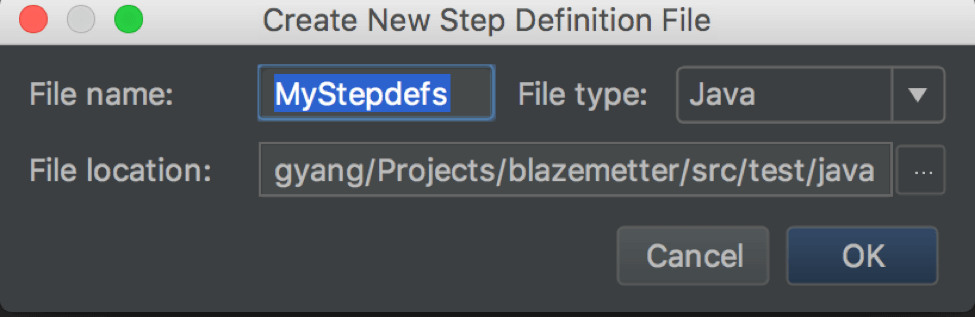
4. By clicking Alt + Enter on the line of feature step, we will get the following popup window:

In the popup you can select “Create step definition” that will create a step definition only for the selected row from the feature file, or “Create all steps definition” that will generate methods for all the steps in the Java classes.
For example, if we select “Create step definition”, we will see the step definition class creation popup, which will create the Java class as an output with a defined name and a defined path.
As usual, you can store your test files anywhere in the src/test/java, according to your personal preferences. I will group them according to test types: unit, rest, bdd, etc.
Don’t forget to name the class for step definitions. Obviously you can do this manually without any Intellij IDEA generation.
Tip #2 - Group All Step Definitions in One Place
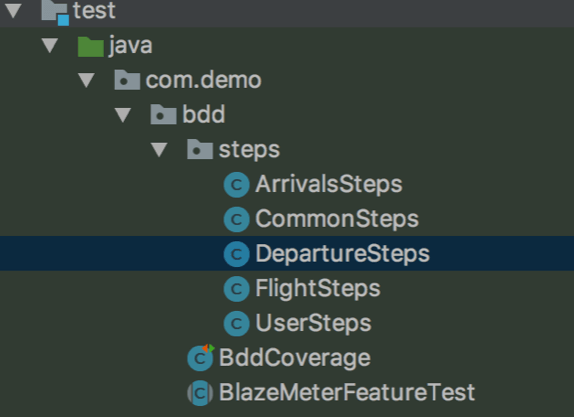
To ensure smooth running and code readability, it’s important to put all your step definition files in one place. This will enable Cucumber to find the steps and feature files easily. As you can see from the screenshot below, we create a folder named “bdd” and a subfolder named “steps” and put all the testing steps in it.

Then, we added a file holder for BDD Cucumber (named “BddCoverage” in this example). The BddCoverage.java class is important because it groups the steps, so Cucumber knows the name of our test suite and where to collect steps and feature files from. This is part of the @CucumberOptions annotation, and done via Glue:
package com.demo.bdd;

import cucumber.api.CucumberOptions;
import cucumber.api.junit.Cucumber;
import org.junit.runner.RunWith;
import org.springframework.test.context.ActiveProfiles;

@RunWith(Cucumber.class)
@CucumberOptions(
       glue = {"com.demo.bdd.steps"},
       features = {"classpath:bdd/features"}
)
@ActiveProfiles(value = "test")
public class BddCoverage {
}
5. You will receive an auto-generated file from the plugin, which shows the class code with all the steps. Add your code to it, instead of the sample code that will appear in it. Below you can see the part that shows the ArrivalsSteps class.
package com.demo.bdd.steps;

import com.demo.bdd.BlazeMeterFeatureTest;
import cucumber.api.java.en.When;
import org.slf4j.Logger;

import static org.slf4j.LoggerFactory.getLogger;

public class ArrivalsSteps extends BlazeMeterFeatureTest {

   private static final Logger LOGGER = getLogger(ArrivalsSteps.class);

   @When("^User gets one arrival by id (\\d+)$")
   public void userGetsOneArrivalById(int id) throws Throwable {
       LOGGER.info("When - User gets one arrival by id [{}]", id);
   }
}
You can also create your own file. This is the CommonSteps file, which I manually created:
package com.demo.bdd.steps;
import com.demo.bdd.BlazeMeterFeatureTest;
import cucumber.api.java.en.Given;
import cucumber.api.java.en.Then;
import org.slf4j.Logger;
import static org.slf4j.LoggerFactory.getLogger;

public class CommonSteps extends BlazeMeterFeatureTest {

   private static final Logger LOGGER = getLogger(CommonSteps.class);

   @Given("^(.+) rest endpoint is up$")
   public void arrivalRestEndpointIsUp(String endpointType) throws Throwable {
       LOGGER.info("Given - [{}] rest endpoint is up", endpointType);
   }

   @Then("^Returned JSON object is not null$")
   public void returnedJSONObjectIsNotNull() {
       LOGGER.info("Then - Returned JSON object is not null");
   }
}
Tip #3 - Create an Abstract Class
To ensure your application runs properly, create an Abstract Class. The Abstract Class ensures the API runs automatically before the tests, and not separately. In this example, we named the class “BlazeMeterFeatureTest”.
The Abstract class that will help us run SpringContext and a random port. As result, all our step classes will extend this one.
package com.demo.bdd;

import com.demo.BlazeMeterApi;
import org.springframework.boot.test.context.SpringBootTest;
import org.springframework.test.context.ContextConfiguration;

@ContextConfiguration
@SpringBootTest(
       classes = BlazeMeterApi.class,
       webEnvironment = SpringBootTest.WebEnvironment.RANDOM_PORT
)
public abstract class BlazeMeterFeatureTest {
}
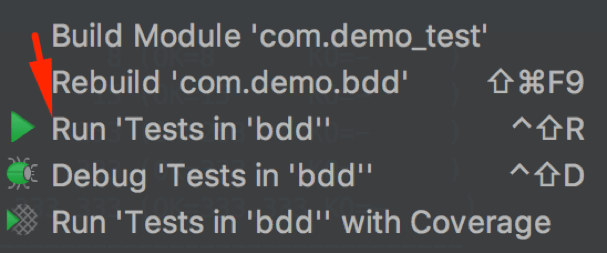
6, Now let’s run the the tests! Right click on “bdd” and select Run ’Tests in ‘bdd’’ as shown in the picture below:
Here are the results of the execution. On the left pane you can see the scenario execution results, and on the right pane you can see the log output and the amount of tests that were run and that passed:

That’s it! You now know how to run Unit Tests with JUnit for REST APIs. Looking to automate your API tests? Get your API Testing started with BlazeMeter.