Blog
August 16, 2017

XMPP is a protocol commonly used for the realization of services for communication. For example, you can connect to Slack via XMPP, and Hipchat uses XMPP to communicate. This blog post will provide a comprehensive step by step guide to load testing a XMPP server with Apache JMeter™. We will cover all the XMPP Sampler features, including connecting and disconnecting, logging in and working with a list of contacts and an online conference. You can download the JMX script for this blog from this link.
This is part one in the load testing XMPP series. Part two covers working with several users and extended communication.
Back to top
What is XMPP?
XMPP is the Extensible Messaging and Presence Protocol, which is designed for instant messaging. Through XMPP, the session is performed in a client-server manner, where the client connects to the server using TCP, and the servers themselves, if required, interact with each other by using TCP as well. Accordingly, the servers provide interaction between the clients and they also serve as storage for user's contacts or subscriptions the user has saved. These storages are called rosters.
Through XMPP, communication is done by means of XML: two XML streams are created between the client and the server, one for each direction. Information is exchanged through these streams. At the end (after closing the connection), the stream will become a valid xml-file, which will consist of the following parts: the opening tag, various XML blocks, which are also called stanzas and, finally, the closing tag. There are four types of stanzas:
- presence stanza - used to control the status of the entity
- message stanza - used to exchange messages between entities
- iq stanza - used to request/specify some information
- error stanza - used when the processing of the above mentioned stanzas fails
Back to top
The XMPP Client Lifecycle
In XMPP, each client takes a pre-determined set of actions, which are performed from the start, when establishing a connection, all the way to the finish, the disconnection. This process is called “the client's lifecycle” and it consists of the following parts:
- Connecting to the server
- Opening the XML stream with the server
- Getting information about the server (applied extensions, etc.)
- Authentication
- Getting the list of contacts from the roster
- Setting the initial status
- Communication, which also involves working with the roster and contacts
- Setting the final status - unavailable
- Closing the XML stream
Each object in the XMPP network has its own address, whether it's a conference, a server or a user. The address looks as follows: [ node "@" ] domain [ "/" resource ].
To save time, only a few examples will be given. To get a better understanding of the XMPP addressing scheme, click on this link.
- blaze@blazemeter/iPhone - the blaze user is on the XMPP server with blazemeter domain from an IPhone resource
- blaze@blazemeter/PC - the user is using another device or client
- conf@blazemeter - conference address
- conf@blazemeter/BlazeBlaze - the address of the user attending the conference under the nickname BlazeBlaze.
Back to top
Creating a XMPP Load Testing Scenario
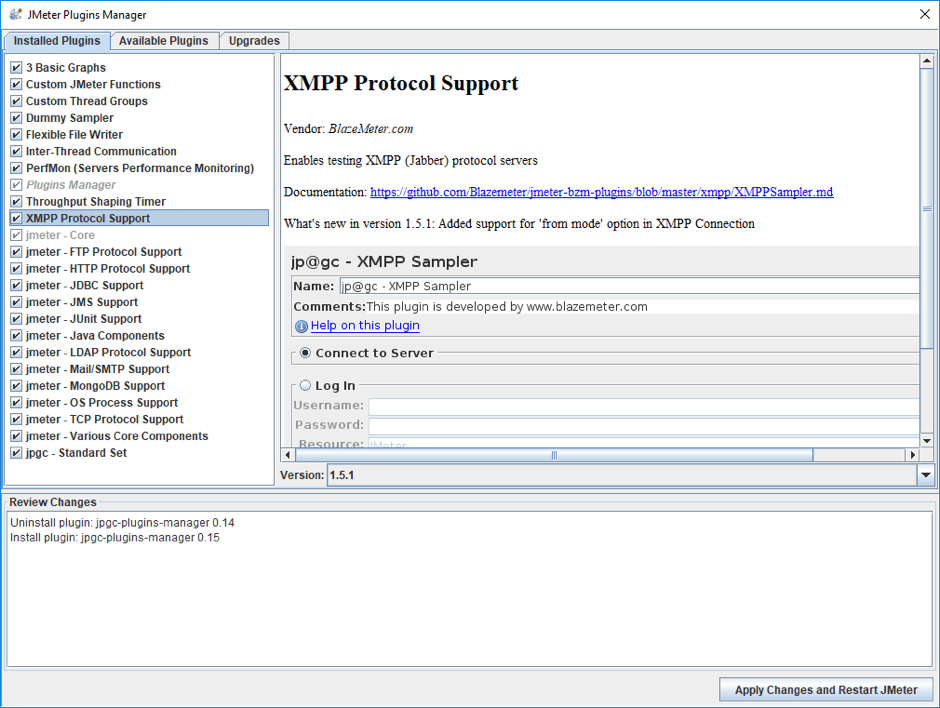
After getting acquainted with the XMPP features, we can proceed with the load testing phase. To test the XMPP server in JMeter, there is an XMPP Protocol Support plugin that can be installed through the JMeter Plugins manager.
In the example below, we will be testing the Openfire XMPP server, which has been deployed on our local computer. You can download it here from Ignite Realtime, and read the installation instructions here on Ignite Realtime. This server is easy to configure and marketed as a solution for enterprises. You can also install Jabber client, which will make it easier to get familiar with the configuration of the plugin. In this article, we will be using the Spark XMPP client, which can be downloaded from the same website as the server.
Tip: If you are going to use a server with self-signed security certificates, a domain without a certificate and Spark XMPP client, make sure to set Accept All Certificates and Disable Certificates hostname verification check boxes in the client's advanced connection settings. Otherwise, you will not be able to log in.
Back to top
Our XMPP Load Testing Scenario
After having looked at the necessary software, we can proceed with the structure of the test scenario. The scenario will be developed for a single user who will log in, work with the list of contacts, communicate in a chat and a conference, and finally log out.
We will analyze all the features of XMPP Sampler and go through the entire client's life cycle. After that, in the next blog post, the script will be modified to work with several users, and the part of the client's lifecycle responsible for communication will be extended.
Let's get started.
Back to top
Understanding the bzm-XMPP Connection Config Element
1. First, we will add a XMPP Connection Config to the test plan. Right click on the Test Plan -> Add -> Config Element-> bzm - XMPP Connection.
This Config Element is required to store the information necessary to connect to the server.
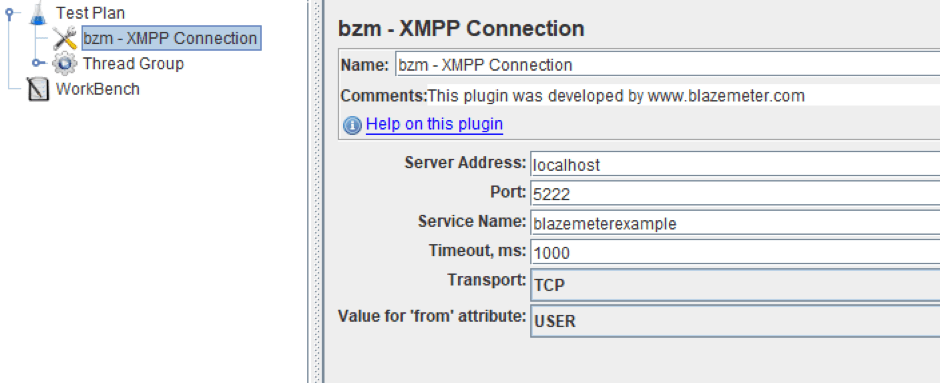
The settings of this element are the following:
- Server Address - the IP address or URL of the XMPP server, in our example it is localhost.
- Port - the port of the server, the standard port for client-server communication is 5222.
- Service - also known as Domain. Sometimes the domain may differ from the server address. For example in a cluster, all computers have the same domain, but are located on different servers. In our example, the server domain is blazemeterexample.
- Timeout - the waiting time for the connection to the server.
- Transport - the transport for communication between the client and the server. There are 2 options: TCP is the standard transport in XMPP, and BOSH is the defining protocol as the transport of HTTP. The latter is used extremely rarely, as it requires a proper extension to be installed on the server. In our example, TCP is used.
- Value for 'from' attribute - needed to control the ‘from’ attribute of entity. Some stanzas can contain the ‘from’ attribute. This attribute indicates the author of the stanzas, and the server uses it to correctly process the stanzas. For example, if a user sends a message to someone, a recipient should know who the author of the message is. There are 3 options: USER - full address of the user login @ domain / resource is used for the attribute; OMITTED - omit the 'from' attribute from the user’s stanzas; UNCHANGED - leave the 'from' attribute unchanged. Read more about why we can omit this attribute and when to use the unchanged option here on Javadox.
2. Next, let's create the Thread group and add 2 XMPP Samplers.
- Right click on the Test Plan -> Threads -> Thread Group
- Right click on the Thread Group -> Sampler -> bzm - XMPP Sampler
- Right click on the Thread Group -> Sampler -> bzm - XMPP Sampler.

Back to top
Understanding the bzm-XMPP Sampler
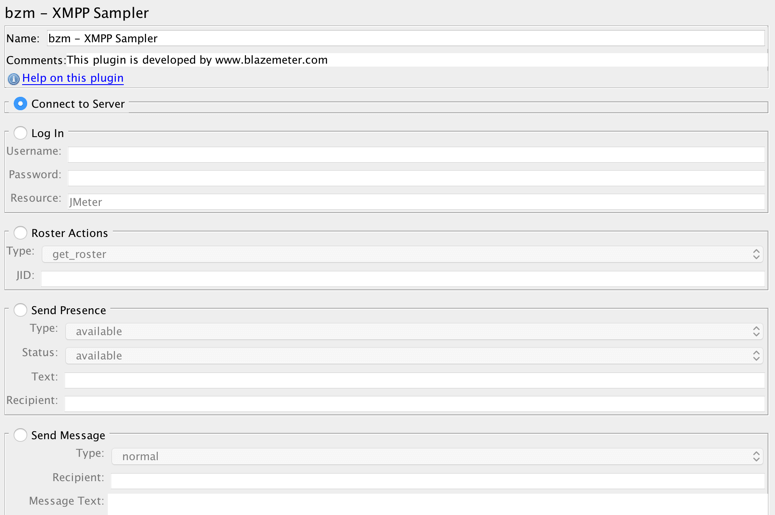
This sampler contains many settings, which are divided into the following categories:
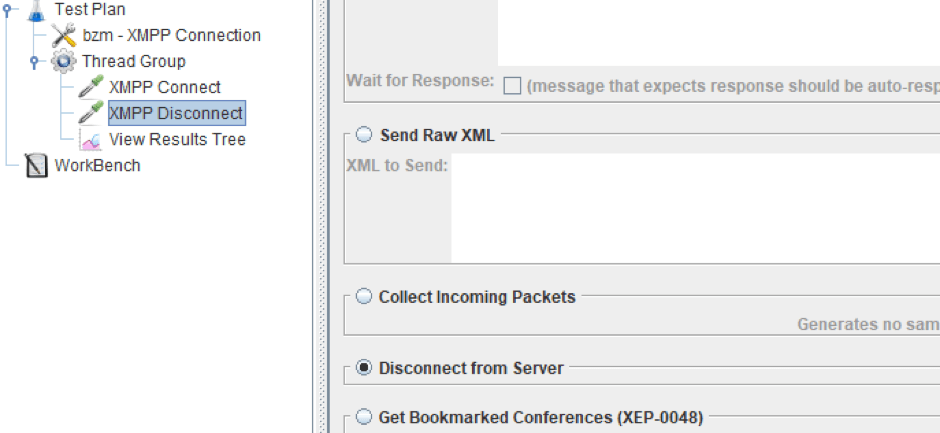
- Connect, Disconnect - these configurations are needed to connect/disconnect from the server. The connection data is retrieved from the XMPP Connection Config. (The “Disconnect” configurations are located at the bottom of the element screen.)
- Log In - the configurations to log in to the server;
- Roster Actions - the configurations to work with the user's roster: getting the list, adding/removing new items.
- Send Presence/Message/XML - these configurations are required to send various messages to the server.
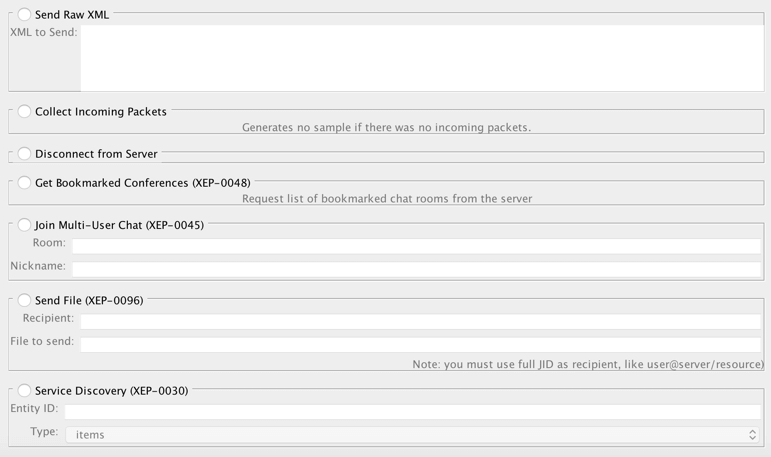
- Collect Incoming Packets - this configuration is for receiving packets from the server.
- There are also configurations to work with server extensions: Get Bookmarked Conferences (XEP-0048), Join Multi-User Chat (XEP-0045), Send File (XEP-0096), Service Discovery (XEP-0030).
Back to top
Connecting to and Disconnecting from the XMPP Server
3. Now, let's select the checkboxes Connect to Server and Disconnect from Server for Samplers 1 and 2, respectively. We will also change their names accordingly. The Samplers will be responsible for connecting to/disconnecting from the server and will be there at the beginning and end of the Thread Group.
Back to top
Logging In to the XMPP Server
4. After connecting, we need to log in to the server. Create another XMPP Sampler, name it “Log In” and select the Log In configurations.
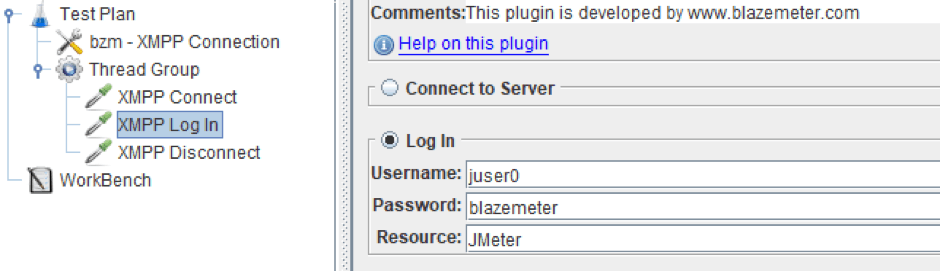
As you can see in the screenshot above, this section contains the following fields:
- Username and Password - the user's credentials. Before creating the script in the server, the user juser0 was created with the password blazemeter.
- Resource - the name of the resource used to identify the device that was used to log in. In our case it is JMeter.
Back to top
Getting Contacts from the XMPP Server
5. After authorization, the user will receive a list of contacts. Create a new Sampler, name it “Get Contacts” and select the configurations to work with the Roster.
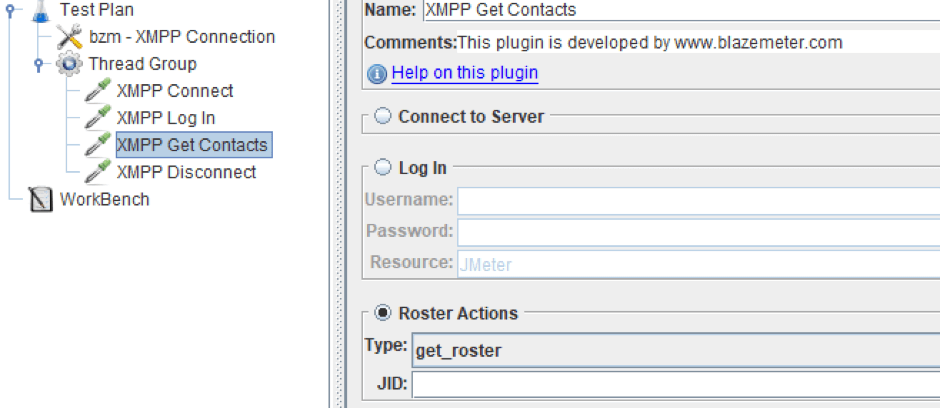
These configurations contain the following fields:
- Type - the type of operation on the roster. Three operations are available: get_roster is to get a list of contacts, add_item is to add a contact, delete_item is to remove a contact.
- JID is the contact's address. This needs to be filled only only when adding/removing item.
Let's select the type get_roster and proceed.
Back to top
Setting the User Status
6. The next step is to set the status of the user. Create another Sampler, name it “Set Presence” and select the Send Presence configurations.
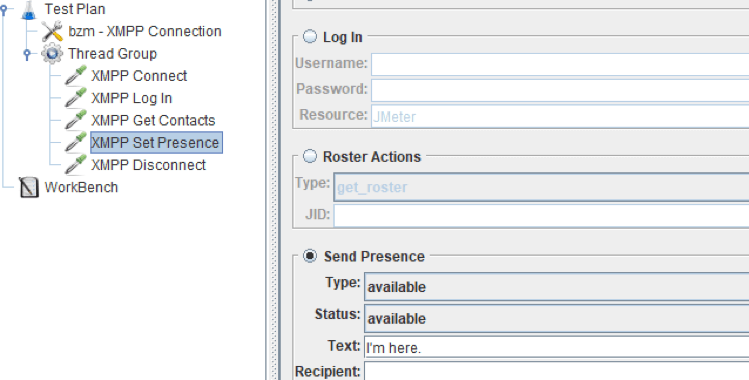
The fields in these configurations are as follows:
- Type - the type of message. There are four types available: available/unavailable is to set your own status, subscribe/unsubscribe is to send a request for subscription/unsubscription. Set up available.
- Status - additional information about the status. Five clarifications can be identified, which you can read about by clicking here on XMPP. Set up available as well.
- Text - a place for extra information. In this case, it's an arbitrary message.
- Recipient - the address of the recipient. It needs to be filled if you send a request for subscription/unsubscription or if you want to set the status for a specific entity only. It can be either a conference or an user.
Back to top
Adding a Contact to the Contact List on the XMPP Server
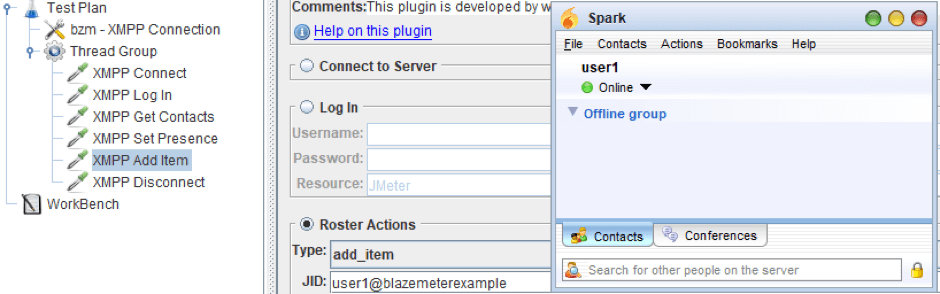
7. The user juser0 is new, so you need to add a recipient address to your contact list. After this, the user will be able to get this address through the get_roster command. Also, if both users are in each other's rosters then they can exchange the presences.
Create a new XMPP element, name it “Add Item” and select the configurations to work with the roster. This time, the type is add_item, and in JID we will specify the address of the recipient. In our case, it is user1@blazemeterexample, which has also been created before the script was written and which was used to log on to the Jabber client.
Back to top
Sending Messages to a Recipient
8. Finally, we have arrived at the sending messages stage. Let's create a new Sampler, name it “First Message” and select the Send Message configurations.
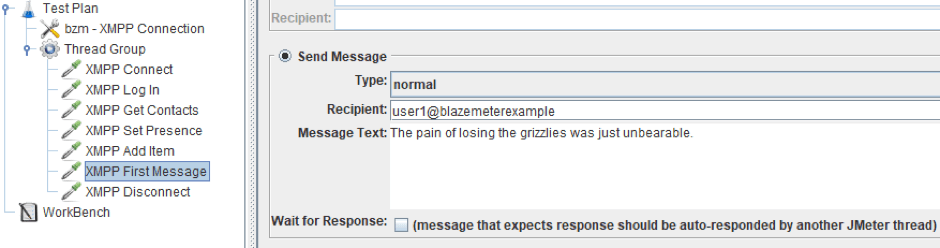
These configurations contains the following fields:
- Type - the type of the message. You can read about all types of messages here on XXMP. Normal type is a good example in our case.
- Recipient - the address of the recipient. Let's specify the user as a recipient, who is authorized in the Jabber client.
- Message - the text to be sent in the message
- Wait for Response - if this checkbox is specified, the sampler will wait for the message response. In our case, there is no second Thread yet that should respond to the message, so leave it unset.
Back to top
Sending Stanzas
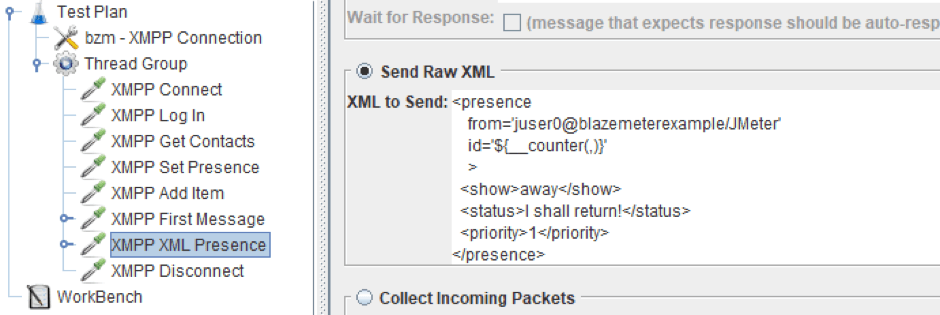
9. Now we need to send independently written stanzas. This is necessary when the plugin doesn’t support any particular type of stanza from the extension, or if the functionality of configurations is insufficient. For example, in the “Send Presence” configurations, no priority can be set. Therefore, in this field, we can customize this stanza in any way. In our example, we are changing our status and setting the priority for the stanza.
Add a Sampler, name it “XML Presence”, and select the Send Raw XML configurations.
Back to top
Collecting Packets
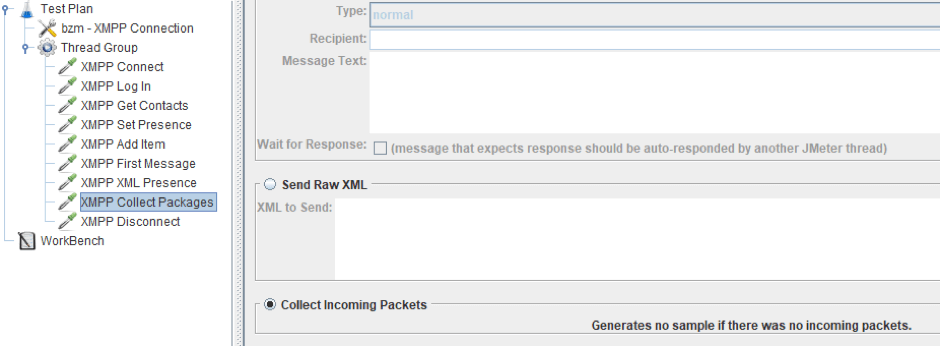
10. There remains the last configuration, which does not work with extensions - Collect Incoming Packets. Let's add a new Sampler, name it “Collect Packages” and select this configuration. This configuration does not contain elements and is intended to collect all incoming packets.
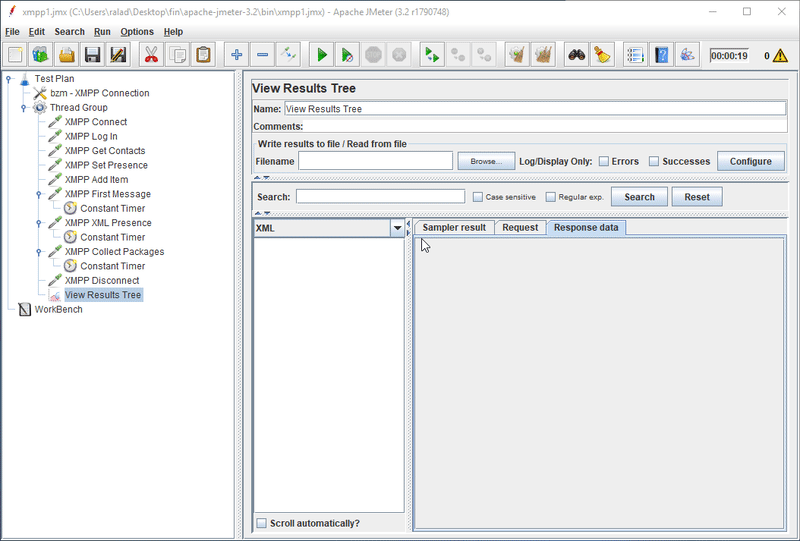
11. By now, we have studied all the configurations that are not connected with extensions. Before the first launch of the script, let's add a timer to each of the following: Change the Status, Send a Message, and Send a Request for Subscription. Let's also add a View Results Tree Listener to monitor the results.
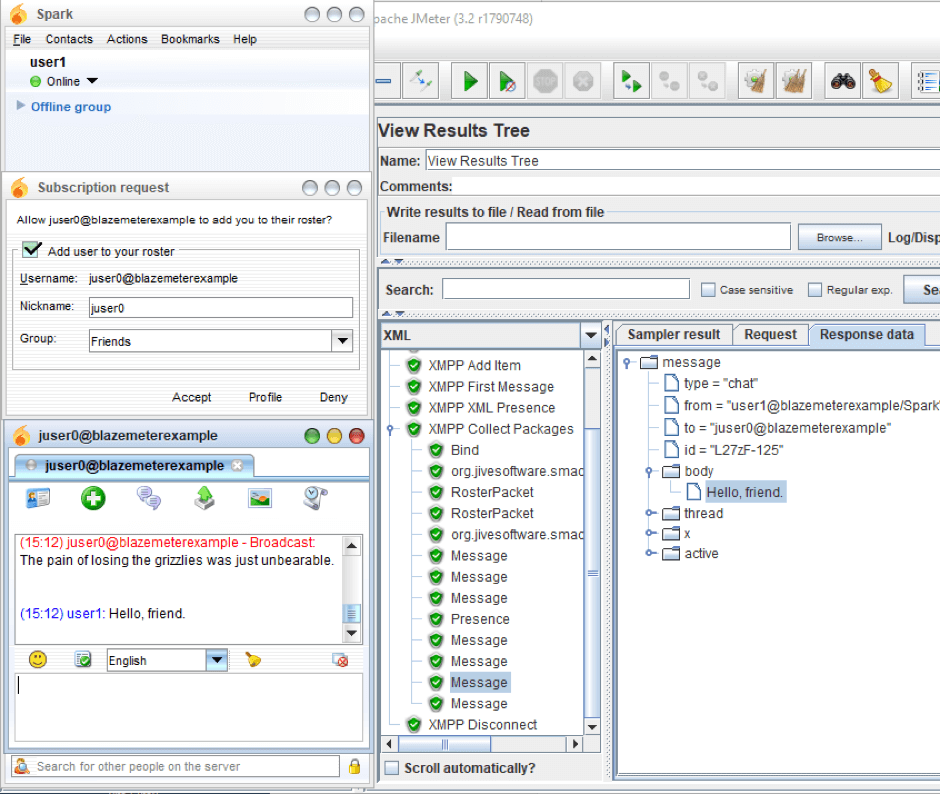
Below you can see the current structure of the script and how it works.
As you can see on the gif above and screenshot below, user1 receives a subscription message and a message. The Collect Packages Sampler collects all packets from the server, including the messages that arrive from another user.
Now let's consider the rest of the configurations. Before doing that, make sure the appropriate extensions are available on the server. For example, on openfire, you need to install Bookmarks extension (XEP-0048).
Back to top
Connecting to a Conference
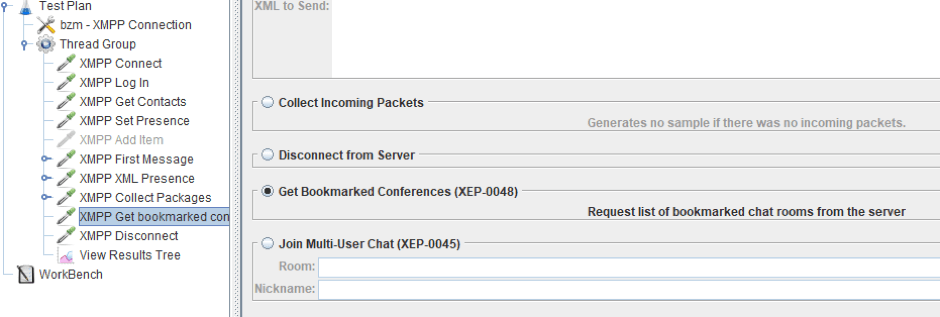
12. Let's look at the configurations to get a list of bookmarked conferences from the server. Add a sampler, name it and select the configurations Get Bookmarked Conferences. Before that, make sure to create several conferences on the server and add them to the bookmarks.
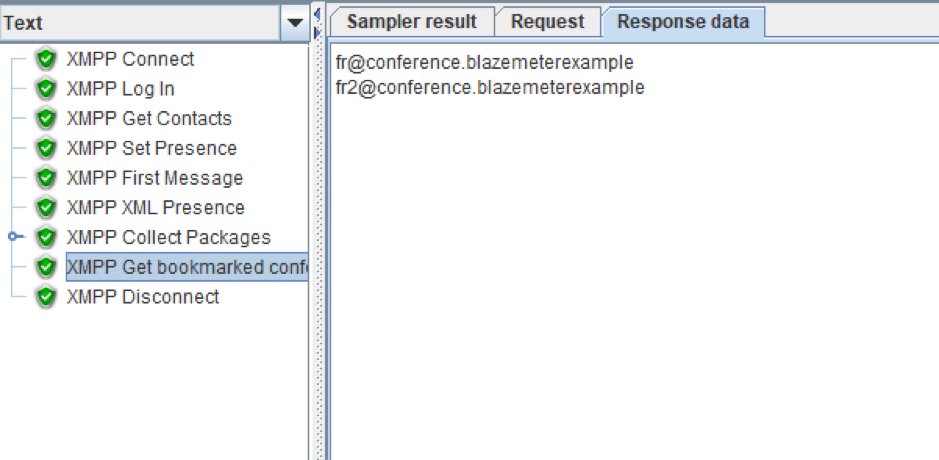
Let's run our script again and see what this sampler will return. We have already created two conferences beforehand and added them to the bookmarks with the access level 'for all users'. As you can see in the screenshot below, the list of conferences is displayed in the Response data tab.
13. The next configurations provide the ability to connect to the conference. Let's create a sampler, name it and select the Join Multi-User Chat configurations. The room name ${conf} will allow you to join multiple conferences.
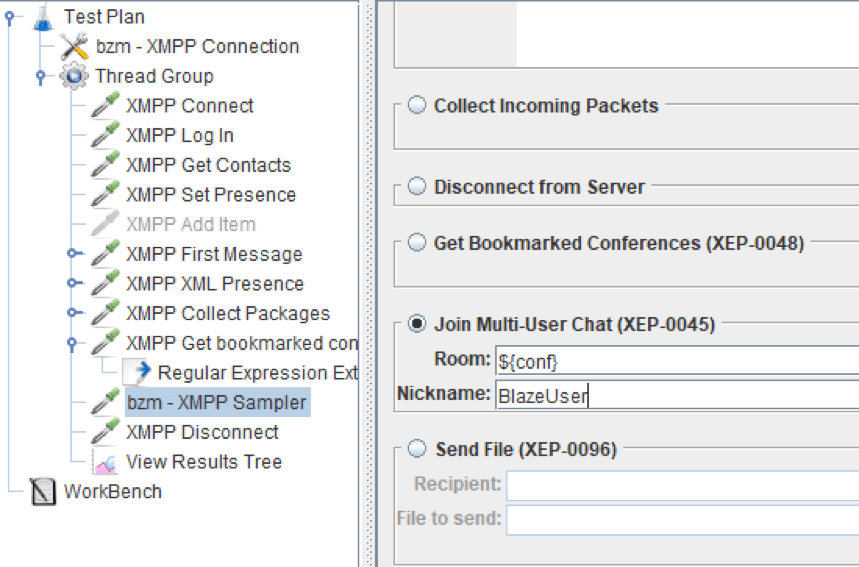
This sampler has only two fields:
- Room - the address of the conference.
- Nickname - the nickname that will be displayed instead of the address.
As you can see on the screenshot above, the address of the room is specified as a variable. This was done because the name of the conference will be taken from the response received by the previous sampler, by using the Regular Expression Extractor post processor. You can read about the work of this post processor from this link.
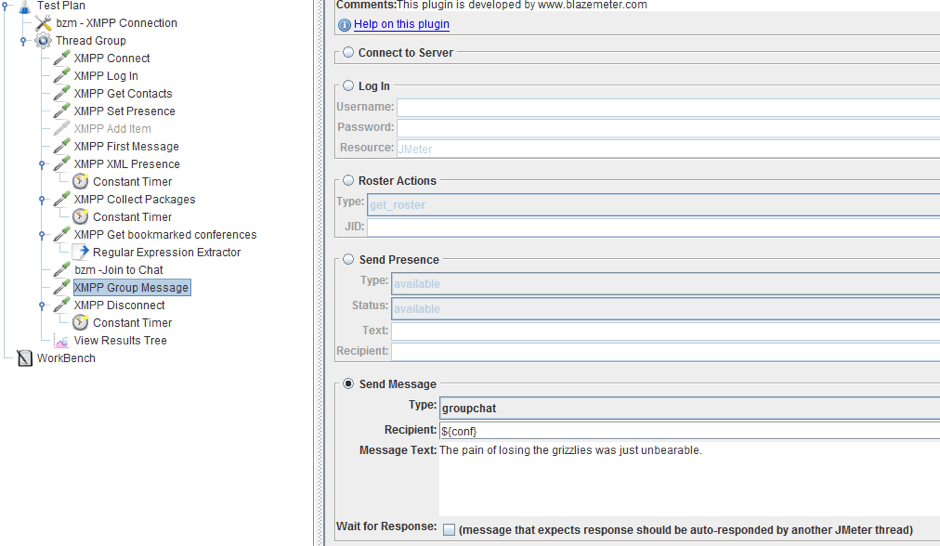
14. Messages to the conference are sent the same way they are sent to a regular user, via the Send Message configurations. After adding another XMPP Sampler and naming it, you only need to select the groupchat message type and specify the conference address, which is shown on the screenshot above.
Back to top
Sending Files
15. Before restarting the script, let's look at an additional configuration - Send File. Create a sampler, name it and select this configurations.
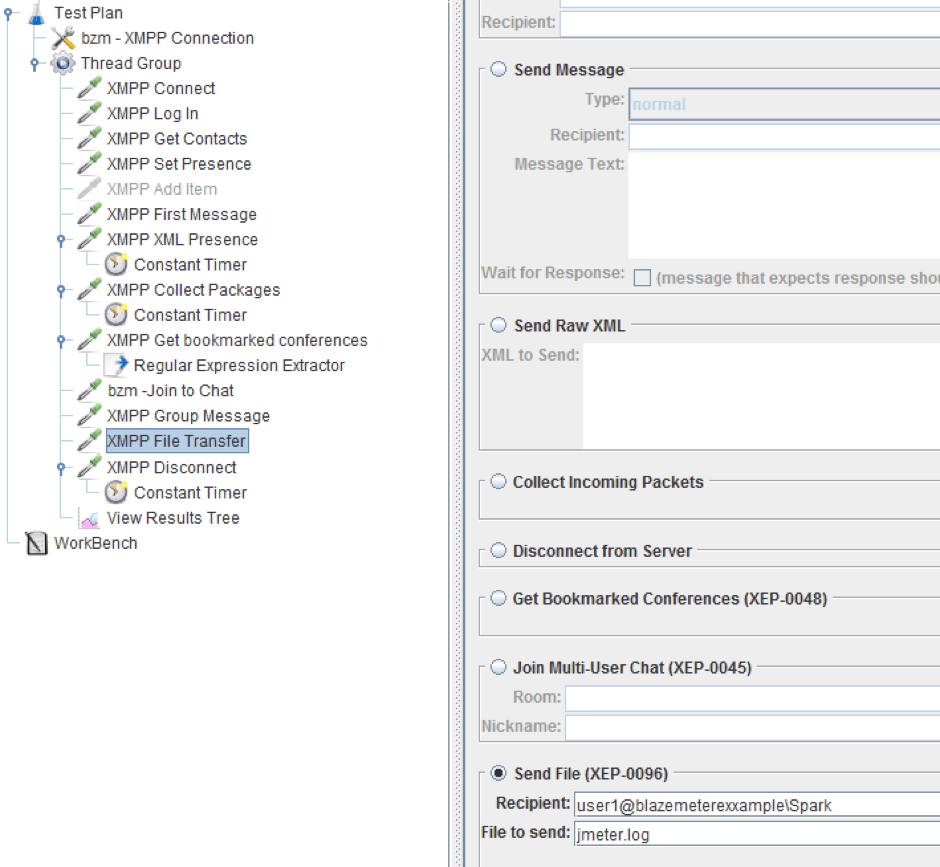
These configurations are intended for file exchange and contain two elements:
- Recipient - the recipient's address. In these configurations, the recipient must have the name of the resource in the address, i.e. if the recipient is logged in from several devices, only one of them will receive the file.
- File to send - the path to the file, full or relative (relative to the jmx file)
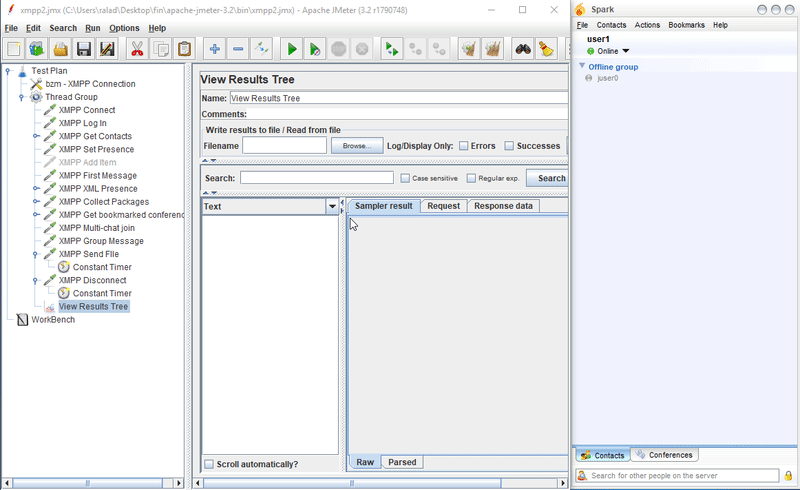
16. Now let's run the script. You will be able to see that the user juser0 connects to the conference under the BlazeBlaze nickname, leaves a message and disconnects during the disconnection in the script. The file sent will appear in the dialogue. Having checked that these elements work correctly, we can move on.
Back to top
Obtaining Object Information
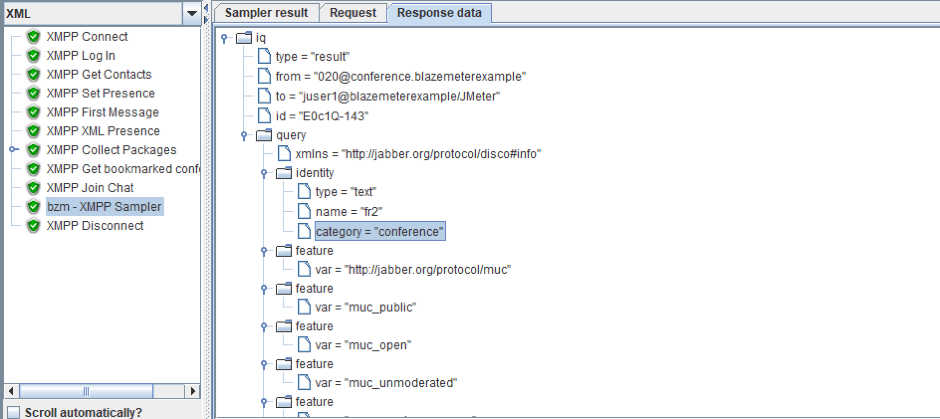
17. The last configuration in this sampler is Service Discovery, which is designed to obtain information about objects by their addresses. Let's create a sampler, name it and select it.
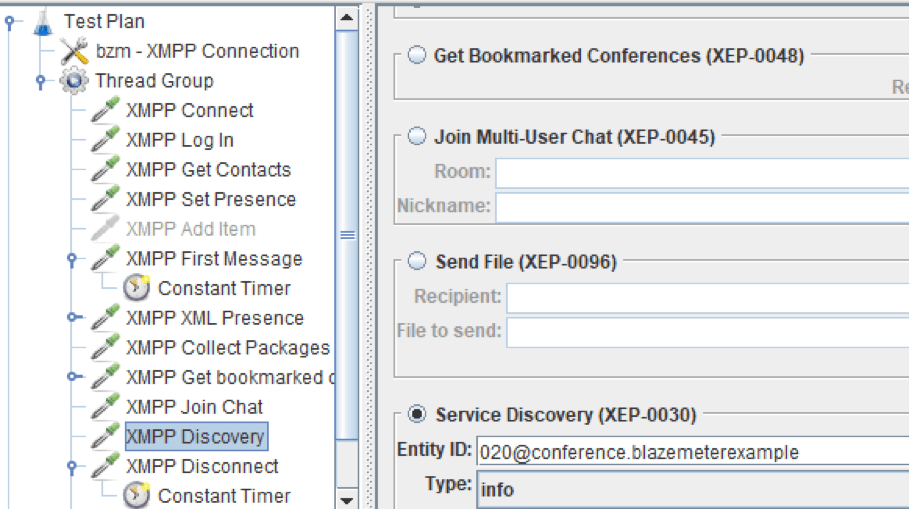
These configurations contain two fields:
- Entity ID - the address of the object that we want to receive information about. For example, we have requested the information about an object which is a conference.
- Type - the type of the information required.
After launching, you can see a large XML in this sampler response with various properties of this object. For example, you can see that the object at this address is a conference.
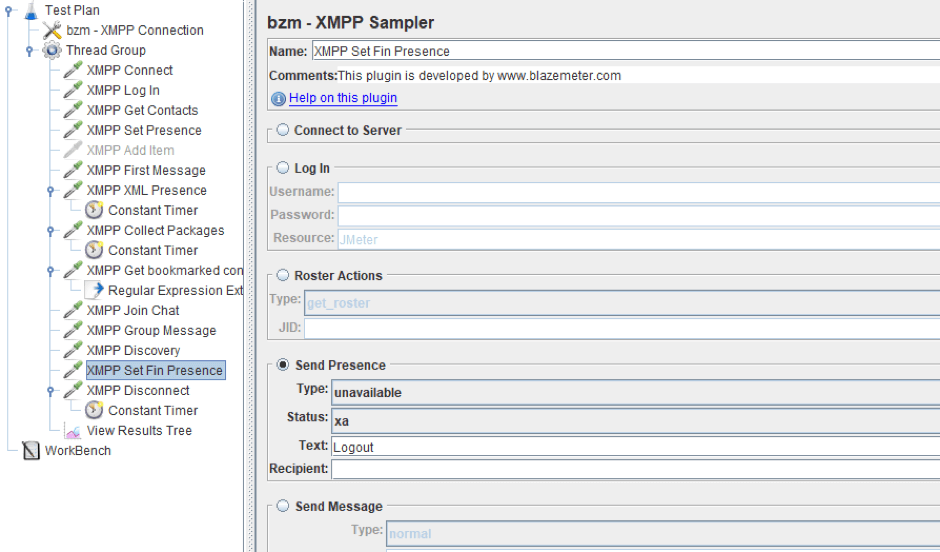
18. By this time, we have covered all the elements present in the XMPP Sampler. To go through the entire client's lifecycle, there is still one action to be done: setting the status to 'unavailable' before the disconnection. Let's create another sampler, select the configurations to set the status and select 'unavailable'. Below you can see the current structure of the script.
That’s it! We have covered all the configurations and elements in the XMPP setting and we have quickly looked through the client's lifecycle.
If you have an extension on your server that does not exist in the XMPP Sampler and you do not want to use the Send XML Raw, then you can inherit the base class (com.blazemeter.jmeter.xmpp.actions.AbstractXMPPAction) and implement the necessary methods.
In the next part, we are going to modify this script to be able to work with several users, and also pay more attention to the part responsible for communication. So stay tuned.
To learn more JMeter, check out our free BlazeMeter University