Blog
September 24, 2021

This blog post will explain how testers test virtual reality apps, with real life users. Let’s get started.
What is Virtual Reality?
VR is an artificial environment created by software. This way of perceiving the environment is completely immersive and supported by two essential physical devices: headsets (like shown in the picture below) and a computer/console/mobile phone.
Why Are We Covering VR?
The BlazeMeter blog covers tools and best practices for performance testing websites, APIs, and apps, in the protocol and API level.
By learning about different types of testing and methodologies, like shifting left, exploratory testing, or BDD testing, you can implement new practices, validate your own working process and become more creative.
In addition to code testing techniques, it can also be helpful to learn from testing methods in other spheres. While you won’t be able to implement the exact practices, you will get ideas that will help you in your own testing.
Back to topWhat Is VR Testing?
VR testing is the process of testing a virtual reality application to ensure that it works properly. Usability is an important part of virtual reality testing, from general user experience to ensuring that the VR application does not cause any negative physical effects.
Technology is constantly moving forward and virtual reality applications are making their own place in the global market and in our lives. In order to better understand the main idea of this post, it is important to clarify two fundamental concepts:
- What is usability?
- What are usability tests with common users?
What Is Usability?
Usability is a quality attribute that indicates the ease of use of a certain application.
What Are Usability Tests With Common Users?
The best way to test something’s functionality is by using it. Therefore, usability tests consist of short sessions where potential users interact with the application on a specific environment, while an expert team observes, records and measures the course of that interaction.
In VR, the essence of this is session-based exploratory testing, e.g., exploring through the application in order to find and achieve what was asked, in a fixed time.
Usability tests should be performed at the right time: when the prototypes and the application are ready. It is highly recommended that the testers perform a heuristic test before the users are given the devices.
The reason is that there are many issues that can be detected in this instance and fixed before the usability test. Thus, the user gets the best application the team could make and the testing session is useful for finding problems the QA team could not see.
Now, let’s learn how to run usability tests for VR apps.
Back to topVR Usability Testing Methodology
In this section, we will learn some aspects of the methodology for usability tests on VR applications with common users. There is no standard way to perform it, so this guide is based on my actual knowledge of and experience in traditional methods applied to VR application testing.
1. Recruit Participants
A reasonable number of members is at least five. This number enables you to get a collection of different opinions. The profile of the user has to match the target audience of the application. It is important to know the skills, VR experience and the interests of the potential participant. Different levels of expertise will be required for making the session more interesting and effective.
2. Arrange the Place and Materials
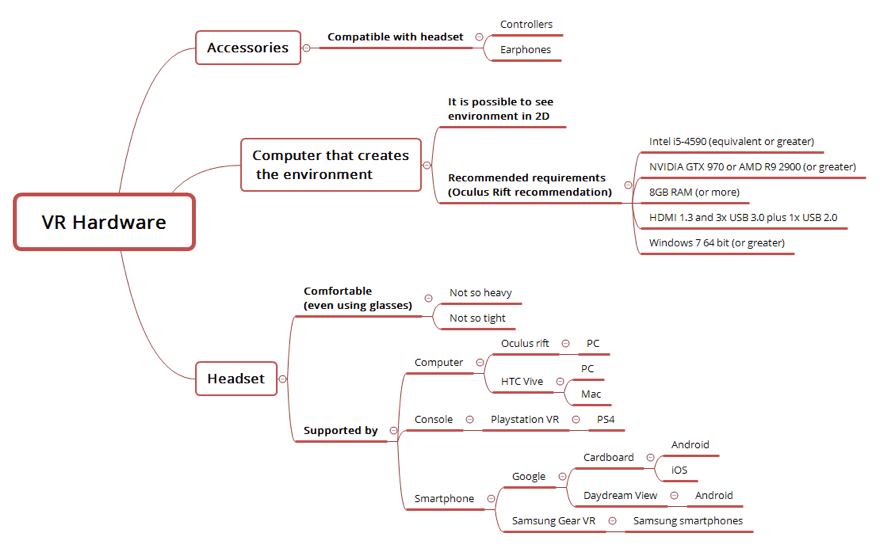
It is of absolute necessity to have technical equipment like headsets and devices to generate the virtual reality. In addition, access to what the user is seeing in every moment and a sufficient quantity of free physical space (a lab from now on in the blog) are required, because users are expected to move while they are exploring.
There are different types of headsets, with different qualities and prices. It is not necessary to buy an expensive device for using VR, but as prices rise the experience gets better. Of course, the quality of the VR device depends on what kind of application needs to be supported, and the requirements of the PC/Console/Smartphone for running it.
The following mindmap focuses on Hardware: a few examples of accessories, aspects to take into account like comfort, recommendations of requirements for PC and different brands of headsets.
3. Plan the Test
Write the goal of the test, what the user will do, and instructions explaining how she/he will do it. This planning is a guideline, meaning it is important to follow it, but it is not necessary to do so strictly.
In this step, the team should think about some useful metrics for measuring the process; e.g.:
- Number of errors by severity
- Health issues and side effects produced (Yes/No, how many, which one?)
- Minutes of learning to navigate in the environment in different situations
- Times that the user needed help with the devices (not the application)
On the application side, there are some general aspects to watch out for when testing. It is important to test one thing (or section) at a time, so testing results become a useful asset for development team. Here are some ideas for planning and writing proper test cases.
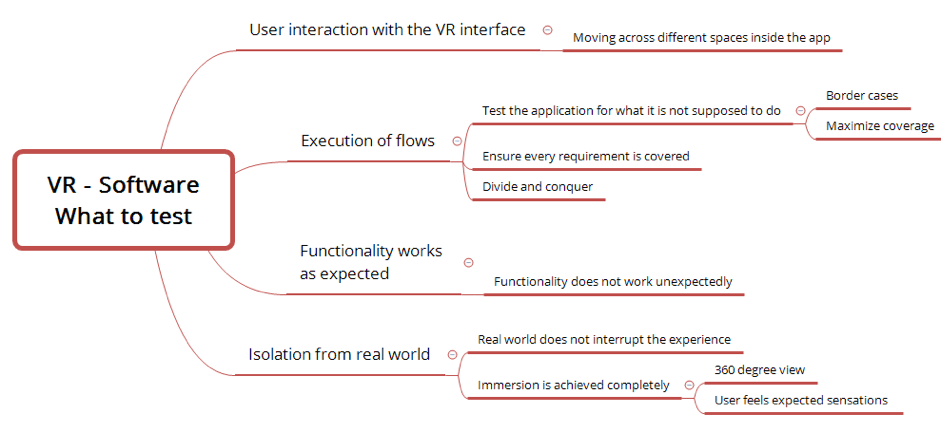
What to Test During VR Testing?
- User interaction with the VR interface:
- Moving across different spaces inside the app.
- Execution of flows:
- Test the application for what it is not supposed to do (think about border cases in order to maximize coverage).
- Ensure every requirement is covered.
- Divide and conquer.
- Functionality works as expected, and therefore, functionality does not work unexpectedly:
- Isolation from the real world.
- Real world does not interrupt the experience.
- Immersion is achieved completely:
- 360 degree view.
- User feels expected sensations.
4. Make the Participants Feel Comfortable
Before the sessions starts, the lab needs to be ready and comfortable and the expert team should have a conversation with the participants. In this conversation, the team should explain how the session will take place.
It is necessary to clarify to the user that any inconveniences that he/she might have are solely an application problem and that the goal of the test is to evaluate the quality of the software and nothing else. It is very important to clarify that: it is the role of the testers to remove the burden of proof from the user.
In addition, explain how the devices work, because the user might not know how to use them. This is the only advice the user can get, he/she cannot receive information about how the application of interest works.
5. Record the Participants’ Initial Reaction
When the test begins, ask the user his/her first impression of the new environment: what is the user seeing and feeling? It is important to take into account that the participant will not feel well, physically. If he/she gets too scared or feels that they cannot continue, the test must be terminated instantly (and a new participant needs to be recruited). Of course, this situation needs to be documented properly.
6. Let Participants Explore on Their Own
Besides following the plan, the user should have free time for exploring by himself/herself, without instructions. It would be interesting to hold this part at the start of the session, during the first interaction with the functionality and the application. The main aspect evaluated here would be how users respond to the VR environment and its features.
7. Record Application Usage
It is the responsibility of the evaluator to pay attention to what the user is saying verbally and expressing in a nonverbal way. According to your plans, ask the user to perform actions on the application and navigate in certain ways. But, don’t give any additional details. Remember: no helping!
If the user gets blocked and cannot achieve a certain requirement, give the user the next task so the session follows its planned course. Again, it is important to clarify to the user that it is not his/her fault, but a failure in the design of the application. On the evaluators’ side, write everything that is happening: reactions and expressions, the amount of time required to complete an action, issues found by user, etc.
It is recommended to video the session so you don’t miss valuable details. Also, observing the participants through cameras reduces the negative feelings of intimidation that can happen when the evaluator is physically close to the participant.
8. Evaluate the Sessions and Create Documentation
This documentation should include:
- A resume that synthesize the session and the conclusions extracted.
- User and his/her profile.
- User’s physical symptoms during the session.
- User’s experience in the virtual environment.
- Metrics results of metrics (a chart would help visualize this)
- A list of the problems founded and possible solutions
Why You Should Test with Potential Users
Some advantages of testing with potential users and not with the experimented testers are:
- Knowing the opinion of a potential user.
- Knowing the physical reaction of a potential user.
- More testing for the application.
Getting Potential User Opinions
While the suggestions and bugs reported by a QA team are important, it is fundamental to know how the user responds to and feels about the application. If a group of users point to something in particular or are all having trouble with the same functionality (in terms of accessibility and usability) the developer has a problem there, for sure.
Obtaining this early opinion of the potential users before releasing the product brings benefits, like: saving time, money or avoiding unhappy user experiences. Everything reported during this instance is feedback for the team for making improvements at the right time. Think about having this session with a functional prototype: issues reported by participants are a powerful asset for the development team, in order to fix those unwanted behaviors. And believe me, that saves a lot of work!
Understanding Potential User Experience
Potential users are the target audience, so understanding their experience provides many insights into how real users will react to the product. Developers and testers can then compare and see if the real experiences match their expectations from what they planned the user to experience. If not, they can fix the product before release.
In VR applications, it’s important to monitor the physical experience. If a user is a beginner in VR applications, her/his body will (probably) react with physical symptoms to the new experience e.g. dizziness or vertigo. If an experienced tester tests this application, he/she will not have the mentioned problems, because he/she is used to do it. It is useful to know which physical issues the application causes to a regular user, to ensure they’re not too severe or to try to design the app in a way that they can be avoided. In virtual apps, it’s important to monitor the user’s navigation throughout it.
Detecting New Usage Types and Bugs
Potential users aren’t familiar with the plan and design of the app. These fresh pairs of eyes can detect things the developers overlooked, like unexpected flows or bugs. These new issues can then be addressed, by the developers, product management, marketing and sales.
Back to topWhat Can Code Testers Learn from VR Testing?
- Most of the practices above can be adapted to code and software testing:
- Test your product on real users.
- Document and monitor users’ reactions and experience.
- Plan your tests according to code design, but leave room for spontaneous exploring.
- The sooner testing is done in the development process, the sooner bugs can be detected and fixed.
- It’s always important to stay up to date with the latest technologies.
- Test your code/feature/product from end to end.
- Run performance tests.
Scale your performance tests with open-source based BlazeMeter, get advanced reporting and collaborate on tests and reports. Then, shift left by integrating with CI tools like Jenkins and TeamCity.
Related Resources: