Blog
August 10, 2020

Unit testing APIs is an important part of API testing. Unit testing ensures that API components will function properly. In this article we will learn how to cover JUnit REST API testing with Spring Boot. Spring Boot is an open-source framework for application creation, and where we create our APIs.
Why Spring Boot For JUnit REST API Testing?
There are many different variations and techniques to unit test APIs. I prefer the following combination: Spring Boot, JUnit, MockMvc and Mockito, because they are all open-source and support Java, which is my preferred language.
To start, we have to have Intellij IDEA, as an IDE for development, and JDK8, for using Java for development. These are my personal preferences but Eclipse, NetBeans, or even a simple text editor could also be used.
Now, let’s set up a project. You can also participate — the source code is located here on GitHub. We will be testing controllers and repository classes. In short, we have 4 controllers (ArrivalController, DepartureController, UsersController, FlightsController) and 4 repositories (ArrivalRepository, DepartureRepository, UsersRepository, FlightsRepository). We will write tests per controller (testing the size of the JSON Object, the status of the call to the endpoint and an assertion on one item from the JSON object) and tests per repository (inserting two new items in a table and making sure the return object is equal).
Related Resource: Watch to learn about BlazeMeter API Testing & Monitoring >>
Back to topHow to Do JUnit REST API Testing
Here's how to do JUnit REST API testing with Spring Boot:
Step 1: Create an API Testing Project
1. Install IntelliJ IDEA.
2. Make sure you have JDK installed (at least version 1.8.XXX).
Now we will create a new project.
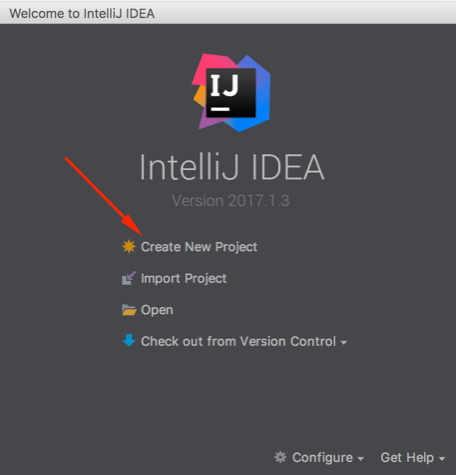
3. Open IntelliJ and click “Create New Project”.
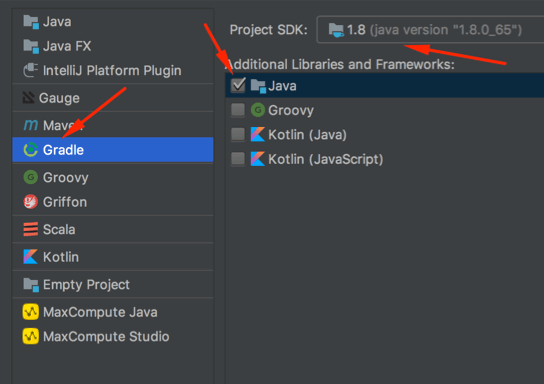
4. Select Gradle, Java, and the JDK version.
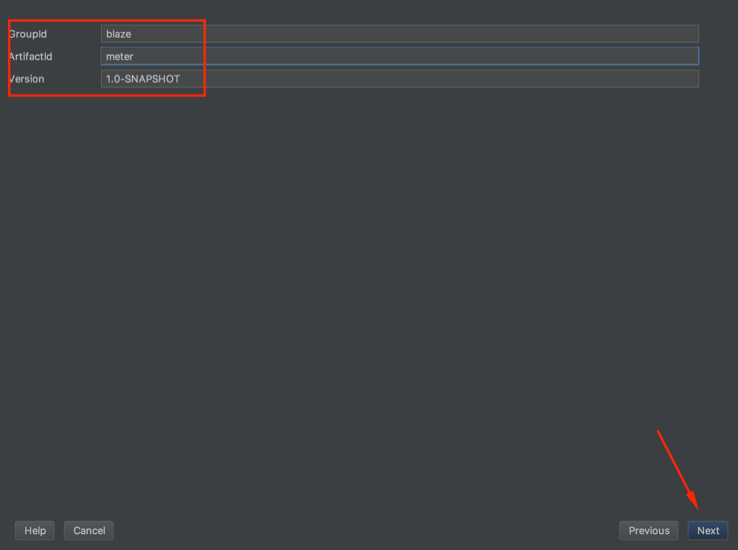
5. Name your project.
6. Choose the project destination.
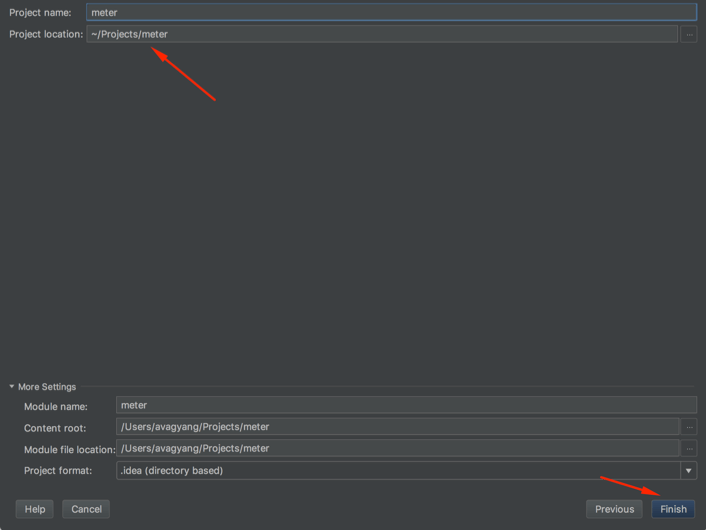
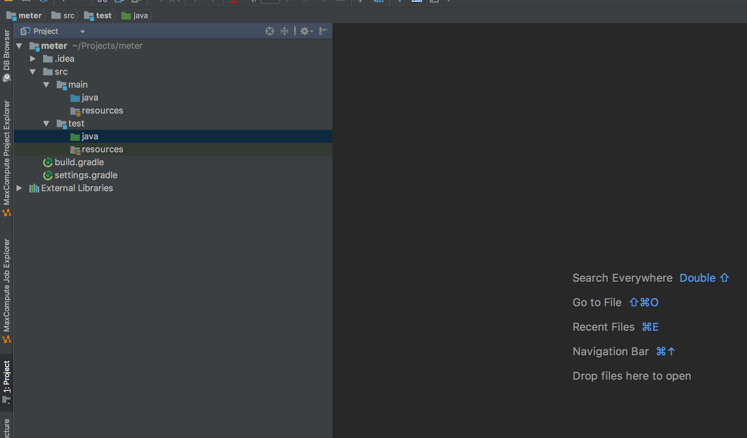
If you did everything correctly, you should now see this window with an empty Java project:
Step 2: Add Dependencies
Now that we have a project, we need to setup the dependencies. You can use these dependencies, since they are public.
To do that, double click on your build.gradle file and add the following gradle configuration file:
group 'blazemeter'
version '1.0-SNAPSHOT'

buildscript {
   repositories {
       jcenter()
       mavenCentral()
       maven { url "http://repo.spring.io/libs-snapshot" }
   }
   dependencies {
       classpath("org.springframework.boot:spring-boot-gradle-plugin:1.5.2.RELEASE")
   }
}

apply plugin: 'java'
apply plugin: 'idea'
apply plugin: 'io.spring.dependency-management'
apply plugin: 'org.springframework.boot'

sourceSets {
   main.java.srcDir "src/main/java"
   main.resources.srcDir "src/main/resources"
   test.java.srcDir "src/test/java"
   test.resources.srcDir "src/test/resources"
}

jar {
   baseName = 'blaze-demo-api'
   version =  '1.0'
}

bootRepackage {
   mainClass = 'com.demo.BlazeMeterApi'
}

dependencyManagement {
   imports {
       mavenBom 'io.spring.platform:platform-bom:Brussels-SR2'
   }
}

repositories {
   mavenCentral()
   jcenter()
   maven { url "http://repo.spring.io/libs-snapshot" }
}

sourceCompatibility = 1.8
targetCompatibility = 1.8

dependencies {

   compile group: 'org.springframework', name: 'spring-core'
   compile group: 'org.springframework.boot', name: 'spring-boot-starter-jdbc'
   compile group: 'org.springframework.boot', name: 'spring-boot-starter-web'
   compile group: 'org.springframework.boot', name: 'spring-boot-starter-actuator'
   compile group: 'org.springframework.boot', name: 'spring-boot-starter-security'
   compile group: 'org.springframework.boot', name: 'spring-boot-starter-data-jpa'
   compile group: 'org.springframework.security.oauth', name: 'spring-security-oauth2'
   compile group: 'com.fasterxml.jackson.datatype', name: 'jackson-datatype-hibernate4'
   compile group: 'mysql', name: 'mysql-connector-java'
   compile group: 'io.rest-assured', name: 'rest-assured', version: '3.0.3'
   compile group: 'io.rest-assured', name: 'json-schema-validator', version: '3.0.3'

   testCompile group: 'org.springframework.boot', name: 'spring-boot-starter-test'
   testCompile group: 'org.springframework.security', name: 'spring-security-test'
   testCompile group: 'junit', name: 'junit'
   testCompile group: 'org.hsqldb', name: 'hsqldb'
}
Step 3: Write Your Unit Test via JUnit
In Intellij IDEA, go to the class that you want to test. Hit Cmd + Shift + T and a popup will appear. In the popup, select “Create New Test...”. Then, Intellij IDEA will create a file for writing the test in. The file will be created in the default place. In our case, if we are going to cover the class ArrivalController, it will create a test class with the path test/java/com/demo/controller. You can see this in the following screenshot:
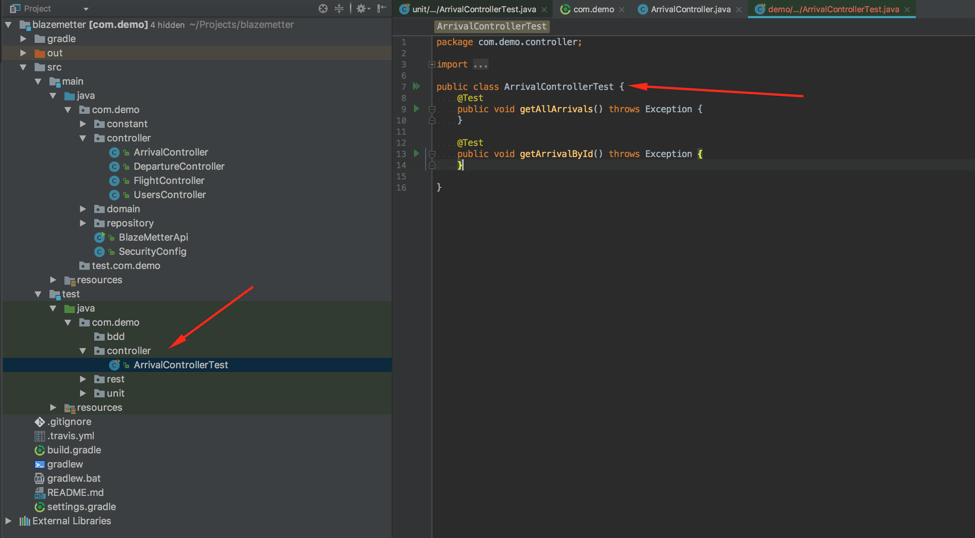
I personally prefer to group tests (as you can see in the same picture - there are 3 folders: bdd, rest, unit) according to the test types: REST, UNIT, BDD, etc. For that reason, I create the test classes by myself. For this example ArrivalControllerTest is located at the test/java/com/demo/unit/controller path.
Here is the test class itself:
package com.demo.unit.controller;

import com.demo.controller.ArrivalController;
import com.demo.domain.Arrival;
import org.junit.Test;
import org.junit.runner.RunWith;
import org.springframework.beans.factory.annotation.Autowired;
import org.springframework.boot.test.autoconfigure.web.servlet.WebMvcTest;
import org.springframework.boot.test.mock.mockito.MockBean;
import org.springframework.test.context.junit4.SpringRunner;
import org.springframework.test.web.servlet.MockMvc;
import java.util.List;
import static com.demo.constant.Paths.ARRIVAL;
import static com.demo.constant.Paths.VERSION;
import static java.util.Collections.singletonList;
import static org.hamcrest.collection.IsCollectionWithSize.hasSize;
import static org.hamcrest.core.Is.is;
import static org.mockito.BDDMockito.given;
import static org.springframework.http.MediaType.APPLICATION_JSON;
import static org.springframework.security.test.web.servlet.request.SecurityMockMvcRequestPostProcessors.user;
import static org.springframework.test.web.servlet.request.MockMvcRequestBuilders.get;
import static org.springframework.test.web.servlet.result.MockMvcResultMatchers.jsonPath;
import static org.springframework.test.web.servlet.result.MockMvcResultMatchers.status;

@RunWith(SpringRunner.class)
@WebMvcTest(ArrivalController.class)
public class ArrivalControllerTest {

   @Autowired
   private MockMvc mvc;

   @MockBean
   private ArrivalController arrivalController;

   @Test
   public void getArrivals() throws Exception {
       Arrival arrival = new Arrival();
       arrival.setCity("Yerevan");

       List allArrivals = singletonList(arrival);

       given(arrivalController.getAllArrivals()).willReturn(allArrivals);

       mvc.perform(get(VERSION + ARRIVAL + "all")
               .with(user("blaze").password("Q1w2e3r4"))
               .contentType(APPLICATION_JSON))
               .andExpect(status().isOk())
               .andExpect(jsonPath("$", hasSize(1)))
               .andExpect(jsonPath("$[0].city", is(arrival.getCity())));
   }

   @Test
   public void getArrivalsById() throws Exception {
       Arrival arrival = new Arrival();
       arrival.setCity("Yerevan");

       given(arrivalController.getArrivalById(arrival.getId())).willReturn(arrival);

       mvc.perform(get(VERSION + ARRIVAL + arrival.getId())
               .with(user("blaze").password("Q1w2e3r4"))
               .contentType(APPLICATION_JSON))
               .andExpect(status().isOk())
               .andExpect(jsonPath("city", is(arrival.getCity())));
   }
}
In this test class we have two test methods getArrivals() and getArrivalsById(). The reason we have two is because we have two methods in the controller itself, so we want to test them both.
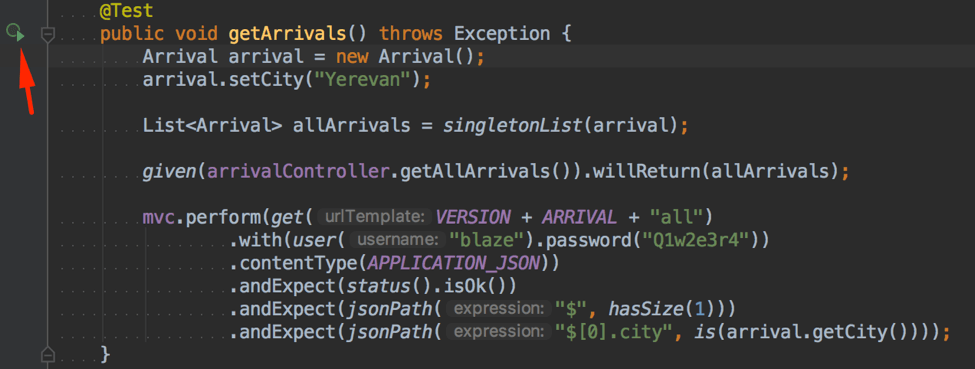
The getArrivals() method does the following (code snippet above):
- Creates an Arrival entity and sets the test value for the city
- Creates a list of Arrivals (because we will have just one member, it can be a singeltonList)
- Using given from mockito, makes sure the mocked ArrivalController will return a list of Arrivals
- Performs a GET request to the mocked controller with the credentials and performs simple assertions:
- Status - 200 (which isOk)
- The JSON object has one member
- The JSON body has a city key with the value we set
The second test method does the same for the getArrivalsById(). The difference is that it assumes one JSON object result instead of a list of Arrivals of JSON objects.
That’s all. Now we can execute this single test by clicking the play button at the beginning of the line of the method name (see the following picture). The purpose of this execution is to make sure the test is working properly:
After execution you will see this results of test execution, including the status, count, and stacktrace. We can see that our test passed (on the left side), the number of tests (the progress bar is in the middle up top) and the stacktrace for execution.

That’s it for that one controller. The next step will be to add tests for all controllers.
Step 4: Setting up the Unit Tests for the APIs
Now, let’s test one API repository class with this unit test. This is a unit test that covers the database testing part. For example, writing test data to the DB and afterwards verifying it is properly stored.
Like in the previous part, go to the ArrivalRepository class, hit Cmd + Shift + T and create a new test class via IntelliJ IDEA or by yourself.
This is the code for that test class:
package com.demo.unit.repository;

import com.demo.domain.Arrival;
import com.demo.repository.ArrivalRepository;
import org.junit.Test;
import org.junit.runner.RunWith;
import org.springframework.beans.factory.annotation.Autowired;
import org.springframework.boot.test.autoconfigure.jdbc.AutoConfigureTestDatabase;
import org.springframework.boot.test.autoconfigure.orm.jpa.DataJpaTest;
import org.springframework.boot.test.autoconfigure.orm.jpa.TestEntityManager;
import org.springframework.test.context.ActiveProfiles;
import org.springframework.test.context.junit4.SpringRunner;
import java.util.List;
import static org.assertj.core.api.Assertions.assertThat;
import static org.springframework.boot.test.autoconfigure.jdbc.AutoConfigureTestDatabase.Replace.NONE;

@ActiveProfiles("test")
@RunWith(SpringRunner.class)
@DataJpaTest
@AutoConfigureTestDatabase(replace = NONE)
public class ArrivalRepositoryTest {

   @Autowired
   private TestEntityManager entityManager;

   @Autowired
   private ArrivalRepository arrivalRepository;

   @Test
   public void whenFindAll() {
       //given
       Arrival firstArrival = new Arrival();
       firstArrival.setCity("Yerevan");
       entityManager.persist(firstArrival);
       entityManager.flush();

       Arrival secondArrival = new Arrival();
       secondArrival.setCity("Israel");
       entityManager.persist(secondArrival);
       entityManager.flush();

       //when
       List arrivals = arrivalRepository.findAll();

       //then
       assertThat(arrivals.size()).isEqualTo(9);
       assertThat(arrivals.get(7)).isEqualTo(firstArrival);
       assertThat(arrivals.get(8)).isEqualTo(secondArrival);
   }

   @Test
   public void whenFindAllById() {
       //given
       Arrival arrival = new Arrival();
       arrival.setCity("Yerevan");
       entityManager.persist(arrival);
       entityManager.flush();

       //when
       Arrival testArrival = arrivalRepository.findAllById(arrival.getId());

       //then
       assertThat(testArrival.getCity()).isEqualTo(arrival.getCity());
   }
}
In this test, we are using the H2 database for testing. This is common practice. Otherwise, you need to have the same type of database set up in all test/dev environments, maintain them and make sure you clean them up after test execution. This is not necessary when you use the H2 DB, because it is in the memory. After the test(s) is finished, the database will be fully dropped.
The test covers the following:
- Use entityManager to create two new rows of data in the Arrival table of test H2 database
- Search for all records from the database via findAll query
- Perform assertions on the size of the data and the equality of the gathered objects
The second method does the same, but because it is for findAllById, it checks just one object equality.
That’s al! Now you can do the same for all other repository classes with their methods.
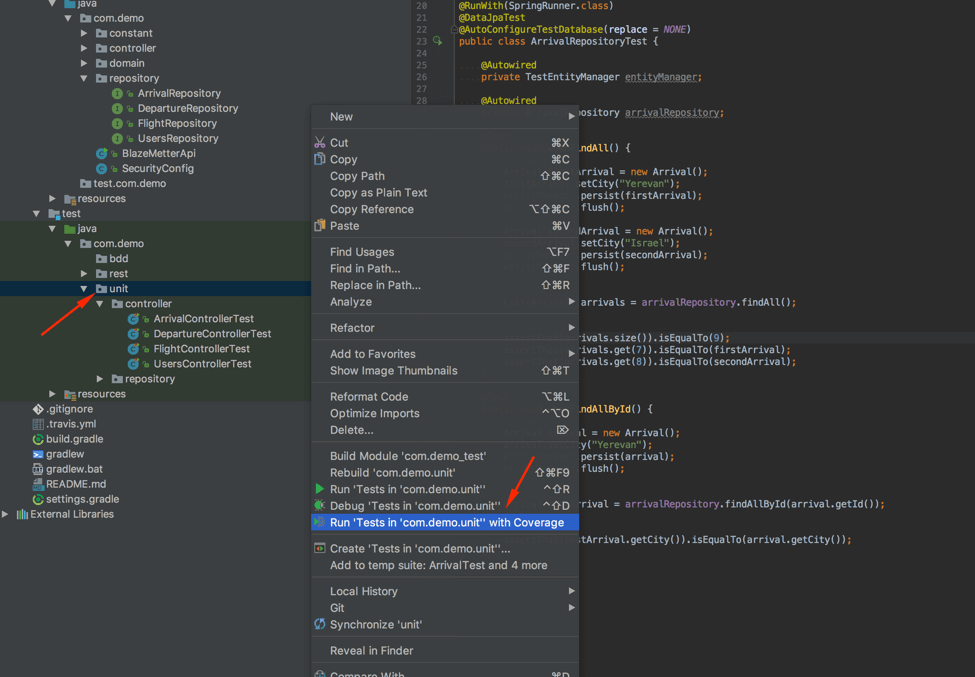
Step 5: Running the Unit Tests on Your APIs
After all the controller and repository class tests are set up, we need to execute them. Do that by highlighting the folder unit -> right click -> select “Run ‘Tests’ in ‘com.demo.unit’ with Coverage” (see next picture), so we will have also the code coverage report.
These are the coverage results, showing how many classes and methods are covered by unit tests:
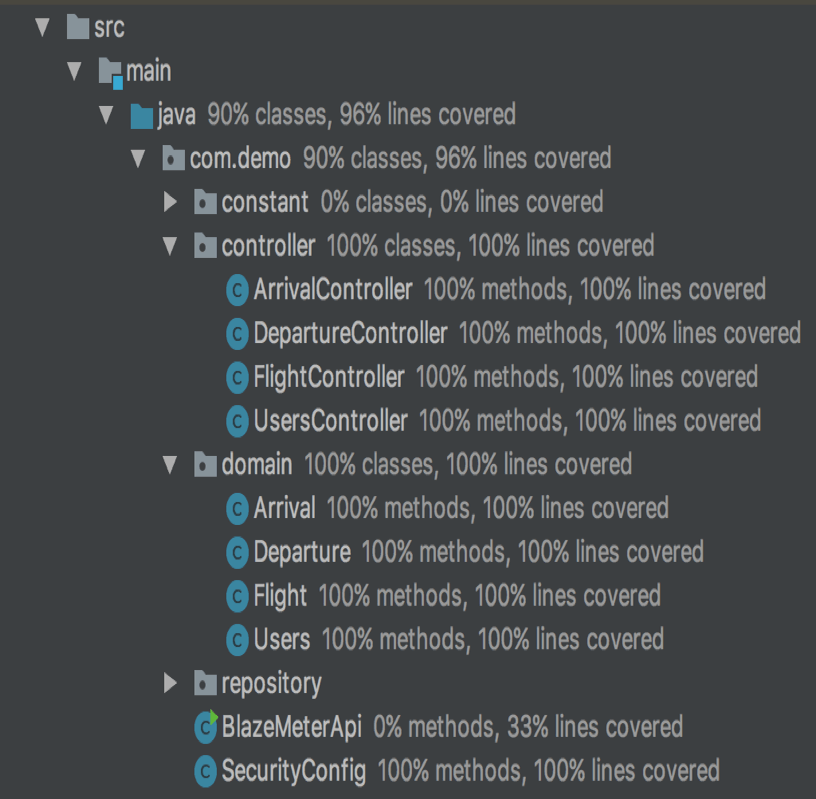
That’s it! You now know how to run Unit Tests with JUnit for REST APIs. Looking to automate your API tests? Get your API Testing started with BlazeMeter.