Blog
January 31, 2020

We are living in a transition time, a “digital revolution”. More and more services are being virtualized, and Docker is an important part of that. The combination of JMeter Docker virtualizes the network infrastructure, enabling developers to virtually handle everything from source to production.
Docker is an open-source platform with the goal of simplifying and optimizing the software lifecycle. Docker provides virtualization services that ease the replication of the working environment. Moreover, it grants deployment solutions with modular and scalable services. Finally, every virtualized service is isolated from other unrelated services on other containers or on the host machine, to ensure portability across host machines and the network.
Docker enables developers to focus on process and methodologies instead of wasting time on handling products and their prerequisites. This is done by installing and setting up everything developers need on the machine, instead of them having to do it themselves.
The Docker approach to virtualization can provide advantages when testing applications with Apache JMeter™. By making it replicable, Docker enables sharing the JMeter tests between users and replicating the test environment. This can be helpful for sharing knowledge between users of different levels, for saving time as not every userneeds to set up JMeter tests, and also for ensuring the testing environment doesn’t affect their other work.
This blog post will explain how to execute a JMeter performance test by running it on the Docker virtualization layer, also called the Docker container. We will show how to organize a JMeter Docker test environment in a portable manner that can be used across the network and on different machines.
Back to topHow Does Docker Work?
Docker is based on the following components and ideas:
- Docker image - the description of the service to be virtualized. The image is almost always used as a starting point for starting containers. A Docker image is a sort of static and optimized file system used by the Docker engine when a container starts. The information carried by the image file system is used only at container boot time and normally no modification occurs during container execution.
- Docker container - the element that runs the virtualized service. It takes the image as a starting point and executes the service to be exported (e.g. a JMeter instance that runs a test script). the Docker image is often described as a screenshot of the container.
A container includes just the application to be virtualized and its dependencies, simulating an operating system. The container is executed in isolation from the other processes in the host operating system. The single container shares the host operating system kernel with other processes and containers.
- Dockerfile - a text document with commands necessary to assemble an image. When using Docker it’s not mandatory to handle a Dockerfile, because you can use the image directly if you have one.
- Kernel sharing - the basic concept of how the Docker container works. Many containers share the kernel of host machine. This is an important difference compared to classic virtualization approach (e.g. VirtualBox) where each virtual machine has its own complete kernel virtualized.
- Resource usage - not only is the kernel is shared, but the host machine resources (e.g. CPU, Memory, Disk space) are shared as well. Docker can split host machine resources among containers in a manner that each one can perform their scopes independently (e.g. web server goes online, JMeter performs test, etc.).
- Docker engine - a sort of minimalistic operating system where virtualized applications are executed. Running applications within this minimalistic operating system is what makes up the Docker container.
Docker works in two phases:
1. Composing the environment to be virtualized, described by a minimal set of information (e.g. which linux OS, installed shell, JMeter version, etc). At the end of this step we get the Docker image, which describes the starting point of next step.
2. Starting from the image, Docker can begin execution by creating a Docker container, which is the virtual environment with the information defined in the previous step. Here the business logic processes run and produce results (e.g. a web application will offer its front-end, a JMeter instance can execute a performance test, etc.).
Docker is based on different layers of abstraction compared to the classic virtualization concept.
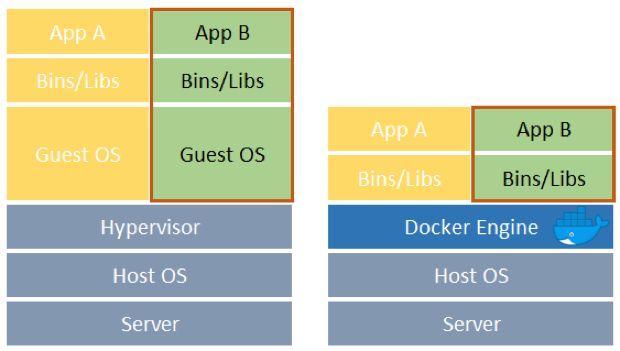
The left picture describes the classic virtualization stack (e.g. VirtualBox, VMware):
- Starting with the lower layer that includes hardware, HostOS and a virtualization hypervisor.
- On top there are many GuestOS with necessary libraries and “finally” the requested applications to be exported.
The right picture describes the Docker virtualization stack based on containers:
- Starting with the lower layer that includes hardware, HostOS and the Docker engine.
- On top there are many containers that bring only the necessary libraries and binaries to export to requested applications.
Comparing the two stacks, it is clear that the Docker approach to virtualization reduces resource occupation for the CPU, Memory and File System. This saving is obtained because the Docker stack avoids recreating many Guest OS with unnecessary duplications and avoids emulating the complete OS (e.g. standard inputs like the keyboard and mouse and standard outputs like the screen).
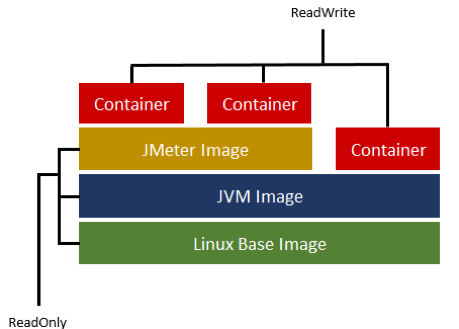
In Docker, the image structure is based on a copy-on-write filesystem that simplifies the tracking of modification from other images (e.g. a base Linux image is the starting point for installing a Java virtual machine that is the starting point for installing a JMeter application). The final result can be portrayed as a version control wall where each brick is an image snapshot on top of another brick.
Another important feature related to Dockers images is the Docker Hub, which allows sharing built images with other Docker users. This infrastructure provides the possibility to reuse image, apply modifications and share new resulting images.
Back to topLevel up how you use Docker and JMeter with BlazeMeter — start testing for FREE today!
Prepare Docker For JMeter
Installing Docker
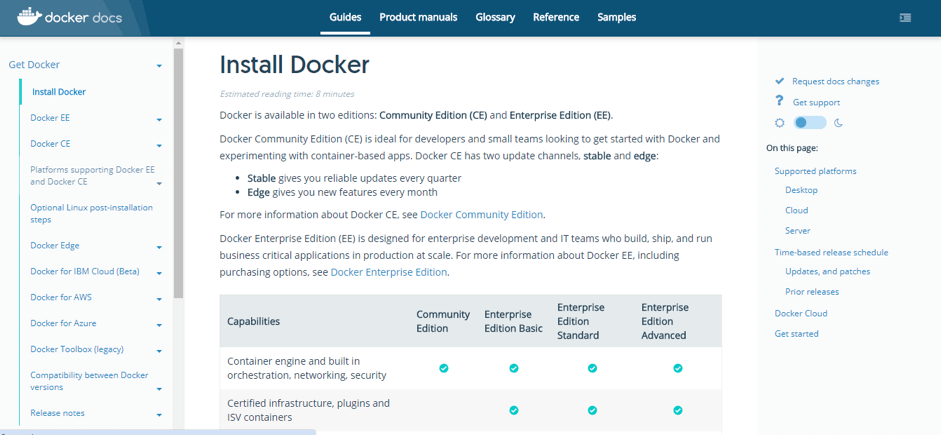
Docker must be installed as a service on the host machine that executes the containers. The best way to perform docker command is via command shell locally or remotely. Check out this link to see which version you should install.
All the examples brought here will be compatible with Docker Community Edition, which can be downloaded directly from this link. If you have an older version of Windows or Mac that does not have the necessary kernel feature, you can find it in the Docker Toolbox package that provides a minimal environment to work with Docker by using a Linux host machine running on VirtualBox.
Docker Commands
After correctly installing the Docker package, it’s possible to interact with Docker by using the command line. The command’s basic structure is:
docker [command] <parameters>
The available list of commands is long and complex. In this paper we will focus on a few commands included in the table below:
Command | Description |
build | Build an image from a Dockerfile |
run | Run a command in a new container |
volume | Manage volumes |
stop | Stop one or more running containers |
commit | Create a new image from a container's changes |
A complete list of commands ia available via the command “help”.
Back to topHow to Use the Docker Container with JMeter
Now it’s time for a practical example: we will execute a performance test using JMeter not directly installed on the test machine, but rather on a Docker container.
The user interaction with JMeter Docker will be performed in two manners:
- Passing JMeter arguments with the “docker run” command (e.g. which jmx script must be executed, script parameters, etc)
- Then, fetching the result file (e.g. jtl and log file) using a shared folder on the test machine called Docker volume, that can be used to save result files after the container execution ends.
As already written, if the container modifies the file system, it does not persist after the container finishes. So to obtain JMeter results it’s necessary to set up an exchange folder with the ‘volume’ command.
A representation of the involved entities is visible in the picture below.
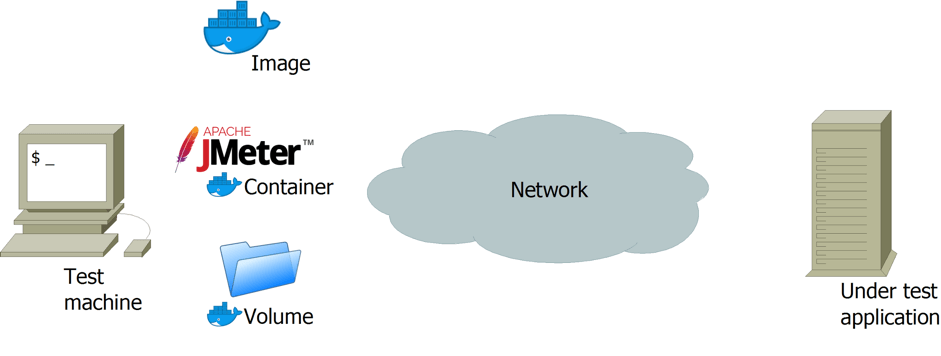
On the left you can see our test machine that hosts the JMeter containers and the Docker volume. The volume is used to provide a JMX script file to be executed, and to retrieve from the container the JTL result file and the LOG file on execution.
On the right, on the other side of network, there is the application under test. For the scope of this paper it’s not crucial to know details about the application under test (e.g. it might be a container too).
In this example, the container starts and as a first action it executes a JMeter application with arguments passed with the “docker run” command. When JMeter completes its execution, the container stops itself, leaving the JMeter result files in the Docker volume.
Back to topUsing a JMeter Docker
Here is the step by step procedure:
First, install Docker and its command line client.
Depending on your test machine, select the appropriate installation package (could be up 200 MB to download). When the installation is complete, there will be:
1. A Docker service running in background on your test machine (or on VirtualBox for Docker Toolbox)
2. The test machine shell (e.g. bash for Linux, cmd for Windows) that can process Docker commands.
Now, let’s build an image from a Dockerfile. (If you have an image you can run “docker run -t " and view the results in the volume folder).
In this example we will not use a standard image that is available on Docker Hub, but one that is customized for our needs. So, it's necessary to build one from a description file called Dockerfile. Dockerfiles (like images) can be shared between different users.
Suppose we have a Dockerfile customized for our JMeter, and we build the image with this command:
docker build -t jmeter <path to Dockerfile>
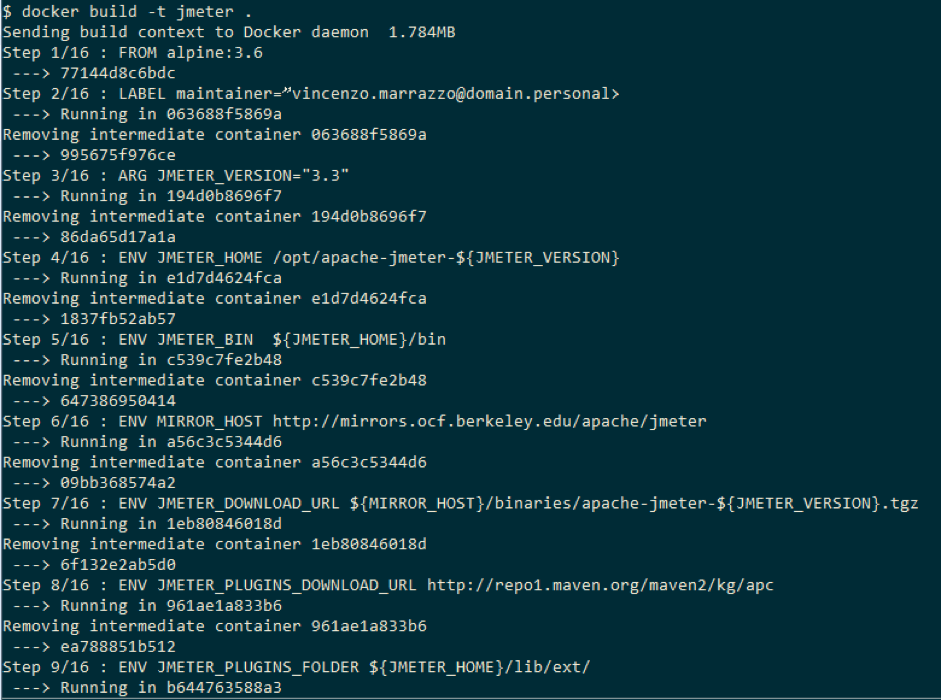
During the build process, many network contents can be fetched, making the “docker build” command execution time a variable you should be aware of. What kinds of content are collected? At least one Docker Image to be used as the first building brick. After the contents type can vary, from a simple text file to archive package (e.g. zip, tar.gz, rpm, deb, etc). Afterwards, these files are “installed” on the image with specific commands (e.g. copy for text file, unzip for zip, tar for tar.gz, etc).
At the end of the build it is possible to see how a new image is “tagged” and available in the local cache.
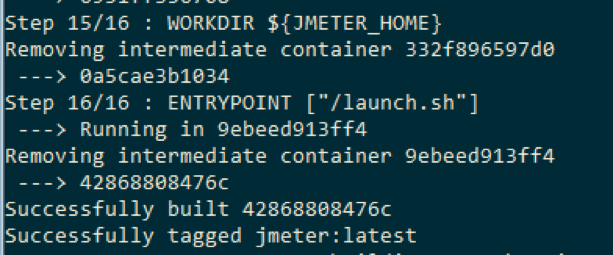
Now it’s possible to see the created image in the local cache with the command
docker image ls

As visible in the picture above, there are two images in the local cache. One was just created by us and one downloaded because it was referenced during the build process.
Now it's time to create a Docker volume to exchange files with the container. Use the command
docker volume create <volume name>
If we don’t want to provide more information, Docker chooses all the volume configuration details for us (e.g. real path on host machine). With the command
docker volume inspect <volume name>
it's possible to retrieve where the volume is mapped on the test machine.
If the test machine is on Windows or you don't want to create a stand alone volume, you can specify the volume directly with the container execution command line via arguments.
Now it's time to execute the containers!
Bash
export timestamp=$(date +%Y%m%d_%H%M%S) && \
export volume_path=<where files are on host> && \
export jmeter_path=/mnt/jmeter && \
docker run \
  --volume “${volume_path}”:${jmeter_path} \
  jmeter \
  -n <any sequence of jmeter args> \
  -t ${jmeter_path}/<jmx_script> \
  -l ${jmeter_path}/tmp/result_${timestamp}.jtl \
  -j ${jmeter_path}/tmp/jmeter_${timestamp}.log
The above command line shows:
- setup of environment variables working folder for host/container
- setup of environment variables for a timestamp label to be used in the result file
- “docker run” command with volume mapping definition on “jmeter” image
- starting from “-n” there are arguments passed directly to the JMeter application on the container (e.g. no gui mode, jmx script and result file name)
- with “-t ${jmeter_path}/” we are defining the jmx script to be executed. From the container point of view, the script is into folder “/mnt/jmeter” (see previous export command). In reality, the jmx script is external to container and provided via the Docker volume.
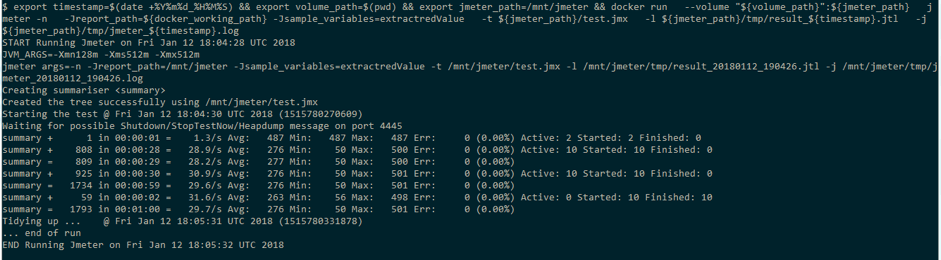
After completing the container execution, the control returns to the user and the JMeter result files are available under the tmp folder in the and can be used as a normal JMeter result file.

Our JMeter Dockerfile - In Depth
Let's take a closer look at the “Dockerfile”.
We have left out how to customize the image and which file should be modified before proceeding with the build command. If the reader is interested only to run pre-built image, you can skip this paragraph, but the writer thinks it is important.
A Dockerfile is a text document that contains all the commands necessary to Docker to assemble an image.
The Dockerfile is used up to the step where the image build is completed. After that, when the container is running, it can be “forgotten”. The Dockerfile is coded with a Domain Specific Language that supports image definition.
Here is the Dockerfile used in the previous example:
# 1
FROM alpine:3.6

# 2
LABEL maintainer=”vincenzo.marrazzo@domain.personal>

# 3
ARG JMETER_VERSION="3.3"

# 4
ENV JMETER_HOME /opt/apache-jmeter-${JMETER_VERSION}
ENV JMETER_BIN  ${JMETER_HOME}/bin
ENV MIRROR_HOST http://mirrors.ocf.berkeley.edu/apache/jmeter
ENV JMETER_DOWNLOAD_URL ${MIRROR_HOST}/binaries/apache-jmeter-${JMETER_VERSION}.tgz
ENV JMETER_PLUGINS_DOWNLOAD_URL http://repo1.maven.org/maven2/kg/apc
ENV JMETER_PLUGINS_FOLDER ${JMETER_HOME}/lib/ext/

# 5
RUN    apk update \
	&& apk upgrade \
	&& apk add ca-certificates \
	&& update-ca-certificates \
            && apk add --update openjdk8-jre tzdata curl unzip bash \
            && cp /usr/share/zoneinfo/Europe/Rome /etc/localtime \
            && echo "Europe/Rome" >  /etc/timezone \
	&& rm -rf /var/cache/apk/* \
	&& mkdir -p /tmp/dependencies  \
	&& curl -L --silent ${JMETER_DOWNLOAD_URL} >  /tmp/dependencies/apache-jmeter-${JMETER_VERSION}.tgz  \
	&& mkdir -p /opt  \
	&& tar -xzf /tmp/dependencies/apache-jmeter-${JMETER_VERSION}.tgz -C /opt  \
	&& rm -rf /tmp/dependencies

# 6
RUN curl -L --silent ${JMETER_PLUGINS_DOWNLOAD_URL}/jmeter-plugins-dummy/0.2/jmeter-plugins-dummy-0.2.jar -o ${JMETER_PLUGINS_FOLDER}/jmeter-plugins-dummy-0.2.jar
RUN curl -L --silent ${JMETER_PLUGINS_DOWNLOAD_URL}/jmeter-plugins-cmn-jmeter/0.5/jmeter-plugins-cmn-jmeter-0.5.jar -o ${JMETER_PLUGINS_FOLDER}/jmeter-plugins-cmn-jmeter-0.5.jar

# 7
ENV PATH $PATH:$JMETER_BIN

# 8
COPY launch.sh /

#9
WORKDIR ${JMETER_HOME}

#10
ENTRYPOINT ["/launch.sh"]
Into details Dockerfile code:
- “FROM” keyword - defines the image baseline for the build. The baseline can be fetched by the local cache or remote repository. A valid Dockerfile must start with this primitive.
- This line is useful to track the ownership of an image.
- An argument customizable via the command line when the build is invoked. It contains a default value.
- Here are defined some environment variables used in the next lines of code. The environment variables configured using ENV will persist when a container is run from the resulting image.
- “RUN” keyword - invokes the command line on the current image status. So for copy-on-write concepts before this line we have an image id with all the modifications defined into this command.
- Here is another example for the “RUN” keyword. Instead of putting many shell commands using ‘&&’, we can use a single “RUN” keyword for a single shell command.
- A single “ENV” instruction, which in our example redefines the PATH variable and sets when the container will run (we have added the JMeter home folder).
- The “COPY” keyword copies files starting from the Dockerfile path to the image path.
- The “WORKDIR” will redefine the working directory for the rest of the Dockerfile.
- The “ENTRYPOINT” defines the base command invoked when the container starts. Every arguments appended at the “docker run ” is appended to an entrypoint defined command. In our example of container execution, “jmeter” is the image name and every jmeter arguments after this word is piped to the entry point command.
To complete the description, we include the source code of the “launch.sh” bash script used by the container as an entrypoint for JMeter arguments.
Bash
#!/bin/bash

set -e
freeMem=`awk '/MemFree/ { print int($2/1024) }' /proc/meminfo`
s=$(($freeMem/10*8))
x=$(($freeMem/10*8))
n=$(($freeMem/10*2))
export JVM_ARGS="-Xmn${n}m -Xms${s}m -Xmx${x}m"

echo "START Running Jmeter on `date`"
echo "JVM_ARGS=${JVM_ARGS}"
echo "jmeter args=$@"

# Keep entrypoint simple: we must pass the standard JMeter arguments
jmeter $@
echo "END Running Jmeter on `date`"
The code is quite simple and adds some timestamps to the standard output, when the container starts piping JMeter arguments passed from the “docker run” command.
Back to topConclusion
This article started out by referring to the digital revolution. Like in every revolution, drastic changes were made. Our revolution is Docker and its approach to virtualization.
The first important change is how virtualization made applications like JMeter modular and reproducible. This is an advantage because it enables developers to focus on their performance script development without wasting time to replicate a required test environment.
Another important change is related to the “engagement” of machine resources during performance tests. With dockerized applications, no CPU, Memory or disk are consumed for unnecessary parts and for no more time than required.
With Docker, the Docker image and its Dockerfile have become the way to run the test plan according to the requirements of the product under test. You might be discouraged to learn a new command line interface and script file language, but the learning curve is quite rapid and the advantage in term of productivity is impressive.
That’s it! You now know how to run your JMeter Docker instance. To learn more about how to create JMeter scripts, check out our free BlazeMeter University.