Blog
August 30, 2021

This IoT testing tutorial will explain how you can simulate an IoT environment in BlazeMeter using Locust and Paho.
For most intents and purposes, JMeter would probably not be the ideal tool for creating scenarios in the IoT world. That’s where Locust comes in as a better alternative. Locust basically does what JMeter was designed to do, but it also gives you some added benefits. Locust is based on the Python programming language and provides added control of your testing without the GUI interface. Most importantly, with Locust, you can create what’s called a "swarm" (and this is where Locust gets its name). A swarm is used to test a multitude of users or devices that have different behaviors.
Back to topWhat is IoT Testing?
IoT Testing is performed to ensure that IoT devices are working correctly and efficiently, so they deliver exceptional services in a timely manner. Testing in IoT is especially crucial across interconnected IoT devices to ensure that the network can operate collaboratively.
The next section of this IoT testing tutorial will talk a little bit more about Locust. However, just to give you a "heads-up" on where we’re heading, this article will show how to use Paho (an implementation of MQTT) in Locust. The idea is to simulate an IoT environment in which there are possibly thousands of devices connected to a server. Locust is a great option for this and Paho gives it the MQTT protocol on which to test publishing and subscribing. Finally, we’ll upload our Locust test to BlazeMeter for performance testing in the Cloud environment.
Back to topWhat is Locust?
Since many people are not familiar with Locust, and it is important to understand the concept behind it, this section will provide an overview of the tool. If you are already familiar with Locust, feel free to skip to the next section.
If you know Python, then using Locust will be quite intuitive for you and easy to learn. Locust is a package that is imported into your Python program. With Locust, you can define a User which is similar to a thread in JMeter. The User is given tasks to perform. A Task is like a Sampler in JMeter, and is used for running HTTP methods or MQTT pub/sub events. With Locust, you have a lot of flexibility and control over the test scenarios because it is based on Python.
The most powerful functionality that Locust provides is the ability to "swarm" the system with many simultaneous users. When you run your test locally, Locust has a Web UI to display statistics and monitor your test.
Here are some great resources for getting started with Locust:
- The Locust project home page
- Examples and background information
- The Locust user manual
- A tutorial for people familiar with JMeter-type tests in Locust
- A general article on Performance Testing with Locust
How to Run Locust
Install Locust using pip (in Command line power mode with Admin privileges).
$ pip install -U locustThe actual software library will be installed here: C:\Python39\Lib\site-packages\locust (depending on the version of Python you have and the installation directory).
Once you have installed Locust, start Locust by typing 'Locust' in the command line. Then, open up a browser and point it to http://localhost:8089/.
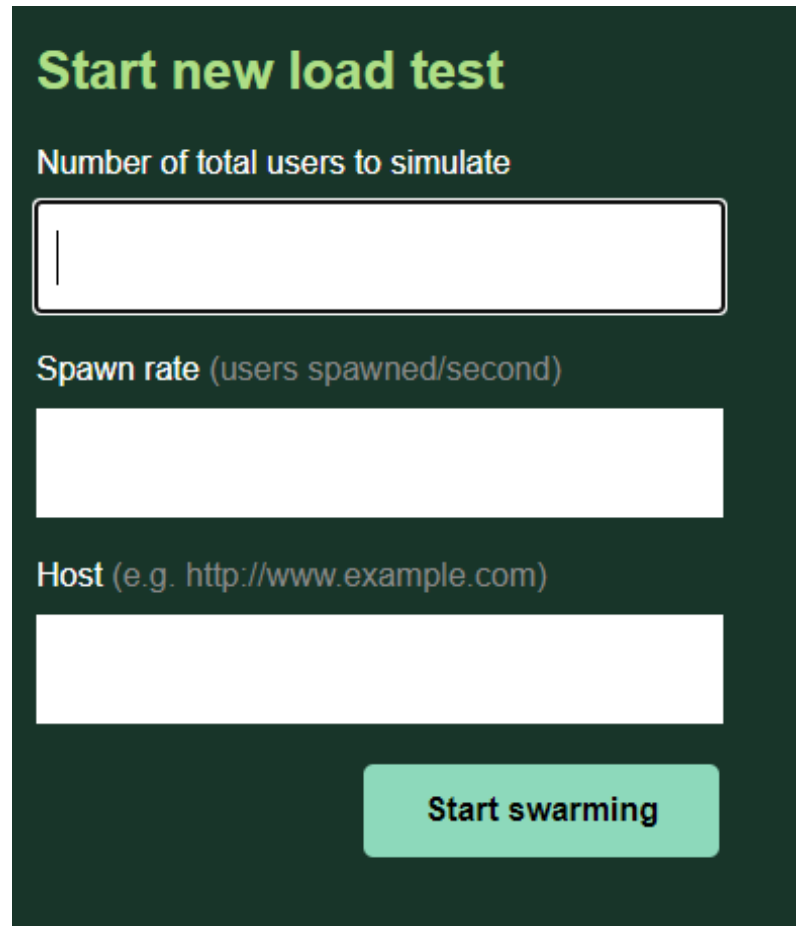
This page contains the parameters for a new load test. The number of total users to simulate is the same parameter as “concurrent users” in JMeter. The spawn rate is the number of threads created per second. Finally, the host is the URL of the site you are testing.
You could do the same without the GUI, by specifying the following parameters in the command line:
locust -f locust_files/my_locust_file.py --headless -u 1000 -r 100 --host http://blazedemo.com --run-time 1h30mwhere
- -f is the location of the locust program,
- --headless is to skip the GUI,
- -u is the number of users,
- -r is the ramp-up,
- --host is the host address, and
- run-time is the duration of the test.
Locust Program Example
Before we jump ahead, it may be useful for most readers to see how Locust works. The following source code is a simple Locust script, based on an HTTP request, which performs a login on a web page. Enter this program into a file called locustfile.py and type Locust in the command line to run the program. Finally, go to http://localhost:8089/ to enter the number of users and spawn rate.
Notice in the following code that we are importing three objects from the Locust package: HttpUser, Taskset, and task. These are the basic building blocks of a Locust script. There are essentially two parts: the class used to define a task and the class used for defining the User (or thread). The @task notation is used for defining a task (basically a request). The TaskSet is a collection of one or more tasks. The class implementing HttpUser is the client and it gets passed the TaskSet defined.
from locust import HttpUser, TaskSet, task

class LoginStep(TaskSet):
    @task
    def login(self):
        self.client.post("/login", {
            'email': 'LocustUser1@gmail.com', 'password': '123456'
        })

class LoginTest(HttpUser):
    task_set = {LoginStep}
    host = "http://blazedemo.com"
    sock = None

    def __init__(self):
        super(LoginTest, self).__init__()
Paho - MQTT library
Locust has a built-in HTTP request library, but in order to implement the MQTT protocol you need to add Paho.
Paho exposes methods such as connect, publish, and subscribe to facilitate working with message brokers. It also handles callbacks for these functions. There is some additional useful information on this subject on the internet, including:
- Using Paho with HiveMQ: https://www.hivemq.com/blog/mqtt-client-library-paho-python/
- Using Paho with Eclipse’s sample broker: http://www.steves-internet-guide.com/into-mqtt-python-client/
Following is an example that uses the free HiveMQ broker (see http://www.mqtt-dashboard.com/) and illustrates some of Paho’s uses.
import paho.mqtt.client as paho
import time

def on_message(client, userdata, message):
    print("message received " ,str(message.payload.decode("utf-8")))

def on_connect(client, userdata, flags, rc):
    print("Connection returned result: "+paho.connack_string(rc))

broker_address="broker.mqttdashboard.com"
print("creating new instance")

client = paho.Client("P1")
client.on_connect = on_connect
client.on_message=on_message
client.connect(host=broker_address, port=1883, keepalive=60)
client.loop_start() #start the loop

print("Subscribing to topic","maintopic/subtopic/tempread")
client.subscribe("maintopic/subtopic/tempread")
print("Publishing message to topic","maintopic/subtopic/tempread")
client.publish("maintopic/subtopic/tempread","22",qos=0, retain=False)
time.sleep(4) # wait
client.loop_stop() #stop the loop
So what we did here in this program is to first import the Paho library and specifically the Client for MQTT. We instantiated a client and set the on_connect and on_message callback events to our own versions, which we defined. This way we can get an indication as to what is happening when the program runs.
Next, we connected to a host (broker) and then put the client in a loop so that it won’t disconnect. The following step is to subscribe to a topic that was called 'maintopic/subtopic/tempread' for testing purposes. This step comes first because you have to subscribe before publishing a message on the topic. Finally, we published a message on the same topic specifying the default (0) Quality of Service (QoS), which means just sending the message.
To run the program, go to the command line and type: python prog.py (or whatever you name the program). The outcome of running this program is:
creating new instance

Subscribing to topic maintopic/subtopic/tempread

Publishing message to topic maintopic/subtopic/tempread

Connection returned result: Connection Accepted.

message received 22
So as you can see, we successfully connected to a broker, published a payload of "22", and subscribed to the same topic thereby receiving "22" as a message.
Back to topIoT Testing Tutorial: Running an IoT Test with Locust and Paho
Now that we’ve learned the basics of Locust and Paho separately in this IoT testing tutorial, it’s time to combine the two for testing devices in the IoT world. Being able to combine the two is important because of Locust’s ability to create a "swarm" and of Paho to use the MQTT protocol.
Integrating Locust and Paho
The following very basic demo script illustrates how to integrate Locust and Paho. For simplicity, it only performs a publish to the broker.
from locust import User, TaskSet, events, task, between
import paho.mqtt.client as mqtt
import time

COUNTClient = 0
broker_address="broker.mqttdashboard.com"
REQUEST_TYPE = 'MQTT'
PUBLISH_TIMEOUT = 10000

def fire_locust_success(**kwargs):
    events.request_success.fire(**kwargs)

def increment():
    global COUNTClient
    COUNTClient = COUNTClient+1

def time_delta(t1, t2):
    return int((t2 - t1)*1000)

class Message(object):
    def __init__(self, type, qos, topic, payload, start_time, timeout, name):
        self.type = type,
        self.qos = qos,
        self.topic = topic
        self.payload = payload
        self.start_time = start_time
        self.timeout = timeout
        self.name = name

class PublishTask(TaskSet):
    def on_start(self):
        self.client.connect(host=broker_address, port=1883, keepalive=60)
        self.client.disconnect()

    @task(1)
    def task_pub(self):
        self.client.reconnect()
        self.client.loop_start()
        self.start_time = time.time()
        topic = "devices/readings/mydevice"
        payload = "Device - " + str(self.client._client_id)
        MQTTMessageInfo = self.client.publish(topic,payload,qos=0, retain=False)
        pub_mid = MQTTMessageInfo.mid
        print("Mid = " + str(pub_mid))
        self.client.pubmessage[pub_mid] = Message(
                    REQUEST_TYPE, 0, topic, payload, self.start_time, PUBLISH_TIMEOUT, str(self.client._client_id)
                    )
        MQTTMessageInfo.wait_for_publish()
        self.client.disconnect()
        self.client.loop_stop()
        time.sleep(5)

    wait_time = between(0.5, 10)

class MQTTLocust(User):
    tasks = {PublishTask}

    def __init__(self, *args, **kwargs):
        super().__init__(*args, **kwargs)

        increment()
        client_name = "Device - " + str(COUNTClient)
        self.client = mqtt.Client(client_name)
        self.client.on_connect = self.on_connect
        self.client.on_disconnect = self.on_disconnect
        self.client.on_publish = self.on_publish
        self.client.pubmessage  = {}

    def on_connect(client, userdata, flags, rc, props=None):
         fire_locust_success(
            request_type=REQUEST_TYPE,
            name='connect',
            response_time=0,
            response_length=0
            )

    def on_disconnect(client, userdata,rc,props=None):
        print("Disconnected result code "+str(rc))

    def on_publish(self, client, userdata, mid):
        end_time = time.time()
        message = client.pubmessage.pop(mid, None)
        total_time =  time_delta(message.start_time, end_time)
        fire_locust_success(
            request_type=REQUEST_TYPE,
            name=str(self.client._client_id),
            response_time=total_time,
            response_length=len(message.payload)
            )
You’ll notice that the program defines three classes: Message, PublishTask, and MQTTLocust.
- The message is used for temporarily holding information from the Publish call.
- PublishTask is used to define the test set.
- MQTTLocust is used to define client behavior.
Let’s start by taking a look at the MQTTLocust class. This class is set with an instance of the task set, which is defined in PublishTask. In this class, we also give the client (thread) a unique name. Finally, we define the callback methods for connect, disconnect, and publish.
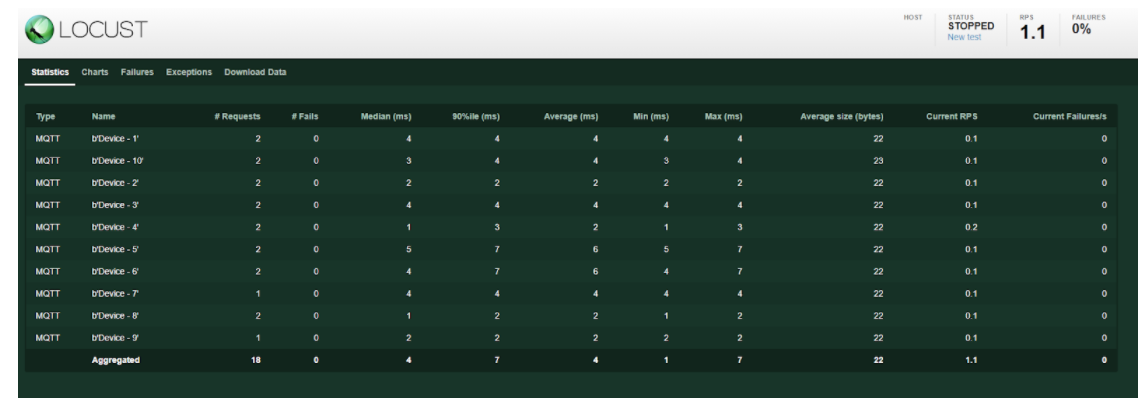
In PublishTask, the publish method returns an object that contains a place-holder (mid), and the content of the payload. We save this information, the start time, and some other settings to Message. On the on_publish callback method, this information is then used to call the fire_locust_success event, which posts the data to Locust. Without this, you wouldn’t see the results in Locust. Look at the Locust UI (see below) in the columns for Type, Name, and different response times that came from this event.
Run IoT Test
To run this script you will need to go to the command prompt and type:
locust -f program.py
After starting the program, go to the browser and enter the address: http://localhost:8089/. Then enter the number of users and swarm rate as described above.
When the tasks run, you can track the progress in the Locust User Interface:
Testing IoT Devices on BlazeMeter
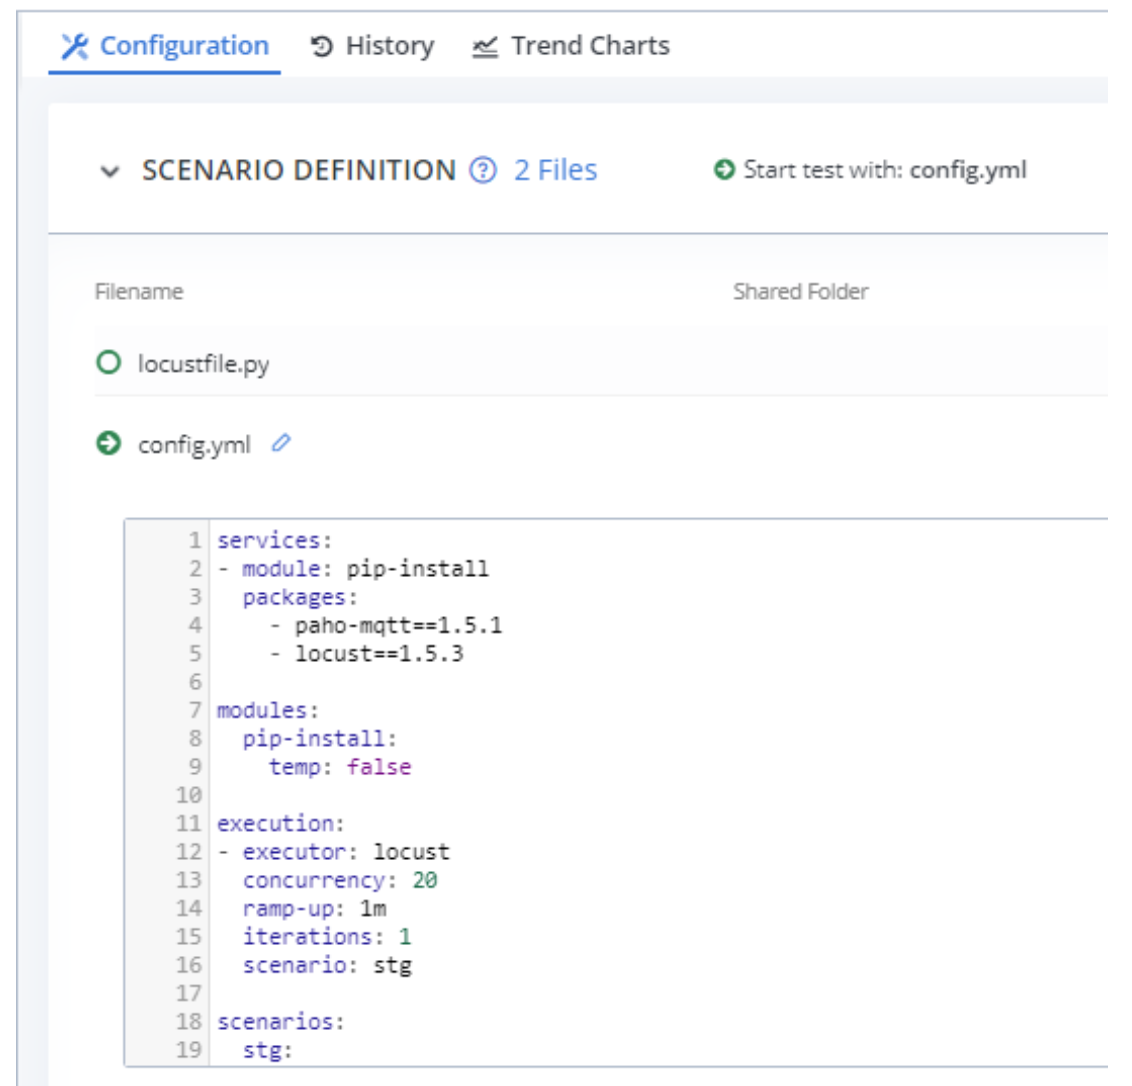
You can leverage the BlazeMeter platform for testing IoT devices because the resources of a regular computer or even a server will find it challenging to run a "swarm" of thousands of threads (tasks). Running the Locust/Paho performance test in BlazeMeter requires a Taurus configuration file. The Taurus file is written in YAML format and contains directives on how to set up the test. Following is an excerpt from the config file used to run the above Locust test.
Keep in mind that in order to run Locust and Paho on the cloud, these libraries need to be installed in the BlazeMeter environment. To accomplish that, add the 'services' section at the beginning of the configuration and specify a pip-install on these packages.
services:
- module: pip-install
  packages:
    - paho-mqtt==1.5.1
    - locust==1.5.3

modules:
  pip-install:
    temp: false

execution:
- executor: locust
  concurrency: 20
  ramp-up: 1m
  iterations: 1
  scenario: stg

scenarios:
  stg:
    default-address: https://broker.mqttdashboard.com
    script: locustfile.py
Below you can see how the performance test would be set up in BlazeMeter. The Scenario Definition contains the Locust file called locustfile.py (the default file name) and config.yml which is the Taurus test definition. Notice that config.yml is marked as the Start test file.
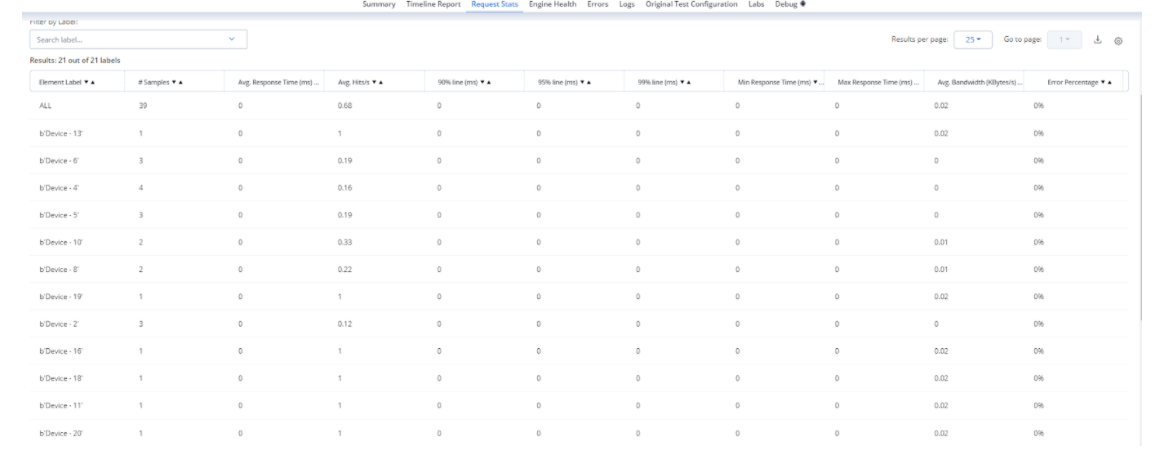
When you click "Run Test", the test will commence and when done the Summary Report will show a graph of the test data.
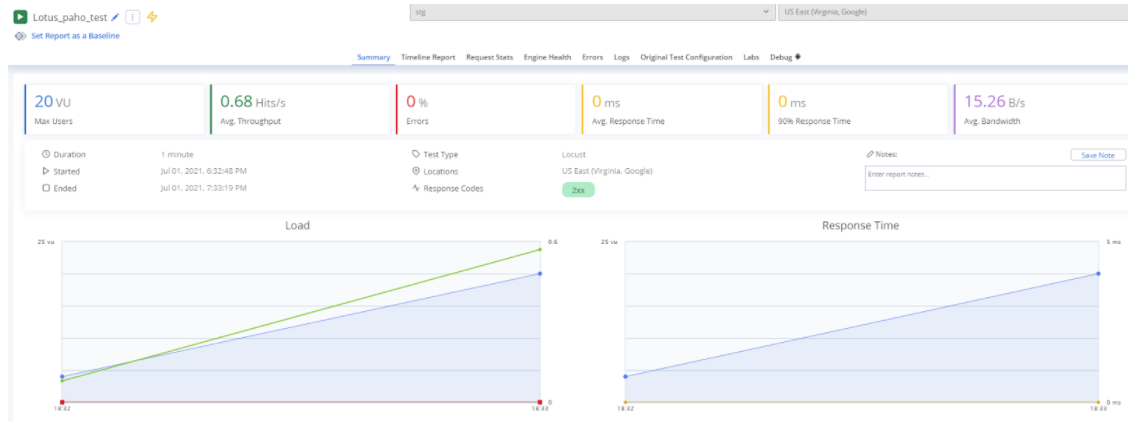
Additionally, in the Request Statistics, you will also see data such as was displayed in the Locust UI. In this example, a very small amount of VUs was generated, so the latency was very low.
Bottom Line
In this IoT testing tutorial, I gave an example of another way performance testing of IoT devices could be performed. Locust is a flexible tool that gives you control over the test scenarios. Together with Paho, which implements the MQTT protocol, you can create a testing environment on the BlazeMeter platform.