Blog
June 9, 2021
IP Spoofing With JMeter: How to Simulate Requests from Different IP Addresses

Open Source Automation
When testing your web applications, you may find yourself needing to simulate requests from different IP addresses. In this blog, I'll explain situations in which IP spoofing is used and how to conduct IP spoofing with JMeter.
What Is IP Spoofing in Performance Testing?
IP spoofing in performance testing is used to simulate real-time requests from different IP addresses in a web application to evaluate server responses from different sources. IP spoofing hits a target server with multiple virtual users from various IP addresses from a single Load Generator.
This process relays to the web server that your HTTP requests are not a threat. Keep reading to learn how to perform IP spoofing with JMeter.
What are Clusters?
Before we dive into IP spoofing, we must cover the concepts of clusters and stickiness and how they come into play with load and performance testing.
It’s not easy today to find a single node system, as both failover and resilience are key points of modern applications. So if you need to load test a system, it will likely be in a clustered form.
The idea of a cluster is to protect the application from failure. If one node goes out of order, the remaining ones will continue to serve incoming requests. Usually hardware or software load balancers act as a single entry point, orchestrating all the incoming requests and sending them to the appropriate backend servers.
We have already covered the situation when the load balancer has more than one IP address and we know how to configure JMeter to hit all the load balancer endpoints.
Back to top
Challenges Associated with Stickiness
One of the main features of load balancers is “stickiness” or “persistence” - a mechanism of wiring a client to one backend node behind the load balancer so requests could go back and forth. For example, if the application uses cookie-based authentication and the user has logged into one of the backend nodes, he will be authenticated there only for the amount of time required to replicate the session cache (which may be not immediate). This is one reason for stickiness.
As simulated by JMeter the request goes via the Load Balancer, hits Server A and gets a Cookie. If the following request will go to the Server B it will not be authenticated as for the moment only Server A knows about this user and accepts its Cookie unless local caches are replicated into a Shared Cache.
A similar situation will happen if a protocol other than HTTP is being used. If communication is being conducted via FTP, it is vital that the requests are going back and forth between JMeter and Server A within the bounds of one session.
Back to top
When IP Spoofing is Needed
Assuming all of the above is happening, you can run into a situation when all of the requests sent from JMeter are hitting only Server A, and Server B doesn’t receive any load. As a result, you cannot tell for sure whether or not your application is scaling correctly and the results of the load testing are vague. Let’s look at how to simulate requests originating from different IP addresses in your JMeter test.
Back to top
How To Execute IP Spoofing With JMeter
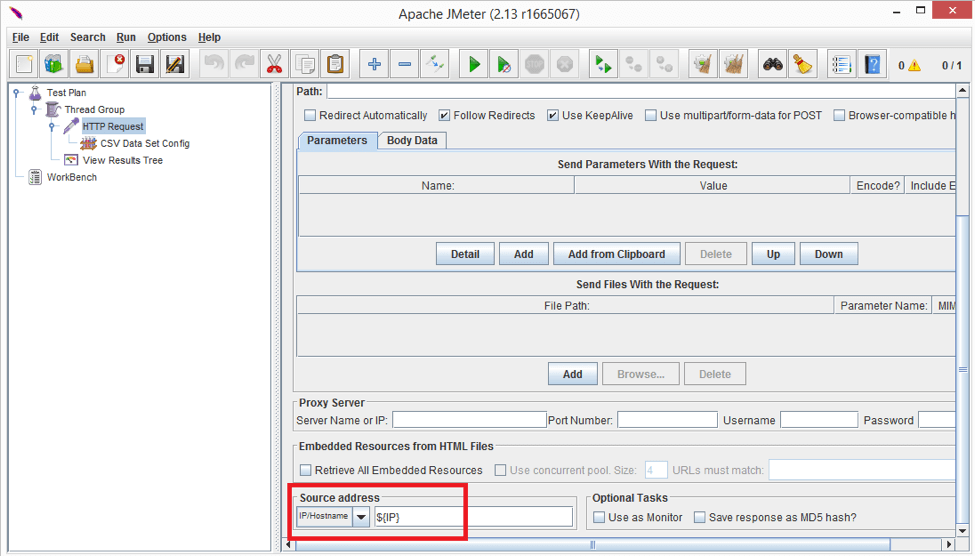
If you look at the bottom of HTTP Request Sampler (you may have to scroll down) you’ll see the “Source Address” input.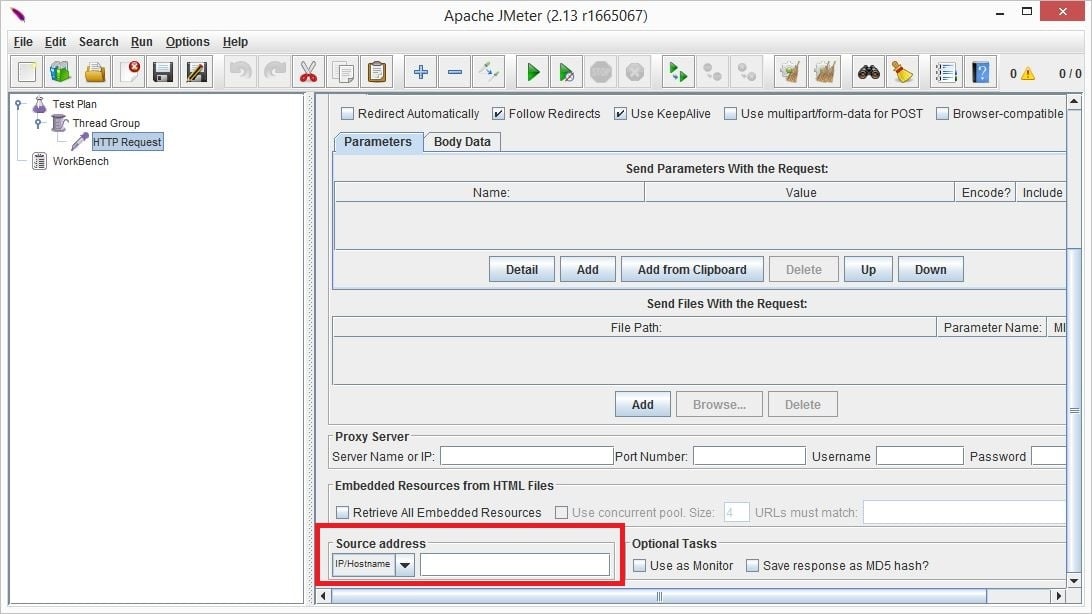
You can use this input for IP Spoofing and put the IP address, hostname or network interface name so that JMeter will send the request from the specified source. Drop-down choices are:
- IP/Hostname
- Device
- Device IPv4
- Device IPv6
Usually load generator machines don’t have more than one network interface so I’ll focus on IP/Hostname bit. First of all we need to add a number of IP addresses on the operating system level.
For the Microsoft Windows family it can be done in 2 ways:
GUI Mode
Depending on your Windows distribution look for “Network Connections” window in the Control Panel, right click on the interface and choose “Properties”. 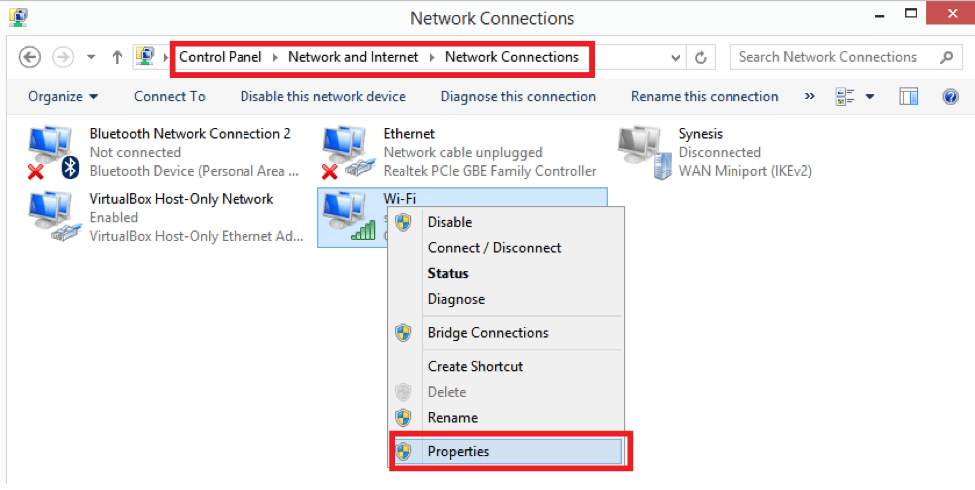 Another option to reach this window is by pressing Win+R combination, typing ncpa.cpl and hitting Enter.
On the next window choose “Internet Protocol Version 4” and click “Properties” again.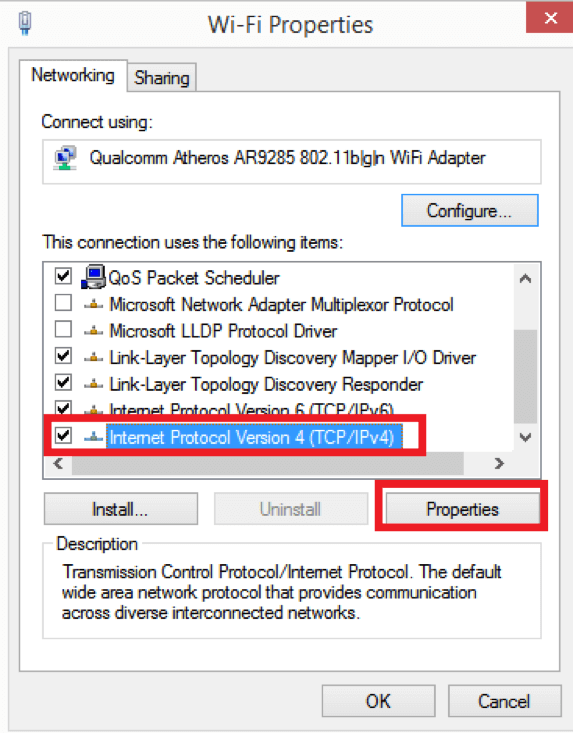 Once you click, the following window will open:
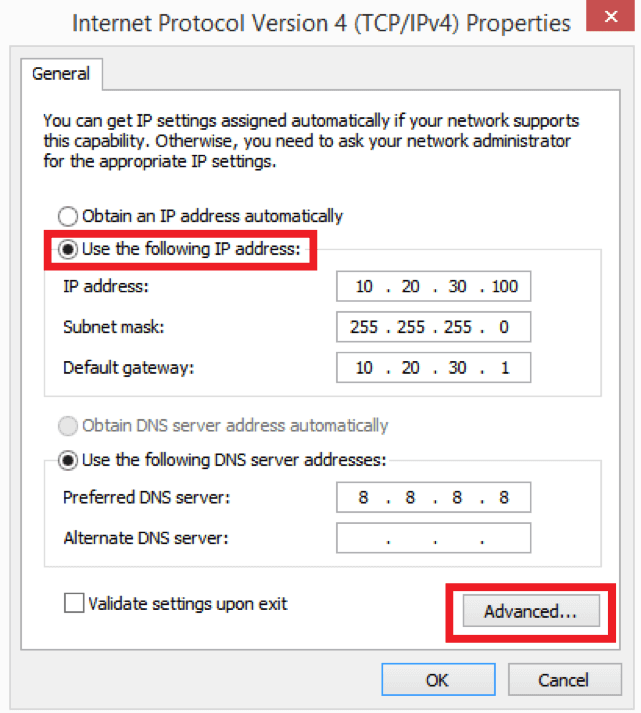 Make sure that you uncheck “Obtain an IP address automatically” and set the IP address, netmask, gateway and DNS servers manually. In the case of a DHCP-assigned address, the IP alias feature won’t work and you won’t be able to add extra IP addresses to your network adapter.
Once you configured the manual IP address, click the “Advanced” button. It will take you to Advanced TCP/IP Settings configuration window where you can click the “Add” button and add as many IP addresses as necessary in addition to your main IP address.

As you can see, I’ve added the 10.20.30.40 IP address. For the “255.255.255.0” netmask, it is possible to have 253 extra IP addresses (256 minus broadcast address minus network address minus primary IP) but in fact you’re only limited with your gateway configuration, RAM, test scenario details, and fantasy. Theoretically it should be possible to simulate as many as 4,294,967,294 IP addresses with a single network interface. I didn’t experience any problems with something like 2000 IPs per interface.
Command-Line Mode
A quicker and (in my opinion) better option is using the Windows Command Prompt and netsh add command so adding a single IP address is as simple as:
netsh interface ipv4 add address “Wi-Fi” 10.20.30.40 255.255.255.0
You can use Windows shell scripting to add the whole range of IP addresses in a single command as follows:
FOR /L %A IN (40,1,50) DO netsh interface ipv4 add address "Wi-Fi" 10.20.30.%A 255.255.255.0
The above command will add 11 IPv4 addresses to the “Wi-Fi” interface starting from 10.20.30.40 and ending with 10.20.30.50 inclusively. I expect that it is more logically compliant to use ethernet for performance testing so your actual network interface name will be different so check it in the “Network Connections” window and replace my “Wi-Fi” with your actual network connection name.
(Linux and MacOSX systems support similar feature. To keep the post more IP Spoofing oriented, I will skip instructions for these systems, but if you need an exact command for your operating system and/or test scenario feel free to ask for it in the comments section in the bottom of this post, either myself or someone else will be happy to assist.)
Now let’s get back to JMeter. For proof of concept, I’ll use Apache Tomcat which has some out-of-box web pages and capable of recording IP addresses of incoming requests in its access log. A very default deployment running on port 8080 is installed on my computer, so let’s hit Tomcat with a single HTTP Request and see how it goes.
Given the following JMeter configuration:
- Thread Group with 1 thread and 1 loop
- HTTP Request
- Server name: localhost
- Port Number: 8080
- View Results Tree Listener
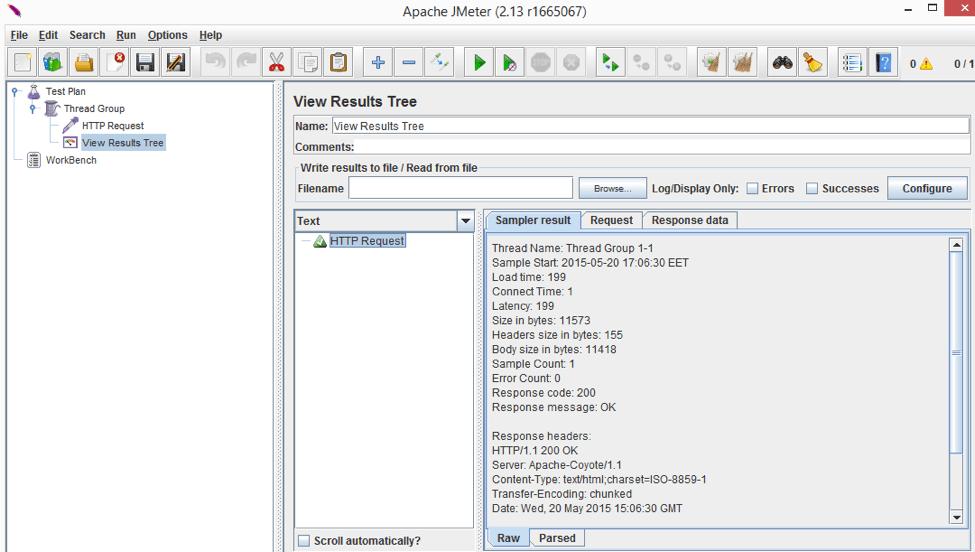
This is pretty much the default View Results Tree listener output containing sample start time, load time, body size, response headers, etc.
Now let’s look into Tomcat access log. It is located under /logs folder of Tomcat installation and default name looks like “localhost_access_log” + timestamp:
 In the access log we can see
- response body size (which is 11418 bytes)
- response code (which is 200)
- protocol (which is HTTP)
- method (which is GET)
- timestamp
- and the most important bit: source IP address, which is currently 127.0.0.1
Now let’s try setting the IP address to the previously added one, i.e. 10.20.30.40. In order to do it, it’s enough just to put the IP into “Source Address” input of the HTTP Request Sampler.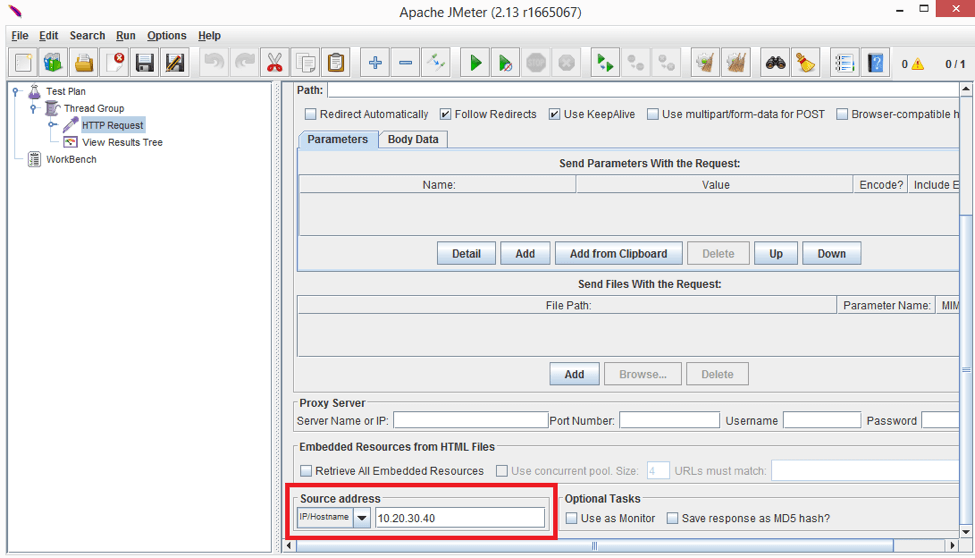
Now let’s look into the access log again.

Voila, origin IP address is now 10.20.30.40
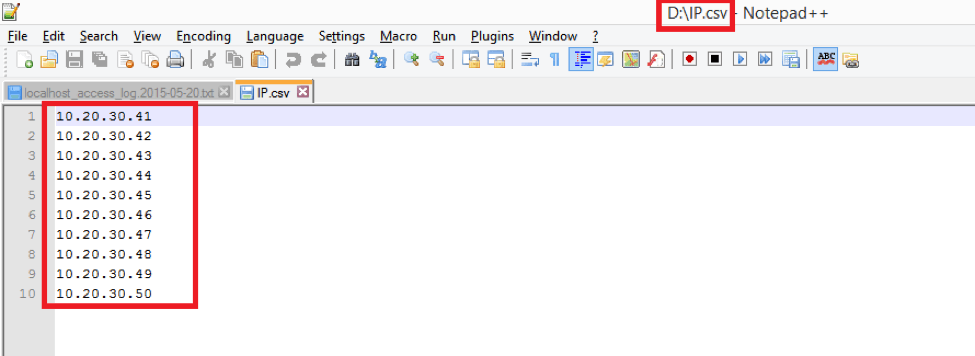
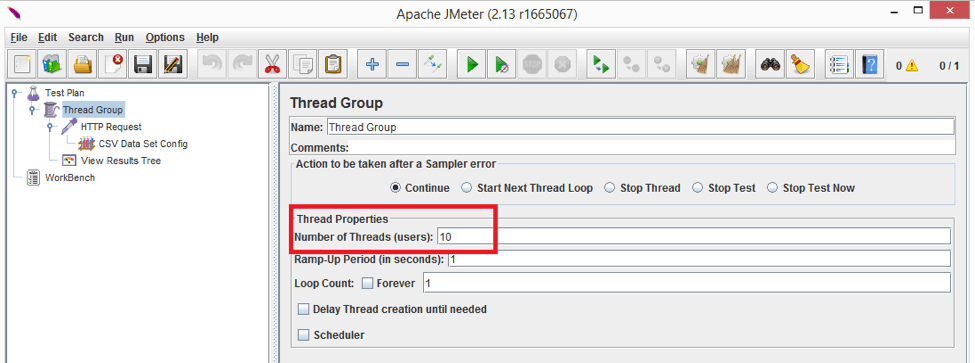
Now let’s go ahead and hit Tomcat server with 10 threads, each of them having different IP address. I will use CSV Data Set Config to read the IP addresses from the file.
Let’s put the IP addresses from 10.20.30.41 to 10.20.30.50 into a .csv file like:
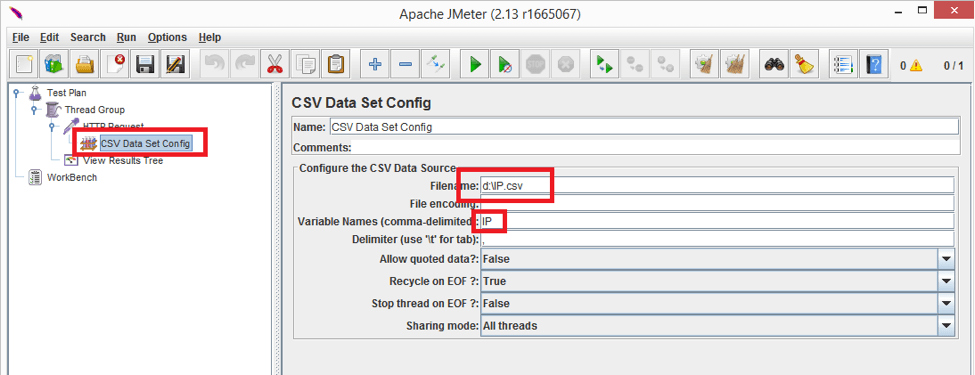
Add a CSV Data Set Config element to the test plan and configure it to read the file by providing full path to the .csv file and arbitrary variable name, let it be IP.
 Now let’s set thread number to 10:
 and configure “Source Address” to be ${IP} dynamic variable.
Now let’s run our test once again and see how it goes.
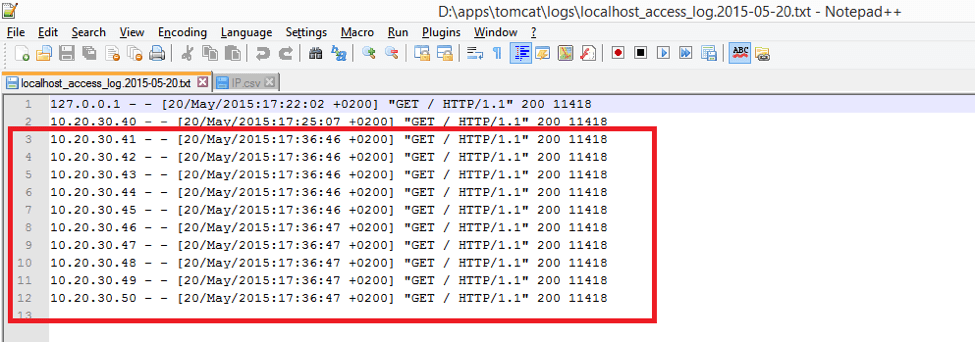
As it can be seen from the access log all the requests were sent at approximately the same time and each thread was using its own IP address. Mission completed.
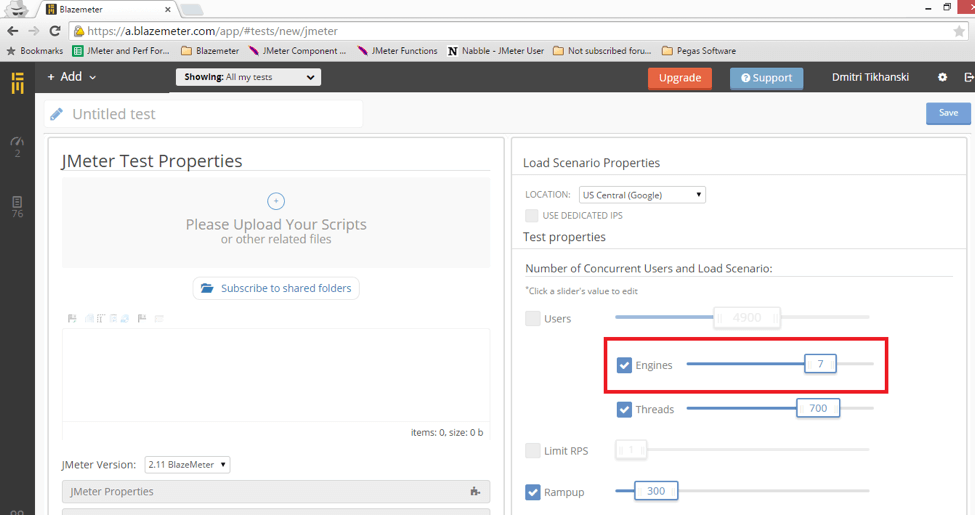
In regards to running tests in the BlazeMeter Cloud you shouldn’t worry about IP Spoofing too much as BlazeMeter systems are distributed by design. Furthermore, you have an option of setting an arbitrary number of JMeter Engines to kick off.
Even more, you can control the hosts file of Blazemeter servers, it is quite enough to provide the file called hosts.txt along with your .jmx script and any other files and it will be automatically picked up.
Hopefully, this guide will make your life easier. As usual, if anything remains unclear you’re very welcome to ask questions or share any form of feedback via discussion section below.
To learn more advanced JMeter, check out BlazeMeter University.