Blog
June 16, 2021

Functional testing Windows applications improves code and feature quality by helping prevent bugs and improving agility. This article details the steps involved in testing the legacy Notepad application by using Taurus, and leveraging a Selenium Script.
Back to topHow is testing Windows applications done?
Back to topTesting windows applications focuses on six major areas; functionality, performance, security, compatibility, regression, and usability.
What is Taurus Selenium?
Taurus is an open-source tool that provides a simple way to create and run performance tests, as well as easy integration with additional open-source functional and performance testing software, like Selenium, Gatling or JMeter.
You will learn how the script goes through opening the notepad application, navigating through different menus and closing the notepad window. We used TestNG (Java) to write the script, but you can use any other language of your choice and achieve the same functionality. Once you have the script, we will use Taurus with Taurus Selenium to execute it.
Please note that the article assumes the reader is familiar with the concept of creating a functional test script in Eclipse (or a similar) IDE using Selenium and TestNG.
Back to top
Testing Windows Applications Prerequisites
- Windows 10 or higher version Windows machine
- WinApp Driver (Click here to download)
- Winapp is a Product of Microsoft. By using this driver, we can automate testing Windows applications, classic Windows applications, universal Windows applications, and mobile applications. We can use this driver on top of a Selenium library.
- Once the driver is downloaded, follow the steps detailed in this article to install it.
- Maven and the appropriate environment variables
- Eclipse (Oxygen 3.a - more recent version are incompatible with TestNG)
- TestNG Library from Eclipse Marketplace
- Windows Development kit (Click here to download)
- Notepad.exe
Back to top
Creating & Executing the Functional Test Script
Now that you've successfully installed WinAppDriver, follow the example below to help get you started. This example uses Eclipse and assumes TestNG is already installed in the project library.
Step 1: Update pom.xml to add Appium as a dependency
Before writing a test script to test windows applications, we need to add the Appium dependency in the pom.xml file in the Eclipse project.
Under the hood, WinAppDriver is nothing more than a REST service, which supports performing commands against a Windows application by leveraging HTTP methods and JSON payloads. However, Appium, an open-source tool for automating desktop and mobile app testing, provides us with a dedicated SDK to simulate commands and actions executed by our application. We can simulate the pressing of a button; or the typing of a text inside a TextBox; etc. This way, we can simulate the most common flow of actions and interactions performed by the user and make sure that everything works as expected.
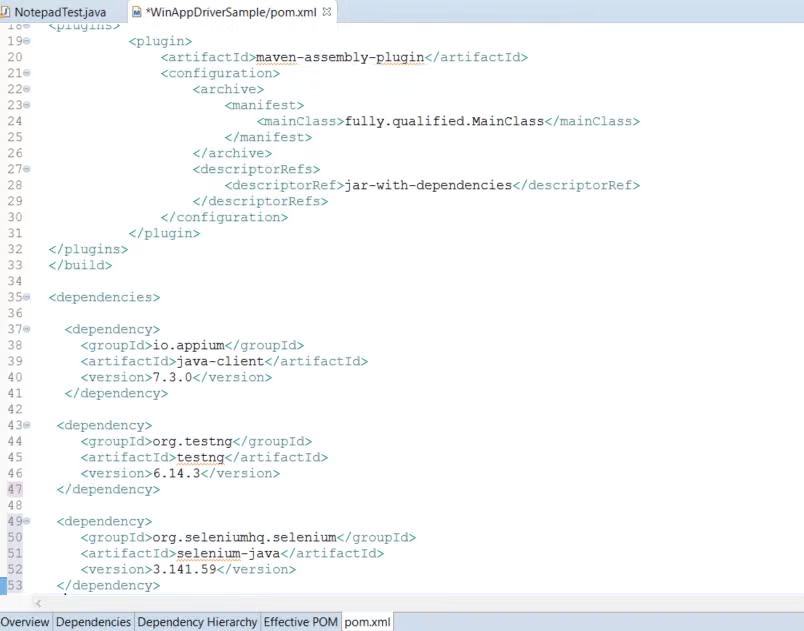
io.appium
java-client
7.3.0
org.testng
testng
6.14.3
org.seleniumhq.selenium
selenium-java
3.141.59
Step 2: Initialize WindowsDriver
To interact with the windows-based application and start testing Windows applications, we will require WinApp Driver. Initialize the WindowsDriver and provide the URL of the Notepad application executable.
Create a class file and set the desired capabilities. In this example, we are setting the Platform Name and the Device Name.
DesiredCapabilities cap = new DesiredCapabilities();
cap.setCapability("app", "C:\\Windows\\System32\\notepad.exe");
cap.setCapability("platformName", "Windows");
cap.setCapability("deviceName", "WindowsPC");
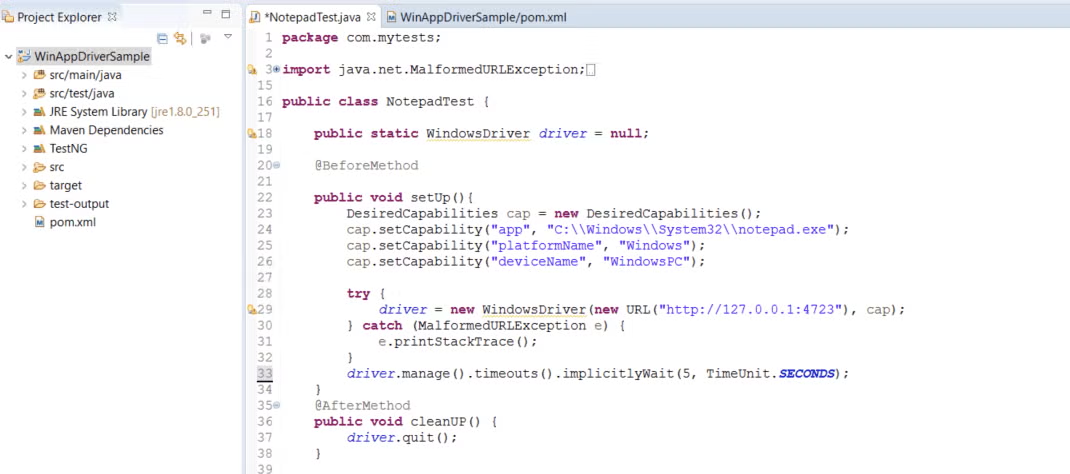
driver = new WindowsDriver(new URL("http://127.0.0.1:4723"), cap);
Step 3: Confirm the Required Fields for the Application
To create a sequence of actions you desire to test, we need to inspect the elements and identify their individual identifiers. This will enable us to locate them programmatically. For this, we will be leveraging the Inspector application that comes with the Windows Development Kit.
Navigate to C:\Program Files (x86)\Windows Kits\10\bin\10.0.19041.0\x64 and double click inspect.exe.
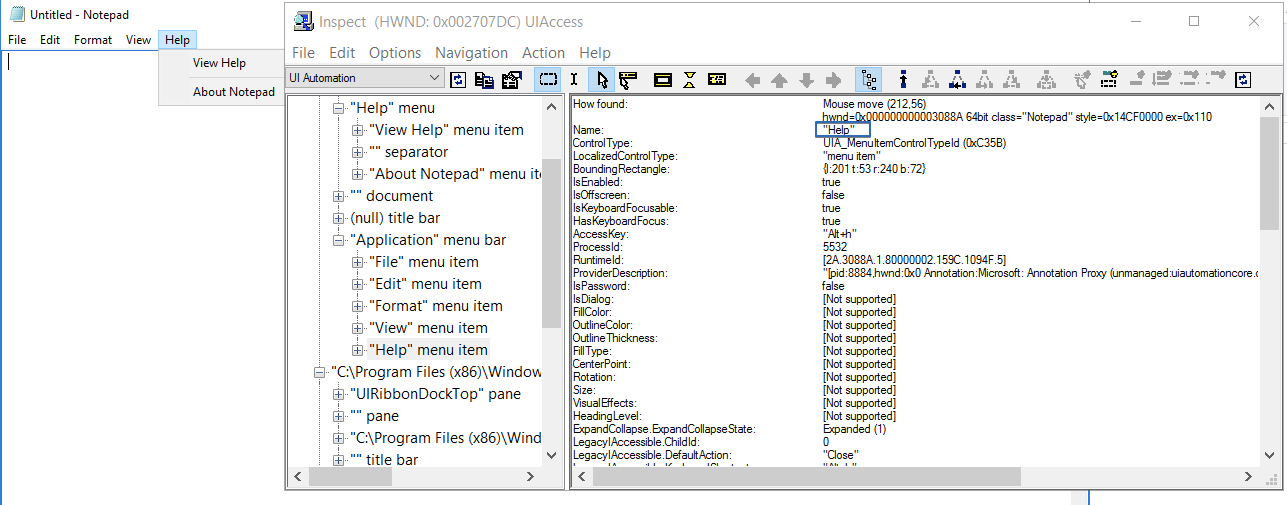
For instance, say you want to test clicking on the Help menu. Locate it as shown in the screenshot above and grab its unique name.
Once you identify the unique name of the element, proceed to the next step.
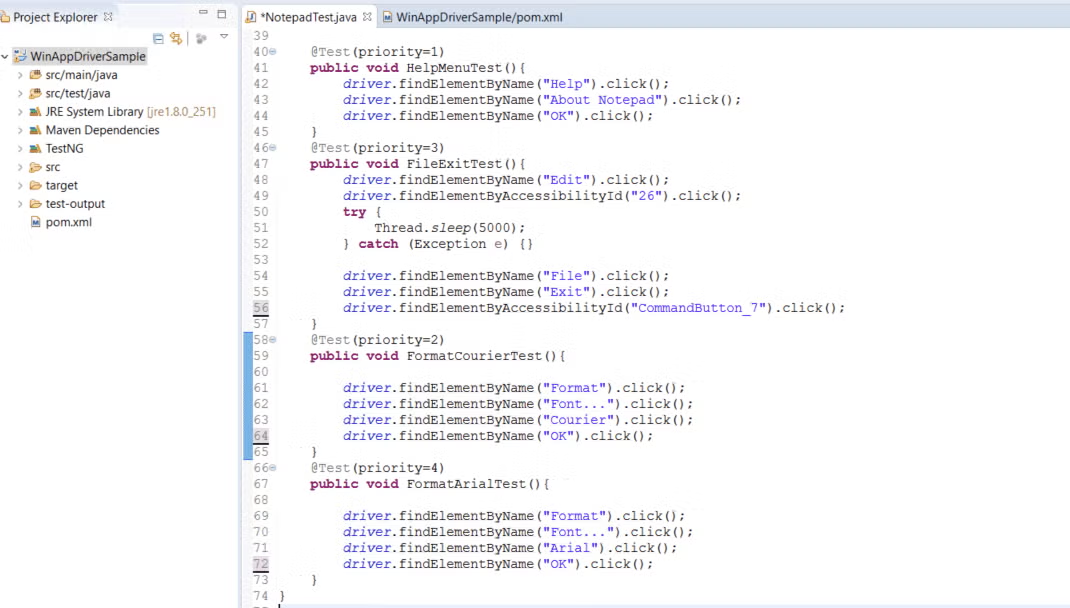
Step 4: Define the Test Using Locators
After locating the individual elements by their name, define your desired actions as shown below.
In our example, we are going to perform the following actions.
- Open Notepad.exe.
- Click Help Menu
- Navigate to Edit >> Font
- Update the Font to Arial and click Ok
- Exit the file by closing the Notepad window
These actions are defined in different methods as shown below.
Once the test script is defined, run it using eclipse to verify its functionality. Then, create a JAR file.
Step 5: Create a Taurus YAML Configuration File
We will now be leveraging Taurus to execute the Taurus Selenium test. Taurus helps us by hiding the complexities above by use of an automation-friendly wrapper.
In order to execute the test using Taurus, we will need to create a YAML configuration file as below.
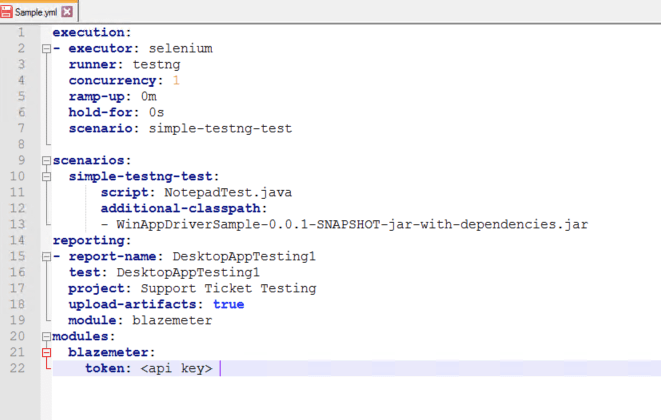
execution:
- executor: selenium
runner: testng
concurrency: 1
ramp-up: 0m
hold-for: 0s
scenario: simple-testng-test
scenarios:
simple-testng-test:
script: Test.java
additional-classpath:
- WinAppDriverSample-0.0.1-SNAPSHOT-jar-with-dependencies.jar
reporting:
- report-name: DesktopAppTesting
test: DesktopAppTesting
project: Demo
upload-artifacts: true
module: blazemeter
modules:
blazemeter:
token: :
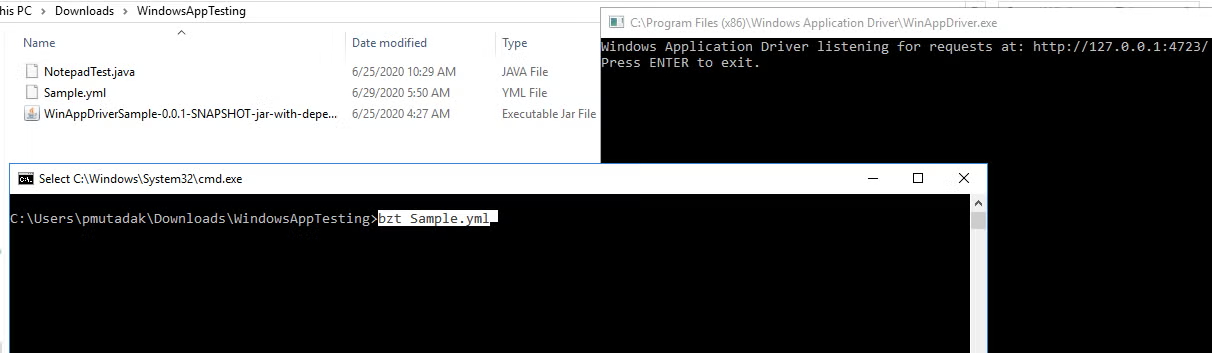
Step 6: Taurus Selenium Test Execution
- Start the WinAppDriver.exe application. (C:\Program Files (x86)\Windows Application Driver)
- Copy the YAML, JAR and Java source code to a separate folder so that all the related test files are in one location.
- Run the test using bzt .yaml command.
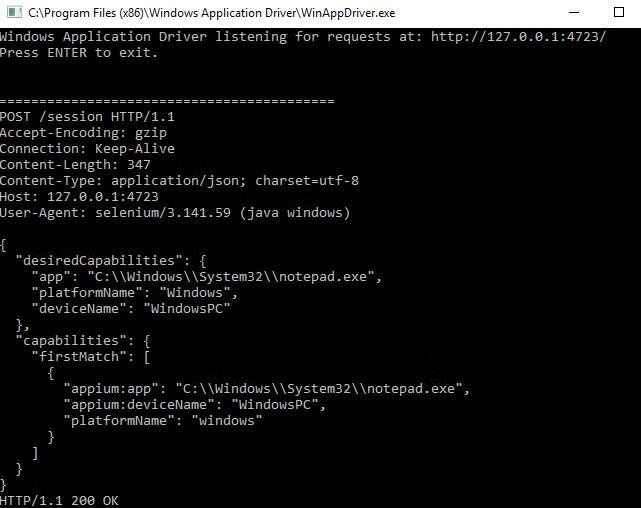
Step 7: Verify Taurus Selenium Test Execution
After the desktop application test starts, confirm the requests are passing through the WinApp Driver.
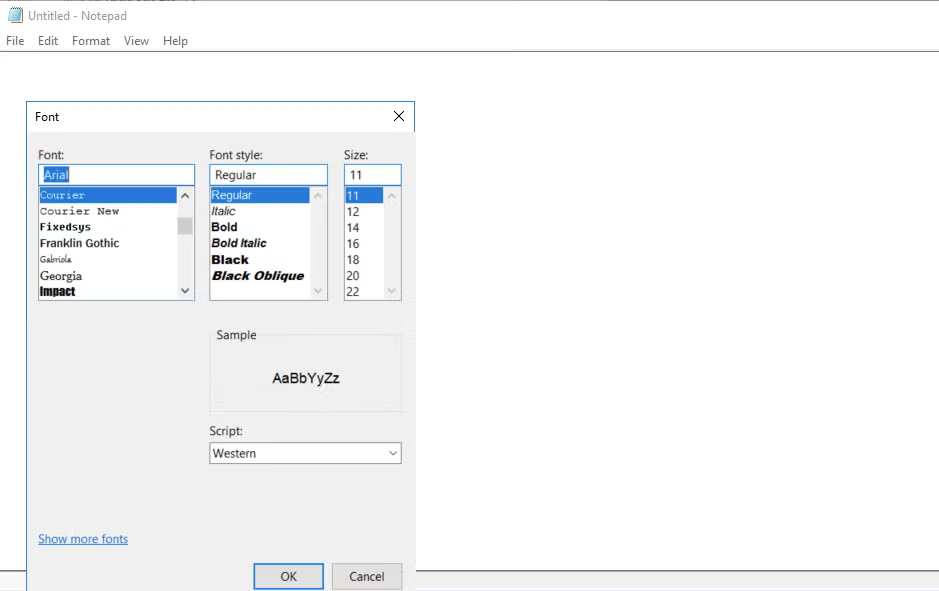
You can see the test execution of your desktop application below.
For example, the screenshot below shows the Help menu pop-up.
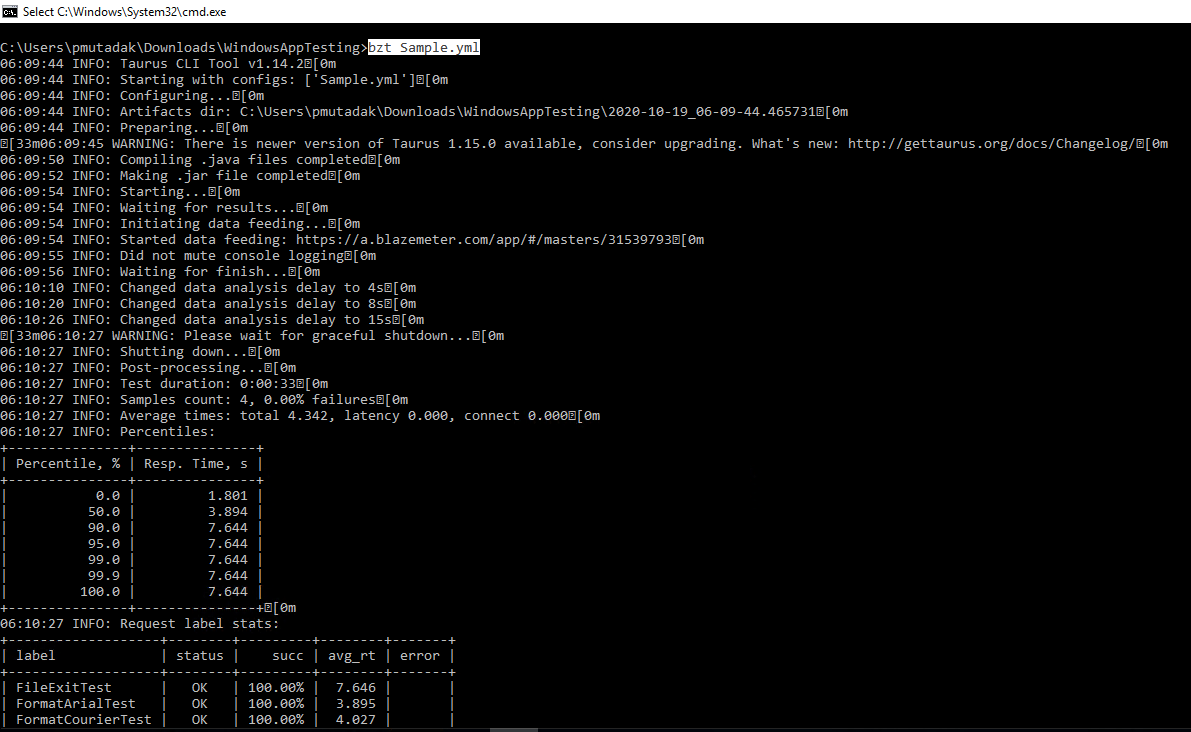
Step 8: Analyzing the Test Results in Taurus CLI
After the test execution is complete, you can see the report in Taurus CLI. The report is pretty comprehensive. It provides us with the average response times per each action and indicates any failures.
As you must have noticed, we have used several different technologies to achieve this - WinApp, Appium and Selenium. Taurus just provided us with a friendly wrapper by hiding all the complexities involved.
To get started with Taurus, the free open-source testing tool, just install and start testing! After running your test, you can upload the file to BlazeMeter for free and enjoy the scalability and advanced analytics.