Blog
July 8, 2020

RESTful API testing is one of the most important parts of software quality assurance. Compared to UI testing, API testing is more technical and requires an additional understanding from you of how an application works inside. In addition to that, in API tests you need to deal with JSON and XML which are used for data representation.
There are many wonderful open-source API testing tools available for each programming language that can achieve all the mentioned goals. Today we are going to check out Serenity and REST Assured for API testing.
Back to topWhat is Serenity BDD?
Serenity is an open-source test automation framework (also known as Thucydides) that helps you write well-structured functional tests, and provides outstanding test reports.
The main advantage of Serenity reporting is that it not only provides raw test results, but also a detailed specification of the tested feature. The Serenity framework is used by many organizations due to a wide variety of features which are available out of the box.
Here is a short list of its main features:
- Out-of-the-box integration with the most popular test frameworks (JUnit, Cucumber, REST Assured, Selenium, and many others).
- Many built-in features (parallel execution, screenshots for UI tests, data-driven testing).
- Detailed reports.
- Integration with any build tool (Maven, Gradle, Ant).
What is REST Assured for API Testing?
REST Assured is one of the most powerful libraries for testing RESTful API using Java. This should be the first choice when you need to test a REST. All tests should be written in the BDD (Behavior Driven Development) format and its framework syntax is very clean and easy to use.
The framework sends a network request to an application under test and verifies the response based on the expectations.
The main features:
- Specification reuse
- Response validation
- XPath verification
- Behavior-driven development syntax
During RESTful API testing, we need to care about the technical side, but we should still think about our tests from the point of view of a real application user. This will help us understand the app better, keep tests clean and maintainable, maintain a clear idea of specifications coverage and will enable the sharing of newly created tests across your team.
In our example, the Serenity framework will be used as a wrapper around the REST Assured API tests. We will learn how to set up a project structure to use Serenity’s important features. The main thing we will try to cover is how you can avoid code duplication by creating reusable methods and specifications.
Back to topREST Assured Example For API Testing Project Setup
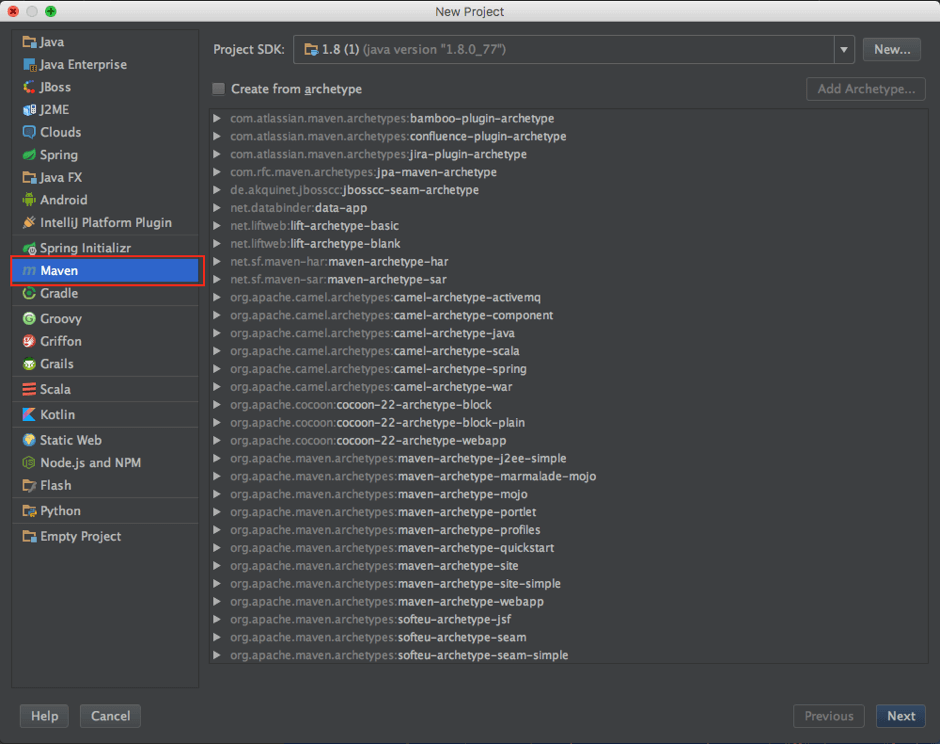
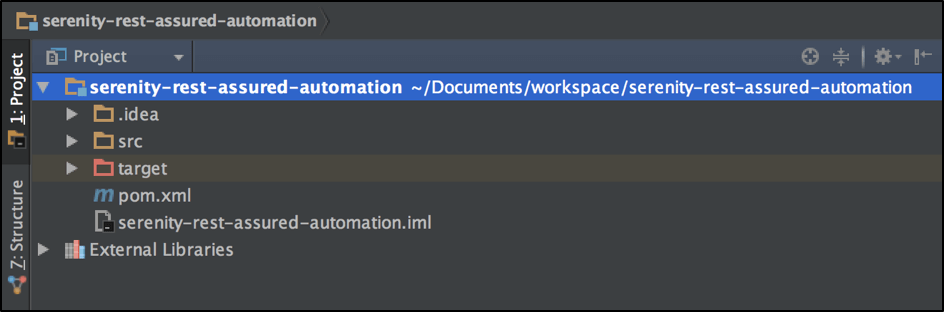
Let’s start with the project creation. All you need in the first step is to create a Maven project with a basic structure in your favorite development environment (as for me, I prefer IntelliJ IDEA):
After that we can start adding the required Maven dependencies to the pom.xml file. We can get these dependencies from the Maven central repository:
Also, in order to run Serenity tests with Maven, you need to add several Maven plugins to the pom.xml file:
If you are familiar with Maven, you can compose the correct pom.xml file yourself. But we can save you time and just give an example of pom.xml which you should get at the end (just replace your current pom.xml if you are following our steps):
 xmlns="http://maven.apache.org/POM/4.0.0" xmlns:xsi="http://www.w3.org/2001/XMLSchema-instance"
         xsi:schemaLocation="http://maven.apache.org/POM/4.0.0 http://maven.apache.org/xsd/maven-4.0.0.xsd">
    4.0.0
    com.blazemeter
    serenity-rest-assured-automation
    0.0.1-SNAPSHOT


        version>1.5.8version>
        maven.version>1.5.8maven.version>
        version>4.12version>
        version>1.6.1version>
        failsafe.plugin.version>2.18failsafe.plugin.version>
        compiler.plugin.version>3.2compiler.plugin.version>
        version>1.8version>


            net.serenity-bdd
            serenity-core
            ${serenity.version}


            net.serenity-bdd
            serenity-junit
            ${serenity.version}


            net.serenity-bdd
            serenity-rest-assured
            ${serenity.version}


            org.slf4j
            slf4j-simple
            ${slf4j.version}


            junit
            junit
            ${junit.version}
            test


                maven-failsafe-plugin
                ${maven.failsafe.plugin.version}


                        **/*.java


                            integration-test
                            verify


                org.apache.maven.plugins
                maven-compiler-plugin

                    ${java.version}
                    ${java.version}


                net.serenity-bdd.maven.plugins
                serenity-maven-plugin
                ${serenity.maven.version}


                        net.serenity-bdd
                        serenity-core
                        ${serenity.version}


                        serenity-reports
                        post-integration-test

                            aggregate
Now we are ready to start writing our first REST Assured test.
Back to top
Your First REST Assured API Test
To show Serenity and Rest Assured integration in action we need to use a publicly available web site which provides REST APIs. We can use the free GroupKT website, which provides different public RESTful web services that allow you to perform such operations like country search by alpha numeric ISO codes.
Let’s try to write our first test. To illustrate the approach of writing tests using REST Assured, here is an example of the test that checks that by using the web service “/country/get/iso2code/” API we can find the “United States of America” country with the “US” ISO code:
package tests;

import io.restassured.RestAssured;
import org.junit.Test;

import static org.hamcrest.Matchers.is;

public class CountriesSearchTests {
   @Test
   public void verifyThatWeCanFindUnitedStatesOfAmericaUsingTheCodeUS(){
       RestAssured.
           when().get("http://services.groupkt.com/country/get/iso2code/US").
           then().assertThat().statusCode(200).
               and().body("RestResponse.result.name", is("United States of America"));
   }
}
You can see that the REST Assured syntax is very natural and human readable. In addition, it is obvious that it follows the BDD principle by providing the well-known “Given,When,Then” syntax that makes tests easy to read and maintain.
REST Assured also provides powerful response validation capabilities. In the mentioned example we verify the response code and the response body. But we can also verify the response latency, size, headers, encoding and actually everything that a response might contain inside.
Before you continue, let’s try to run our tests by using the simple maven command:
mvn clean verify
If the configuration and place and everything is right, you should see a similar output:
-------------------------------------------------------
T E S T S
-------------------------------------------------------
Running tests.CountriesSearchTests
Tests run: 1, Failures: 0, Errors: 0, Skipped: 0, Time elapsed: 2.101 sec - in tests.CountriesSearchTests

Results :
Tests run: 1, Failures: 0, Errors: 0, Skipped: 0
The output tells you briefly about the test status and the time spent on running the test suite. Basically, that’s it. All we have done is to create a simple REST test using REST Assured and JUnit frameworks. We haven’t used any Serenity components, but don’t worry - outstanding Serenity reporting (mentioned above) is on our path. Now it’s time to continue with writing the tests the way it’s supposed to be done in the Serenity framework.
Back to topOrganizing Your Tests in Serenity
To ensure that our test works not only for one specific country, let’s add two more tests for two different countries.
package tests;

import io.restassured.RestAssured;
import org.junit.Test;

import static org.hamcrest.Matchers.is;

public class CountriesSearchTests {
   @Test
   public void verifyThatWeCanFindUnitedStatesOfAmericaCountryUsingTheCodeUS(){
       RestAssured.
           when().get("http://services.groupkt.com/country/get/iso2code/US").
           then().assertThat().statusCode(200).
               and().body("RestResponse.result.name", is("United States of America"));
   }

   @Test
   public void verifyThatWeCanFindIndiaCountryUsingTheCodeIN(){
       RestAssured.
               when().get("http://services.groupkt.com/country/get/iso2code/IN").
               then().assertThat().statusCode(200).
               and().body("RestResponse.result.name", is("India"));
   }

   @Test
   public void verifyThatWeCanFindBrazilCountryUsingTheCodeBR(){
       RestAssured.
               when().get("http://services.groupkt.com/country/get/iso2code/BR").
               then().assertThat().statusCode(200).
               and().body("RestResponse.result.name", is("Brazil"));
   }
}
On the one hand, you can see the tests look more or less clean and easy to read. But on the other hand, they feel a bit overcrowded with plenty of code duplication. Of course, we can refactor the class itself and create a reusable function that will be placed in the same class as the tests. But what if we need to use the same check somewhere else? We can’t predict that we won’t have any other tests anymore in the future in our test project that should verify country search by ISO codes.
Therefore, it is obvious that it is better to keep this function separately. In case of any response changes, we have to fix the logic in all tests. In our example, it’s not so difficult. But just imagine that you have a few hundred tests. The solution is to implement reusable methods and use these methods in all the tests. Let’s refactor our code to implement some of these good practices.
In Serenity, all tests are split into reusable blocks called “steps”. The main principle of the BDD approach is that we are trying to keep complexity to a high level human readable level. (This allows us to operate with tests and objects not using technical terms like “response code is 200” or “execute request”, but with human readable sentences like “action was successful” or “perform search”). Therefore, it’s always better to start from the smallest steps. When they are implemented you can later use these bricks in more complicated steps. So the main principle to make your tests maintainable is DRY (Don’t Repeat Yourself).
First of all, let’s create a separate package to keep our steps. It is always better to keep them separate as it shows which classes contain reusable components.
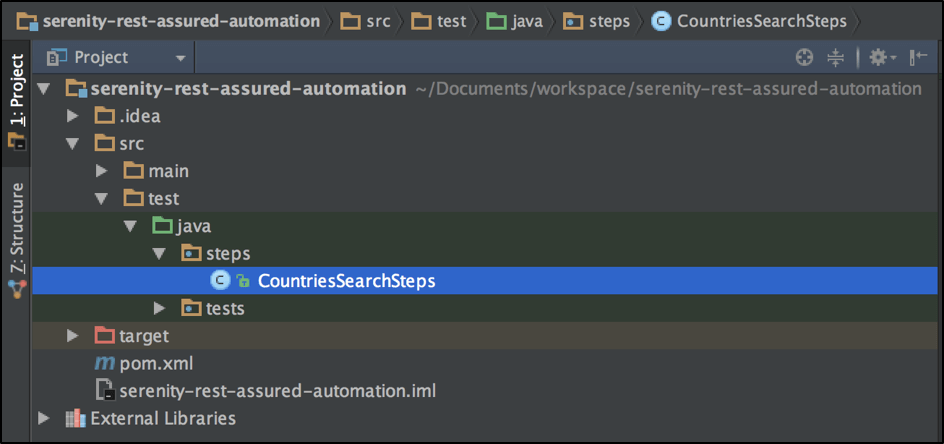
As we discussed before, it is better to make steps smaller. So let’s make separate reusable steps from our tests:
package steps;

import io.restassured.response.Response;
import net.serenitybdd.rest.SerenityRest;
import net.thucydides.core.annotations.Step;

import static org.hamcrest.Matchers.is;

public class CountriesSearchSteps {
   private String ISO_CODE_SEARCH = "http://services.groupkt.com/country/get/iso2code/";
   private Response response;

   @Step
   public void searchCountryByCode(String code){
       response = SerenityRest.when().get(ISO_CODE_SEARCH + code);
   }

   @Step
   public void searchIsExecutedSuccesfully(){
       response.then().statusCode(200);
   }

   @Step
   public void iShouldFindCountry(String country){
       response.then().body("RestResponse.result.name", is(country));
   }
}
If you want, you can also customize steps description that are presented in Serenity reports. For that, you can add a string argument value to override the default step name. Also, if you put references in the string like “{0}, {1}...”, they will be replaced by method parameters:
@Step(“I try to search the country by {0} code”)
   public void searchCountryByCode(String code) {
Note that all steps have “void” as the return type. This helps keep the tests clean and to perform easy integrations with BDD frameworks like JBehave or JVM Cucumber. If you want to pass data between steps, the ‘response’ member variable can be shared between all test steps in that class.
Now our steps are ready. Let’s refactor the main class with our tests:
package tests;

import net.serenitybdd.junit.runners.SerenityRunner;
import net.thucydides.core.annotations.Steps;
import org.junit.Test;
import org.junit.runner.RunWith;
import steps.CountriesSearchSteps;

@RunWith(SerenityRunner.class)
public class CountriesSearchTests {
   @Steps
   CountriesSearchSteps countriesSearchSteps;

   @Test
   public void verifyThatWeCanFindUnitedStatesOfAmericaCountryUsingTheCodeUS() {
       countriesSearchSteps.searchCountryByCode("US");
       countriesSearchSteps.searchIsExecutedSuccesfully();
       countriesSearchSteps.iShouldFindCountry("United States of America");
   }

   @Test
   public void verifyThatWeCanFindIndiaCountryUsingTheCodeIN(){
       countriesSearchSteps.searchCountryByCode("IN");
       countriesSearchSteps.searchIsExecutedSuccesfully();
       countriesSearchSteps.iShouldFindCountry("India");
   }

   @Test
   public void verifyThatWeCanFindBrazilCountryUsingTheCodeBR(){
       countriesSearchSteps.searchCountryByCode("BR");
       countriesSearchSteps.searchIsExecutedSuccesfully();
       countriesSearchSteps.iShouldFindCountry("Brazil");
   }
}
Now our tests definitely look more readable. If our response needs to be changed after a certain time, we don’t need to change the response validation in each test, but only in the “iShouldFindCountry” step definition in the “CountriesSearchSteps” class. Please, also note that we do not need to initialize the steps class as all annotated steps classes are automatically initialized by Serenity.
Back to topSerenity Test Execution and Reporting
One more important thing we added is the “@RunWith(SerenityRunner.class)" annotation on top of the class. As we have now organized our structure to meet some basic Serenity principles, we are ready to run the test using Serenity. This time (after we added the mentioned annotation) these tests will be run using the “SerenityRunner”. For that we can use exactly the same command to run our tests:
mvn clean verify
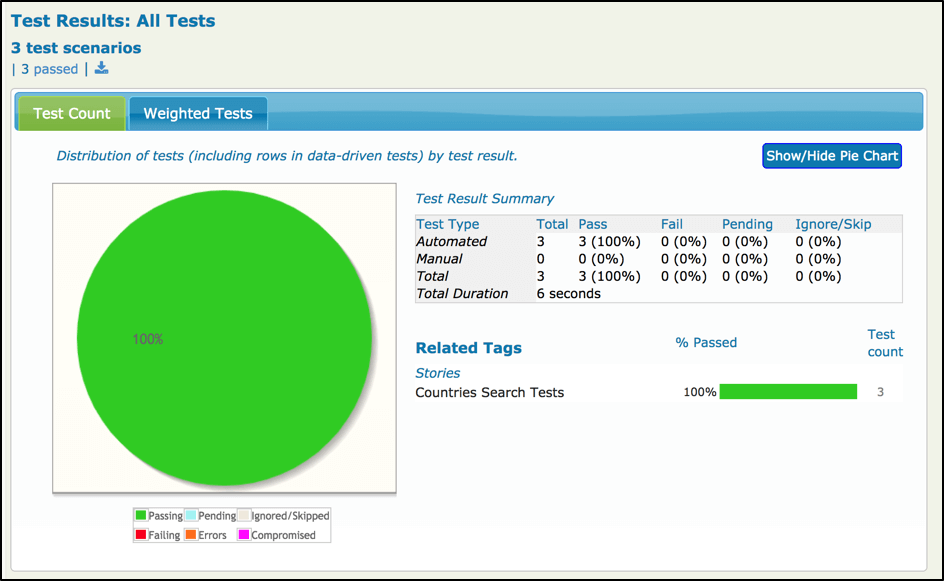
In the console, you should find printed messages for tests to start. At the same time under the target directory you can find the HTML generated report we were talking about before:
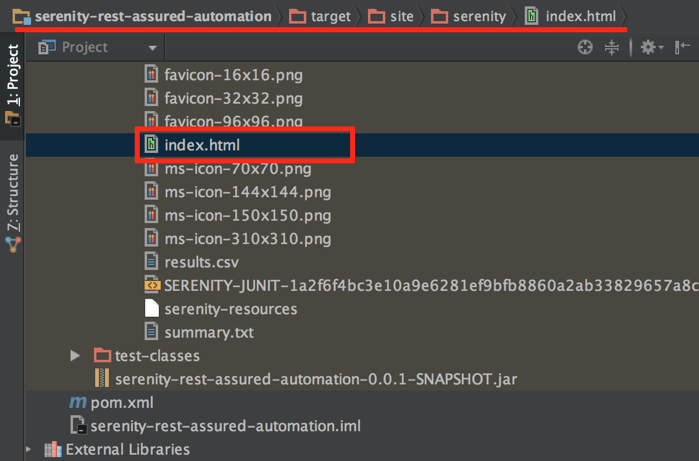
You can open the report in any browser:
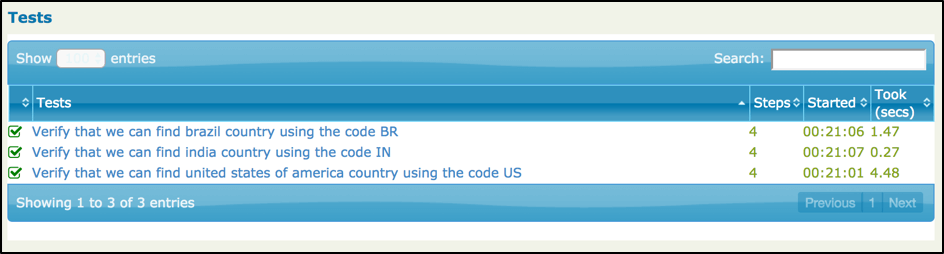
If you click on any test you should see a detailed description of the test steps:
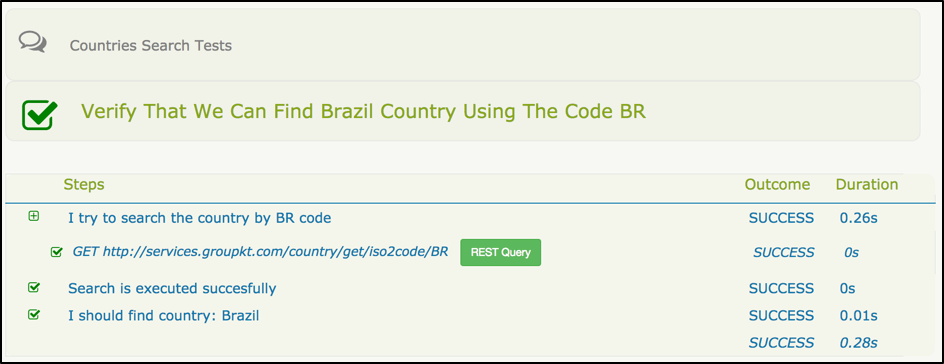
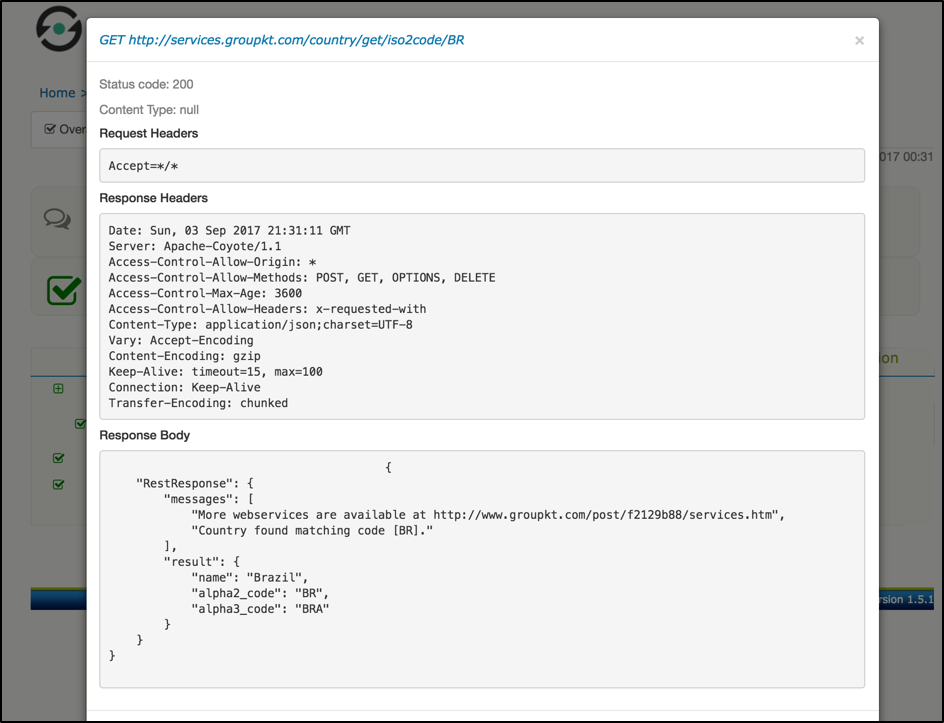
One of the most important features of the Serenity and REST Assured API testing integration is that by using detailed reporting, you can easily validate all requests and response details even if you are not adding any logs inside tests. Like the example above, for each executed REST request you can click the button “REST Query” and get a detailed request and response description:
Usually, if you run RESTful API tests without proper steps logging, you might miss the reason of a failed API call. To get a clear picture, you have to run the failed test in debug mode to verify what is going on step by step. But by using powerful Serenity reporting you have a detailed explanation of all the executed steps. So you just need to perform some trivial step analyses and almost always the reason becomes clear without any additional tests debugging.
Back to topBottom Line
As you can see, Serenity and REST Assured provide you with a wonderful combination. REST Assured keeps API testing clean and easy to maintain, while Serenity gives you outstanding test reporting and flexibility in running and grouping your tests inside a test suite. Using these tools, the test creation process becomes easy and efficient.