Blog
November 11, 2020

While performing the testing of the API, which saves data in a database or performs data reading from a database, it is often necessary to encounter objects of the BLOB type.
BLOB, or Binary Large Object, is where the API can store images, video, text, and other information that is stored in a binary form. (Binary data or a binary data view is data that is represented as 1 and 0). In addition to writing data to the BLOB, the API can also read data from the BLOB.
In this blog post, you will see how to use Apache JMeter™ to create a table with one of the BLOB data types, how to write the data in the BLOB, and how to read the data from the BLOB.
Let’s get started.
Table of Contents:
- What is BLOB in MySQL?
- BLOB Types
- Creating a Table with a BLOB Data Type in JMeter
- Adding Rows to a Table that Contains BLOB in JMeter
- Getting Data from a BLOB in JMeter
What is BLOB in MySQL?
Back to topBLOB, which stands for a Binary Large Object, is a MySQL data type that can store images, PDF files, multimedia, and other types of binary data.
BLOB Types
In MySQL, there are 4 types of BLOBs: TINYBLOB, BLOB, MEDIUMBLOB, and LONGBLOB. All these 4 types of objects differ from each other only in the size of the data that can be stored.
📕 Related Resource: Learn more about How to Test MySQL Connection
The table below shows the values for the length of data that each object type can hold
| Object type | Value length that the object can hold |
| TINYBLOB | from 0 to 255 bytes |
| BLOB | from 0 to 65535 bytes |
| MEDIUMBLOB | from 0 to 16 777 215 bytes |
| LONGBLOB | from 0 to 4 294 967 295 bytes |
Back to top
Creating a Table with a BLOB Data Type in JMeter
To create a table with a BLOB data type, you need to do the following in JMeter.
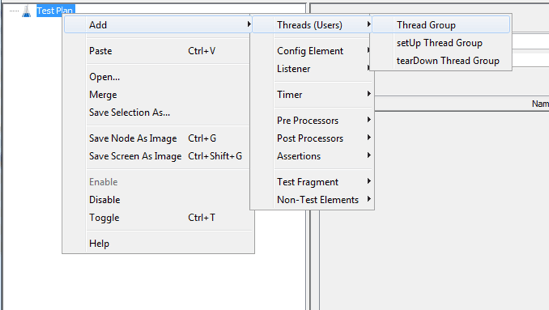
1. Add a Thread Group
Right Click -> Threads -> Thread Group
2. Configure the connection to the database
Configure the connection to the database and learn how to test MySQL connection.
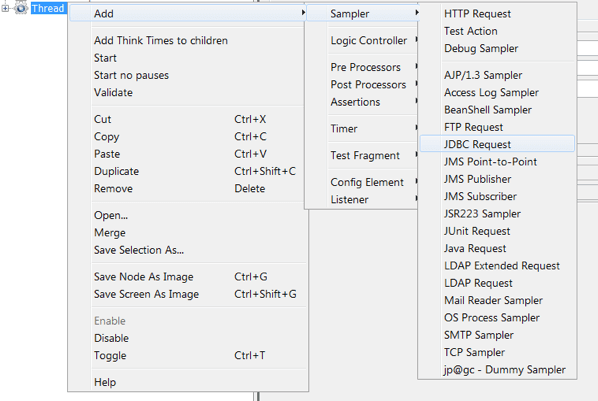
3. Add a JDBC Request.
Right Click on Thread Group -> Add -> Sampler -> JDBC Request
Query Type -> Update Statement
In this step, we will send a request to the database to create a table.
In the JDBC Request add the following code.
CREATE TABLE sakila.test_blob( ID INT, TEXT BLOB, IMAGE BLOB);
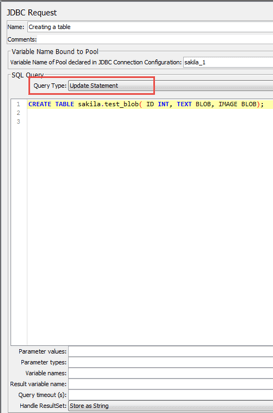
The code shown above does the following:
- CREATE TABLE - The operator that creates the table in the database
- sakila - Database name.
- test_blob - The name of the table to be created
ID INT:
- ID - Column name in the table
- INT - The data type for the values that will be stored in the column
TEXT BLOB:
- TEXT - Column name in the table
- BLOB - The data type for the values that will be stored in the column
IMAGE BLOB:
- IMAGE - Column name in the table
- BLOB - The data type for the values that will be stored in the column
4. Add a View Results Tree
Thread Group -> Right Click -> Add -> Listener -> View Results Tree
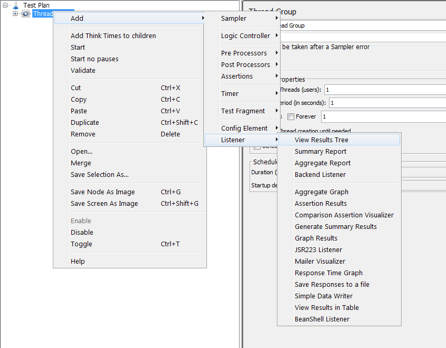
This step will display the request that JMeter sends to the database and the response that it receives from the database.
After starting the test, we will see a result, as shown in the image below:
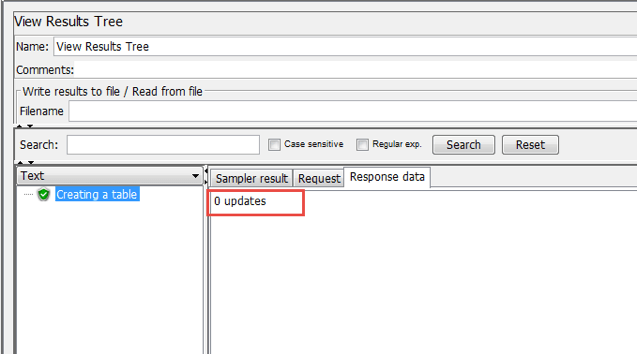
0 updates means that we successfully created the table in the database
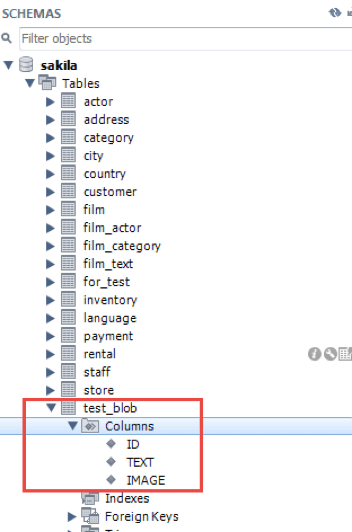
If we go to the database, we will also see the created table, as shown in the image below:
Adding Rows to a Table that Contains BLOB in JMeter
The following example shows how to create a row in the test_blob table that will contain the BLOB, and the BLOB will contain the text.
The value for the BLOB object will be passed as a string in the SQL query itself.
To do this, you need to do the following
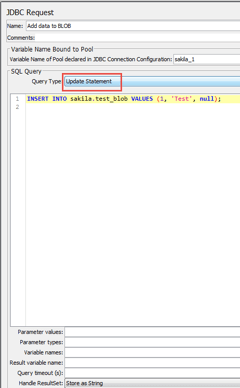
5. Add a JDBC Request
Thread Group -> Right Click -> Add -> Sampler -> JDBC Request
Query Type -> Update Statement
In the JDBC Request, add the following code:
INSERT INTO sakila.test_blob VALUES (1, 'Test', null);
The code shown above does the following:
- INSERT INTO - The statement that allows adding data to a table
- sakila - Database name
- test_blob - The name of the table that data will be added
- VALUES - Specifies the values to add to the table
- (1, 'Test', null) - The values to be written to the columns, in our case.
- 1 - will be written in the column ID
- Test - will be written in the column TEXT. Before the "Test" value is written in the "TEXT" column, the MySQL database will automatically create a BLOB object and write the value "Test" into that object.
- null - will be written in the column IMAGE.
After starting the test, we will see a result, as shown in the image below:
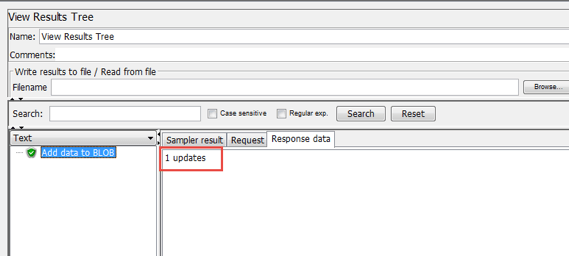
1 update means that we successfully added data to the table.
If we go to the database and execute SELECT * FROM sakila.test_blob, we'll see the result, as shown in the image below:
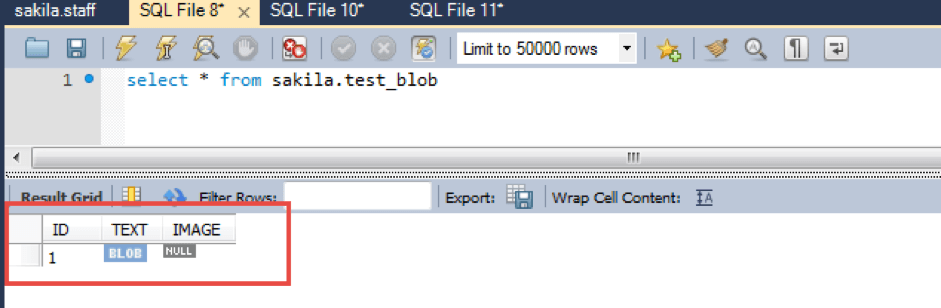
The image above shows that in the "TEXT" column a BLOB object has been created.
To see that the BLOB actually contains the value "Test", you need to do the following in the database:
- BLOB -> Right Click -> Open Value in Viewer -> Text

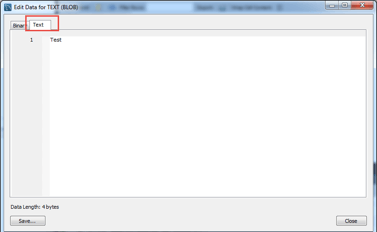
The image above shows that we really created a BLOB that contains the value "Test".
Next, you'll see how to create a row in the test_blob table that will contain the BLOB object, and the BLOB object will contain an image.
To create a BLOB that will contain an image, you need to do the following:
6. Create an image file and place it in the C:/ProgramData/MySQL/MySQL Server 5.7/Uploads/ directory
In our case, an image.png file of the following kind will be created:

An explanation of why the image is placed in the C:/ProgramData /MySQL/MySQL Server directory 5.7/Uploads/ appears below.
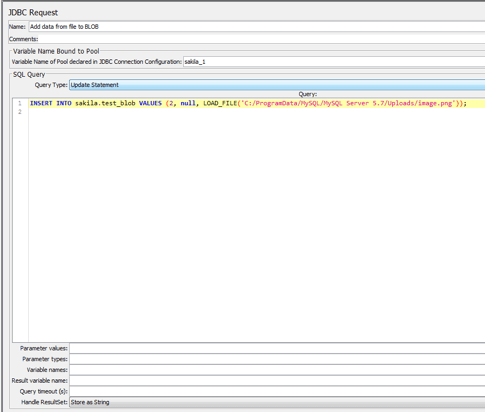
7. Add a JDBC Request
Thread Group -> Right Click -> Add -> Sampler -> JDBC Request
Query Type -> Update Statement
In the JDBC Request, add the following code:
INSERT INTO sakila.test_blob VALUES (2, null, LOAD_FILE('C:/ProgramData/MySQL/MySQL Server 5.7/Uploads/image.png'));
The code shown above does the following:
- INSERT INTO - The statement that allows adding data to a table
- sakila - Database name
- test_blob - The name of the table that data will be added
- VALUES - Specifies the values to add to the table
- (2, null, LOAD_FILE('C:/ProgramData/MySQL/MySQL Server 5.7/Uploads/image.png')) - The values to be written to the columns.
- 2 - will be written in the column ID
- null - will be written in the column TEXT.
- LOAD_FILE('C:/ProgramData/MySQL/MySQL Server 5.7/Uploads/image.png') - This is a function that reads data from a file and returns the data as a string. The argument of this function is the full path to the file (In this case, the full path is C:/ ProgramData/MySQL/MySQL Server 5.7/Uploads/image.png). This function allows you to read any data from a file.
When using this function, there are the following restrictions:
- The file must be in the directory from which download is allowed. This permission is set for a specific directory in MySQL itself. In our case, the file was placed in the directory 'C:/ProgramData/MySQL/MySQL Server5.7/Uploads, for this directory MySQL grants permission to load files by default
- The user who has connected to the database must have the rights to upload files
If these requirements are not met, then null is created instead of the BLOB.
In our case, the function LOAD_FILE ('C:/ProgramData/MySQL/MySQL Server5.7/Uploads/ image.png') reads the data from the file and converts it to a string. Then, MySQL creates a BLOB object and places the data in the created object that will be written in the table test_blob.
After starting the test, we will see a result, as shown in the image below:
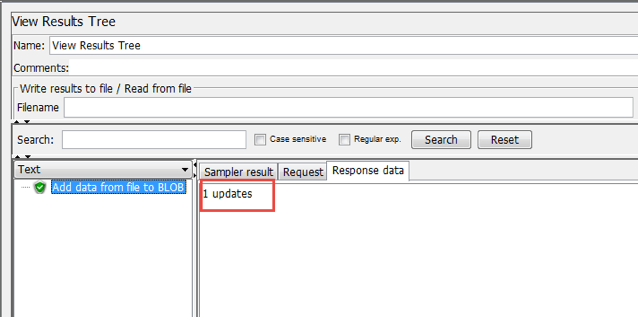
1 updates means that we successfully added data to the table.
If we go to the database and execute SELECT * FROM sakila.test_blob, we'll see the result, as shown in the image below:
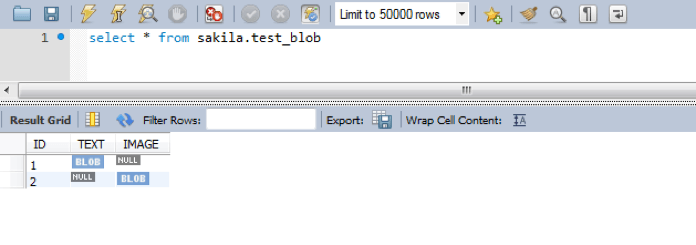
The image above shows that in the "IMAGE" column a BLOB object has been created.
To see that a BLOB object actually contains an image, you need to do the following:
- BLOB -> Right Click -> Open Value in Viewer -> Image
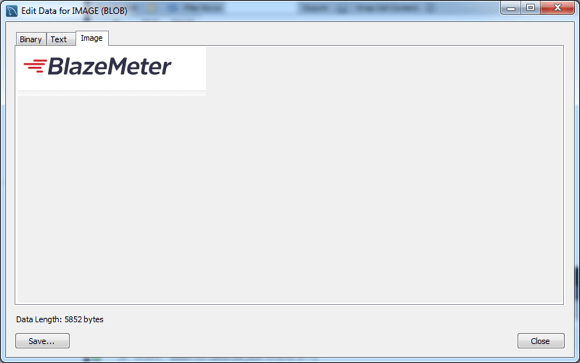
The image above shows that we really created a BLOB object that contains an image
In addition to the LOAD_FILE () function, which reads data from a file, you can also use Groovy.
To create a BLOB that will contain an image or text, you need to do the following:
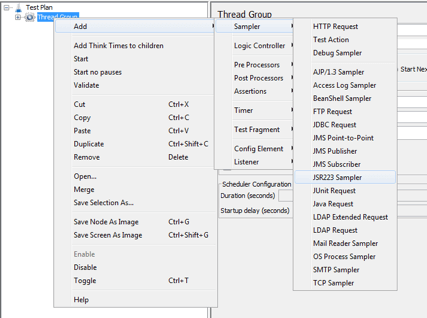
8. Add a JSR223 Sampler
Thread Group -> Right Click -> Add -> Sampler -> JSR223 Sampler
JSR223 Sampler -> Language Groovy
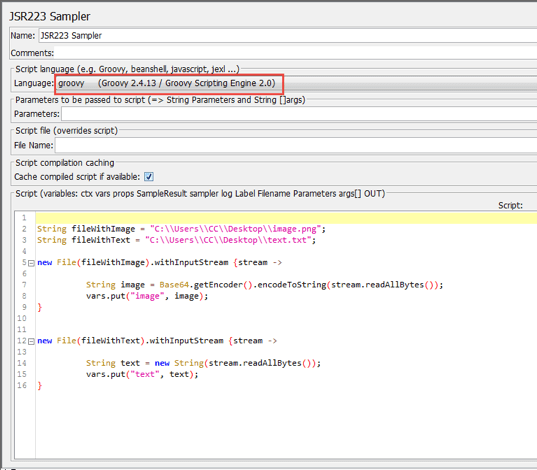
In the JSR223 Sampler, add the following code.
String fileWithImage = "C:\\Users\\CC\\Desktop\\image.png";
String fileWithText = "C:\\Users\\CC\\Desktop\\text.txt";

new File(fileWithImage).withInputStream {stream ->

		String image = Base64.getEncoder().encodeToString(stream.readAllBytes());
		vars.put("image", image);
}

new File(fileWithText).withInputStream {stream ->

		String text = new String(stream.readAllBytes());
		vars.put("text", text);
}
The code shown above does the following:
String fileWithImage = "C:\\Users\\CC\\Desktop\\image.png" - Creates a variable with data type String whose value is the full path to the image file.
String fileWithText = "C:\\Users\\CC\\Desktop\\text.txt"; - Create a variable with data type String, whose value is the full path to the file with the text.
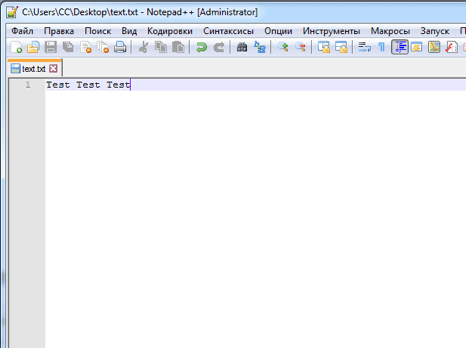
This file will look like the image below.
When you use Groovy to read data from a file, you can place the files in any directory.
new File(fileWithImage).withInputStream {stream ->

  String image = Base64.getEncoder().encodeToString(stream.readAllBytes());
  vars.put("image", image);
}
In this code, reading data from a file as bytes, converting bytes to Base64 Format and assigning the resulting value to the “image” variable with the data type String.
Base64 is the standard for encoding binary data in a string.
new File(fileWithText).withInputStream {stream ->

  String text = new String(stream.readAllBytes());
  vars.put("text", text);
}
In this code, reading data from the file as bytes, converting data from bytes to a string and assigning the received value to the ‘text’ variable with the data type String.
9. Add a JDBC Request
Thread Group -> Right Click -> Add -> Sampler -> JDBC Request
Query Type -> Update Statement
In the JDBC Request, add the following code:
INSERT INTO sakila.test_blob VALUES (3, '${text}', FROM_BASE64('${image}'));
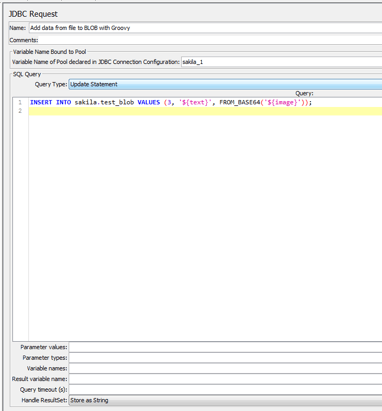
The code shown above does the following:
- INSERT INTO - The statement that allows adding data to a table
- sakila - Database name
- test_blob - The name of the table that data will be added
- VALUES - Specifies the values to add to the table
- (3, '${text}', FROM_BASE64('${image}')) - The values to be written to the columns:
- FROM_BASE64 - a MySQL function that converts the value of the variable '$ {image}' from BASE64 to a string.
- '${text}' - variable, the value of which is data from the file text.txt
- '${image}' - variable, the value of which is data from the file image.png
After starting the test, we will see a result, as shown in the image below:
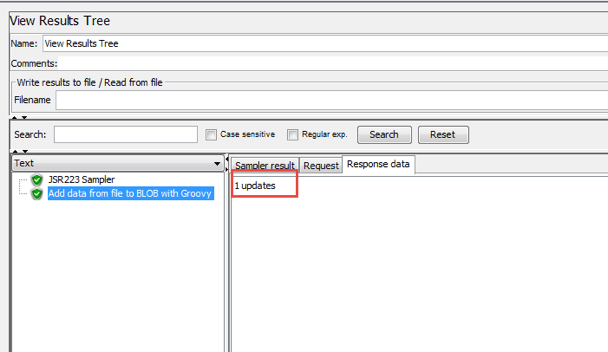
1 updates means that we successfully added data to the table.
If we go to the database and execute SELECT * FROM sakila.test_blob, we'll see the result, as shown in the image below:
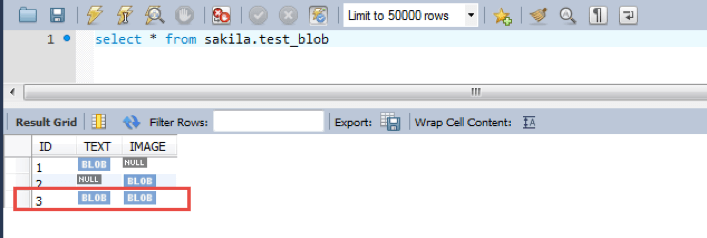
The image above shows that in the "TEXT", "IMAGE" column a BLOB object has been created.
To see that a BLOB object actually contains an image and text, you need to do the following
- BLOB -> Right Click -> Open Value in Viewer -> Text
- BLOB -> Right Click -> Open Value in Viewer -> Image
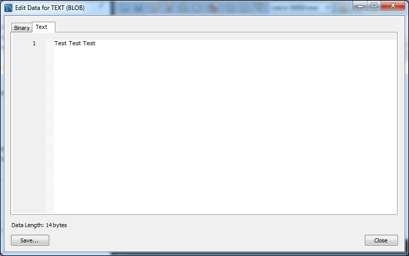
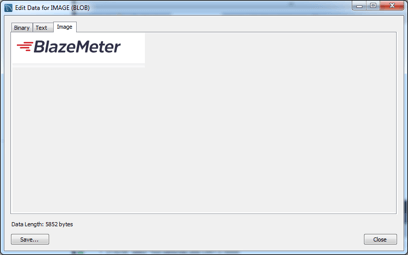
The images above show that we really created BLOB objects that contain an image and text.
Back to topGetting Data from a BLOB in JMeter
To get data from a BLOB, you need to do the following:
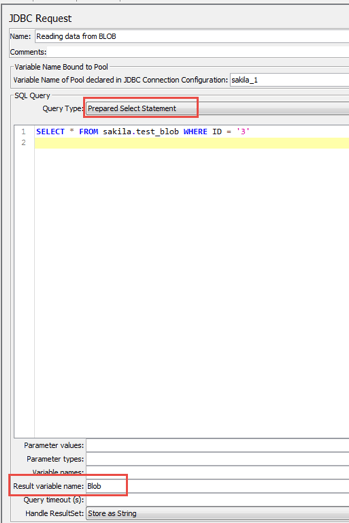
10. Add a JDBC Request
Thread Group -> Right Click -> Add -> Sampler -> JDBC Request
Query Type -> Prepared Select Statement
Result variable name -> Blob
In the JDBC Request, add the following code:
SELECT * FROM sakila.test_blob WHERE ID = '3'
The code shown above does the following:
SELECT * FROM sakila.test_blob WHERE ID = '3'This code example shows getting a row (with all the fields) that has the value ID = '3' from the table sakila.test_blob.
11. In the JDBC Request add a JSR223 PostProcessor
JDBC Request -> Right Click -> Add -> Post Processors -> JSR223 PostProcessor
JSR223 PostProcessor -> Language Groovy
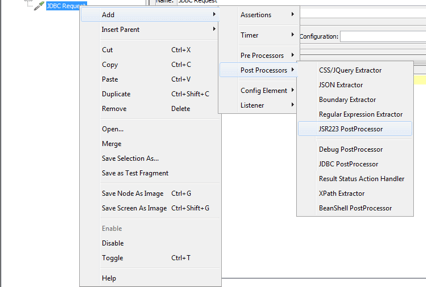
In the JSR223 PostProcessor, add the following code:
byte[] blobByte = vars.getObject("Blob").get(0).get("TEXT");
String blob = new String(blobByte);
log.info(blob);

The code shown above does the following:
- byte[] blobByte = vars.getObject("Blob").get(0).get("TEXT"); - Getting the BLOB object, which is stored in the "TEXT" column, reading data from the BLOB object and assigning the received value of the variable “blobByte” with the data type byte [] (Array bytes).
- String blob = new String(blobByte); - Converting a byte array to a string and assigning the resulting value to the “blob” variable with the data type String
- log.info(blob); - Displaying the value of the “blob” variable in the JMeter console
After starting the test, we will see a result, as shown in the image below:
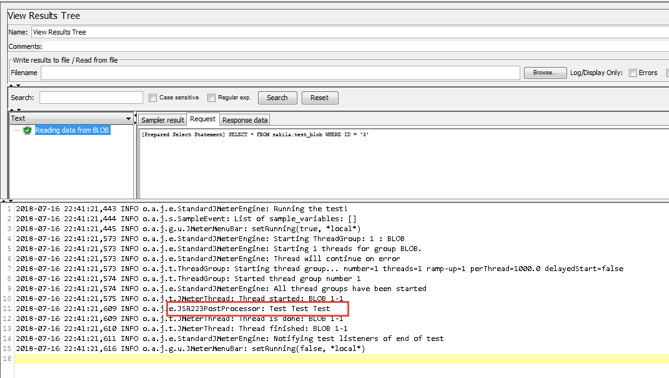
In the image above, the JMeter console displays the data that we received from the BLOB. Row 3 had the data “Test Test Test”.
Back to topNext Steps: Running Your JMeter Script in BlazeMeter
After creating your JMeter script, you can upload your JMX to BlazeMeter. Use BlazeMeter if you want to scale your test, collaborate on the test and results, share reports with managers and improve agility.