Blog
November 13, 2017
OpenID Connect - How to Load Test with JMeter

Open Source Automation,
Performance Testing
In this article we will describe how to load test one of the relatively new technologies - OpenID Connect, with Apache JMeter™. OpenID Connect is an add-on for OAuth 2.0, and it defines how OAuth 2.0 should authenticate users. We can explain it with the following expression: Authentication(OpenID) + OAuth 2.0 = OpenID Connect.
Table of Contents:
- What is OpenID Connect?
- How OpenID Works
- Implicit Flow Implementation
- Load Testing the Implicit Flow with JMeter
- Authorization Code Flow Implementation
- Load Testing the Authorization Code Flow with JMeter
- Conclusion
With the help of OpenID, some services, for example Disqus, can understand that the user who visited, is a certain Ivan from Google. At the next authentication, Disqus will be able to recognize him again and understand that this is the same Ivan from last time. OAuth also allows you to grant rights to perform actions that Disqus can execute on Google on behalf of Ivan. In this case, after authorization, Ivan does not need to carry out any actions at all. For example, Disqus will be able to independently extract files from Ivan's Google Drive.
Back to topWhat is OpenID Connect?
So, OpenID Connect is a collection of the best of OpenID and OAuth 2.0, allowing users to both identify themselves and provide services with personal information, as well as access server resources belonging to an authoritative source.
Back to top
How OpenID Works
First we need to learn a few definitions:
- OP - OpenID Provider, a server that is capable of authenticating the user and providing claims to a Relying Party (RP)
- RP - Relying Party, a client application requiring user authentication and claims from an OpenID Provider.
- Claims - part of the information about a user or organization
- Endpoint - a protected resource that, when presented with an access token by the user, authorizes access
- Token - a JSON “identity card” that contains claim
The OpenID Connect protocol, in general, follows the steps below.
- The RP (Client) sends a request to the OP (OpenID Provider).
- The OP authenticates the End-User and obtains authorization.
- The OP responds with an ID Token and usually an Access Token.
- The RP can send a request with the Access Token to the UserInfo Endpoint.
- The UserInfo Endpoint returns Claims about the End-User.
The actions during steps 1-3 may differ and depend on the authentication flow. There are 3 types of flows:
- Authorization Code Flow
- Implicit Flow
- Hybrid Flow
The Authorization Code Flow is designed for clients who can hide the implementation of authorization from the user, for example, in the backend of the application. An Implicit Flow is designed for clients who cannot, for example, a single page application written in JavaScript. A Hybrid Flow is a combination of these two types. Below we will look at each of them in more detail, and for the first two we will develop a script that will be authenticated using OIDC.
For this blog post, we will use Okta as an OP. Okta provides services for secure identity management and single sign-on to any application. As an RP, we will use the application that Okta provides to familiarize users with the flows.
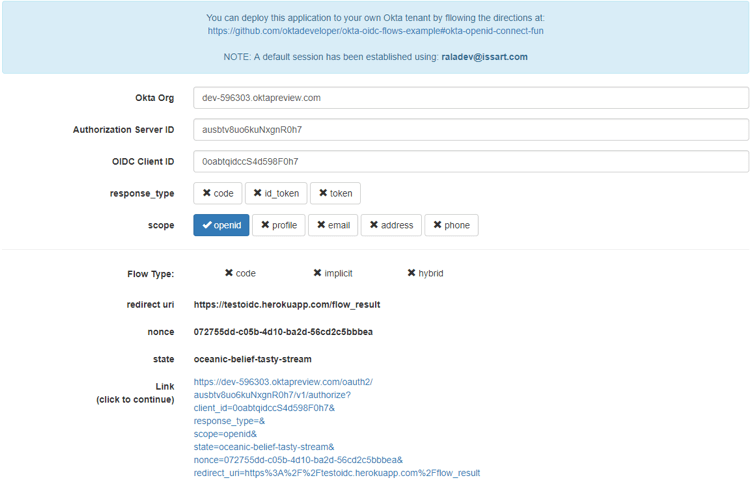
The application allows you to generate various flows by forming various authorization requests. It looks like this:
Implicit Flow Implementation
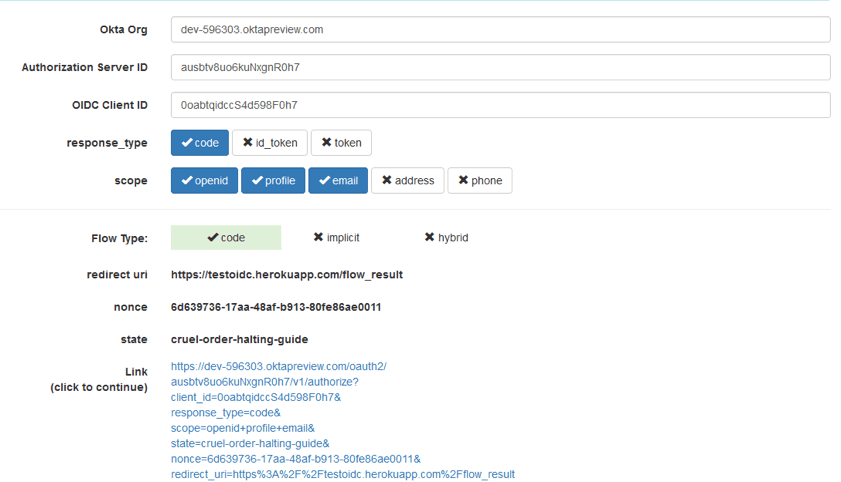
1. Let’s configure the application as follows:
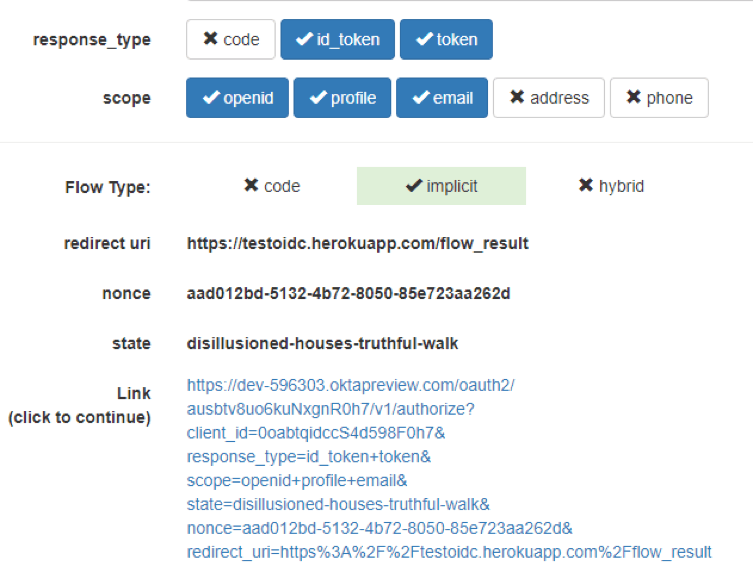
- The parameter that signals that this is an Implicit flow is the response type with the id_token and token values. The request for these parameters is typical for this particular flow. The first one is used for authentication, the second one is to get the access to EndPoints. It is not mandatory, but without it we will not be able to access protected resources.
- The scope parameter specifies the claims that we want to receive after the authorization has been successfully completed.
- The openid value is mandatory and it indicates the use of OIDC.
- All the other values are optional and can be added/deleted by the OP. In this example, we request the user's email from the OP and the profile details.
Also, as you can see in the screenshot above, the request has a few more unknown parameters.
- redirect_uri contains the address to which the OP should send its response about the result of the authorization
- nonce - the value of this parameter must return to the ID Token and it is intended to prevent the client from being attacked
- state - this parameter is also intended to prevent attacks, in this case, CSRF. It is returned with the token.
You can find a list of all the parameters used in Okta, right here. You can also see the list of parameters in the OIDC documentation.
The URL you see at the bottom of the page is the button that you often see - 'Sign in with', for example, Sign in with Google or Facebook. In our case, this is the 'Sign in with Okta' button, but without graphic design.
2. Follow this link, and an authorization window will open in a new tab in our OP.
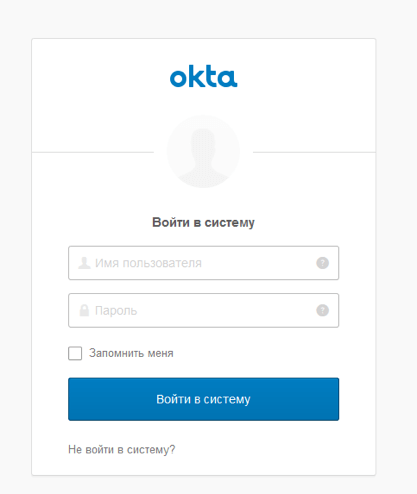
If we look at the processed requests in Chrome’s Developers Tools, we will see that after following the link, there was a redirect to the authorization page.

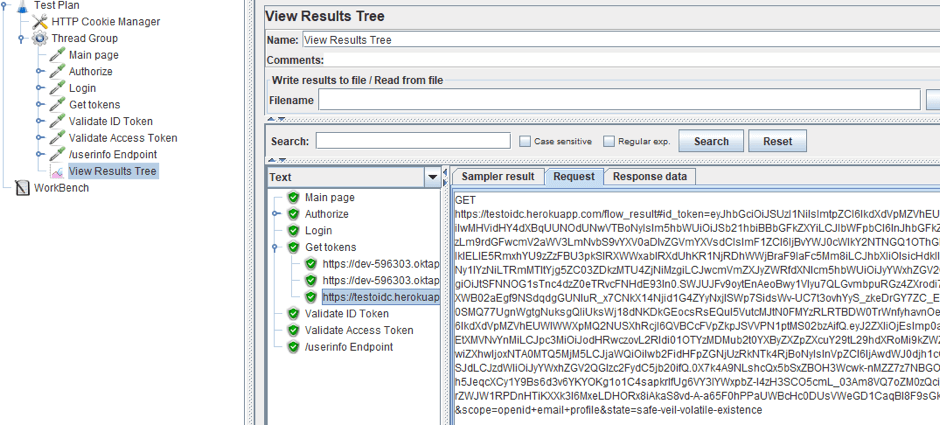
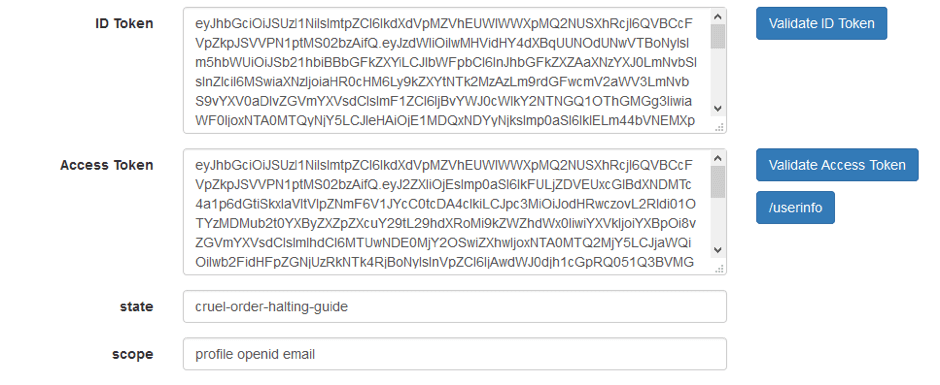
3. By putting in the username and password, we will get authorized as one of the users, who was created earlier on the OP website. After that, we return to the RP with the received data from the OP. The data is passed as parameters of the GET request. As you can see, we got the ID Token, Access Token, state, and scope.
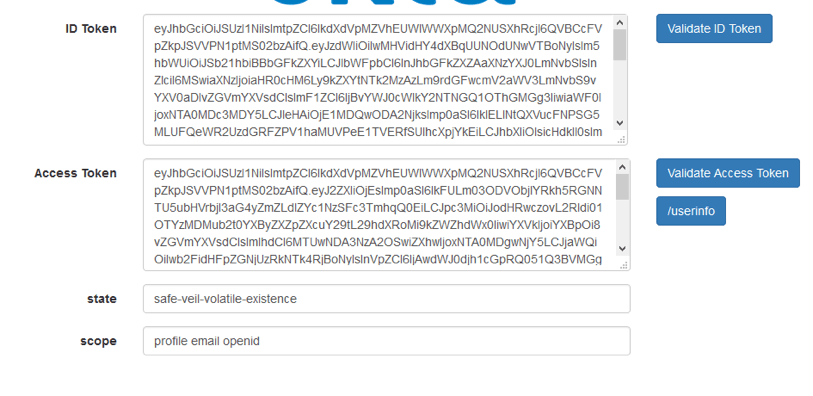
Both tokens are JWT. Therefore, the next stage of authorization is the validation of these tokens. In this application, the authorization is organized as a separate step, but it is usually invisible to the user.
4. Let’s validate both tokens.
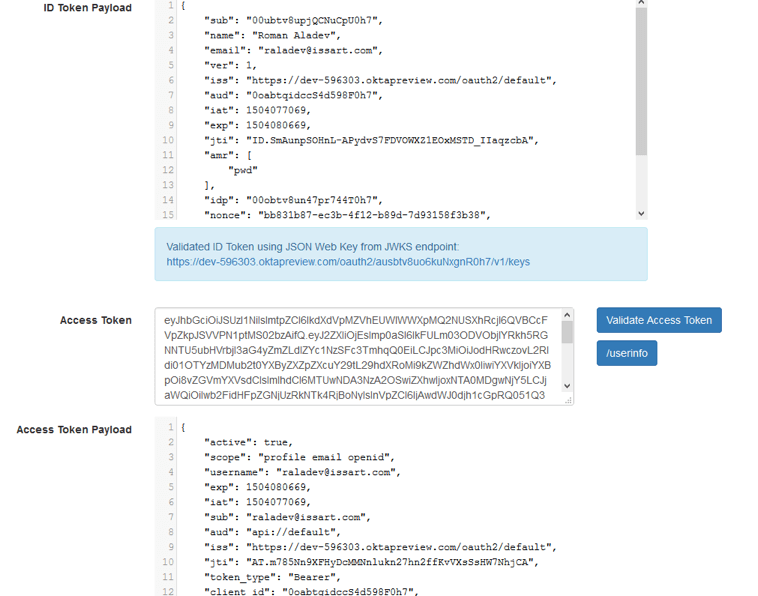
As you can see, both tokens have been decoded correctly. You can also notice that the values of the state and nonce parameters remain unchanged, which indicates the validity of the received data.
Earlier in the scope we mentioned that we needed to return the information about the profile and email to the id token. And, as you could see in the screenshot above, it is there.
5. Since we requested an Access Token, we can now access resources from different Endpoints. In our example, the UserInfo Endpoint is defined on the server. We will make a request to this resource.

If we look at the request sent, which is shown below, we will see that an Access Token is passed to the specified address as a parameter.

This is the response we got as a JSON file, with information about our user.

Now that we have covered all the OIDC steps when using Implicit flow, we will transfer all of these actions to the JMeter script.
Back to top
Load Testing the Implicit Flow with JMeter
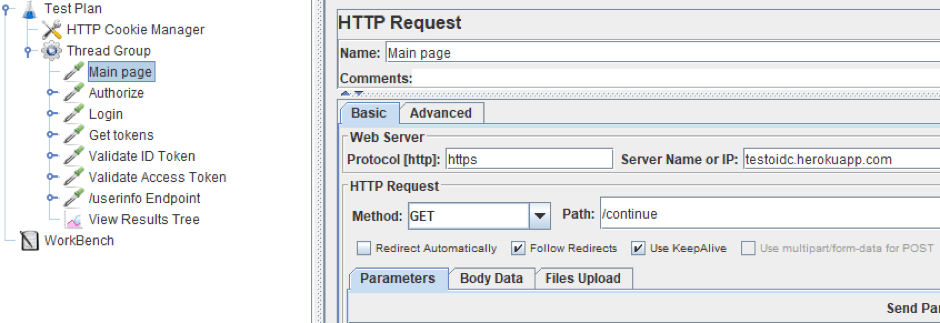
1. First, we will use the same data for requests as in the case study above. The authorization script will contain 7 HTTP Request samplers: going to the main page, clicking on the 'Login as' button, log in to the OP website, receiving tokens, token ID validation, Access token validation and access to the resource using the Access token.
The initial configuration of the script looks as follows:
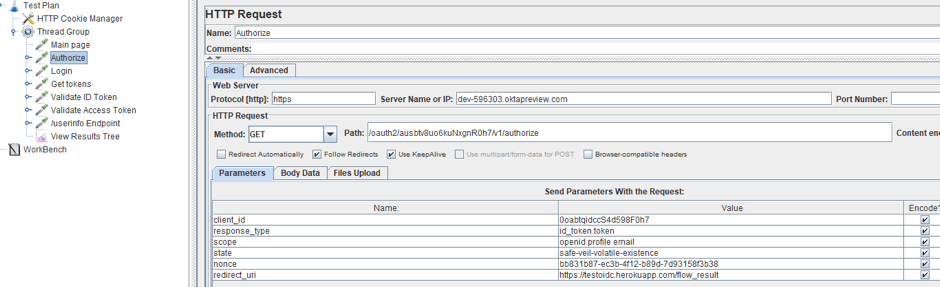
2. Going to the login page is a regular GET request with the corresponding parameters. We will take the same parameters as in the demonstration above.
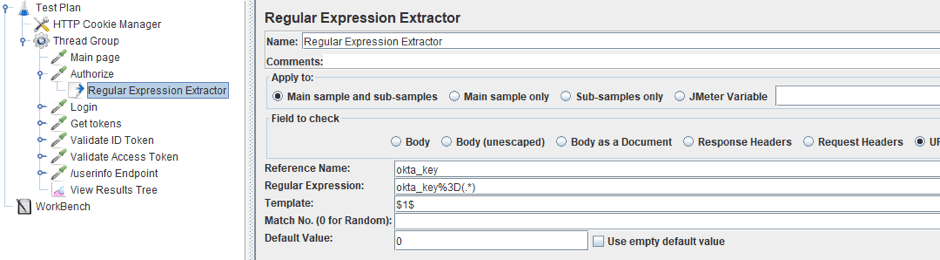
3. Add a Regex Extractor, because after going to the page, the URL will contain the key we will need to perform the request to receive both tokens.
4. The request body for authorization on the OP is JSON, as you can see in the screenshot below.
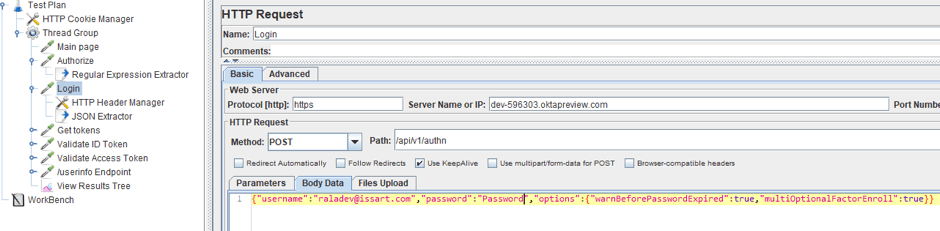
Therefore, in order for the request to be processed successfully, it is necessary to add a Header Config to the request and specify the Content-Type: json/application.

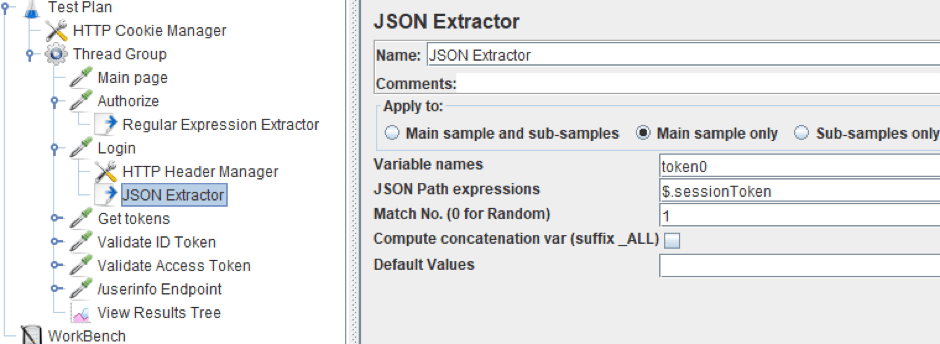
As you can see below, in response to this request, we also get JSON. It contains the sessionToken, which we need in order to get the two tokens.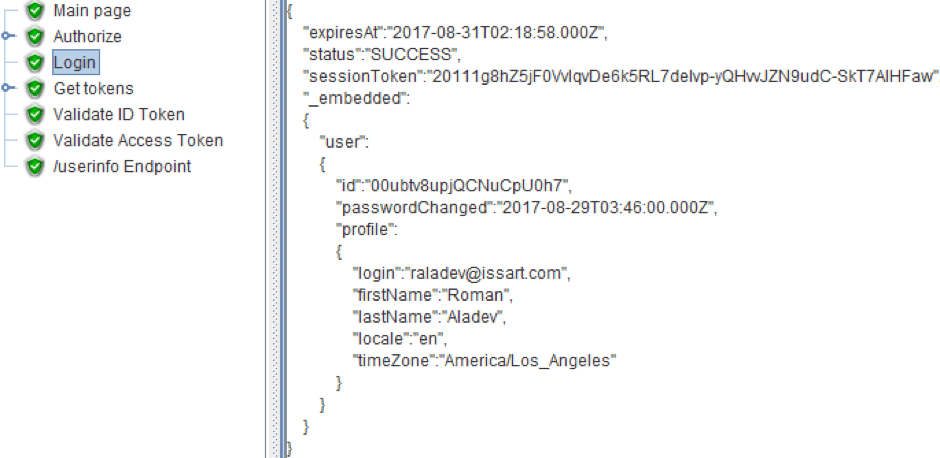
5. Extract it by using the JSON Extractor.
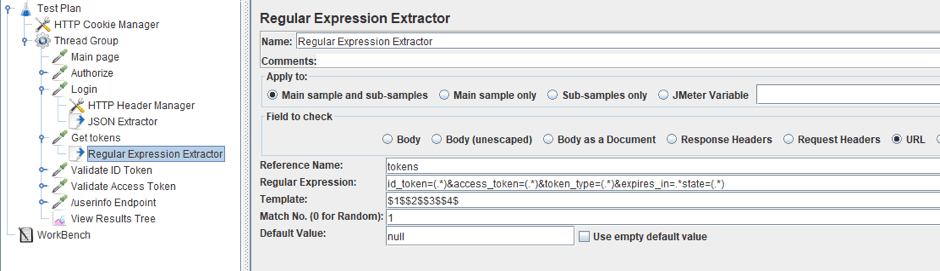
6. The request to receive tokens is a regular GET request with the appropriate parameters.
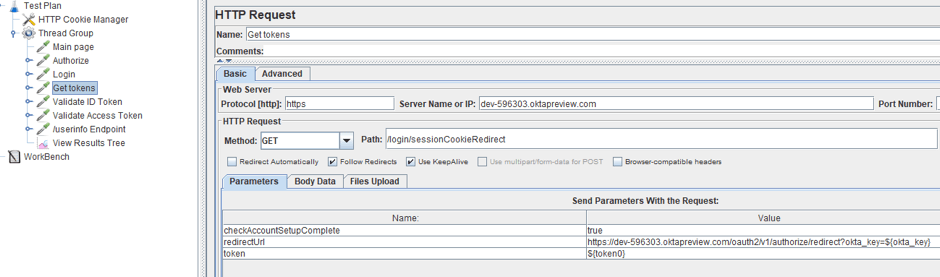
Tokens can be extracted from the URL of the sub-sample request to our resource. For example, in our case, it is the third sub-request.
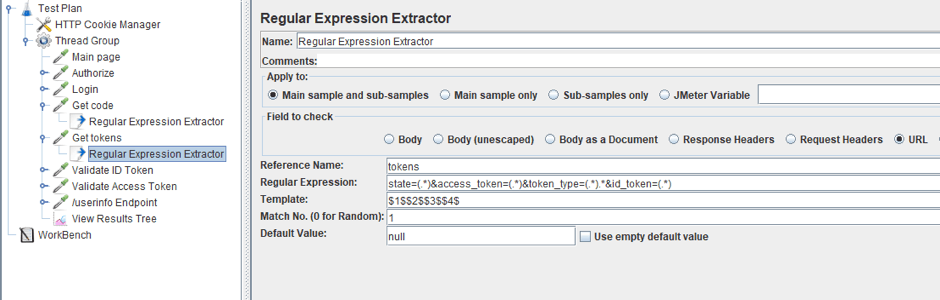
7. Extract tokens with the help of the Regex Extractor.
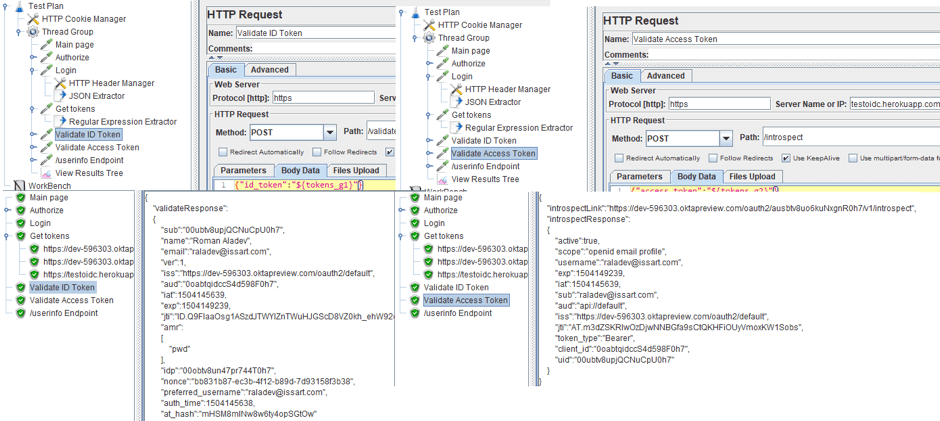
8. Send your tokens for validation. The request body and response are JSON files, as you can see in the screenshots below. The validation will look like a POST-request to a certain address with the token in the body of the request. A decrypted token or an error message will come as a response.
9. Make a request to the UserInfo Endpoint. As a parameter, we will pass the access_token as a JSON.
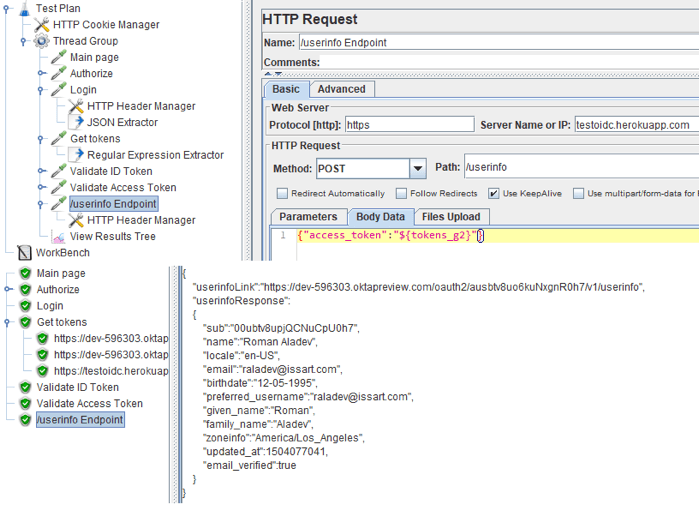
10. In response, we will also get JSON with the user information. We already have information about the user from the UserInfo Endpoint, therefore the authorization can be considered successful. If you need to get this info you can use the Regex Extractor and if you need to check the availability of certain information in the response, use the Response Assertion.
Now let's move on to the next flow implementation.
Authorization Code Flow Implementation
In this flow, we will not request the id_token or token, but a one-time authorization code, which we will then exchange for these tokens.
1. Configure the request as follows:
We will set response type as the code, thus indicating that we need the authorization code. The rest of the request does not differ from the request in the Implicit flow.
2. Follow this link, and an authorization window will open in a new tab in our OP. We authorize and we are thrown to the application window, where we see the Auth code and state.

If we look at the requests being processed, we will see how the OP performs a redirect to the RP, passing the code and state in the parameters.

3. Send a request to receive an id token and access token. We will get the same picture as in the implicit flow.
If you look at the requests, you can see we are sending 2 parameters by the POST request to /exchange_tokens, and receiving the tokens in the parameters of the get-request to our redirect_url.
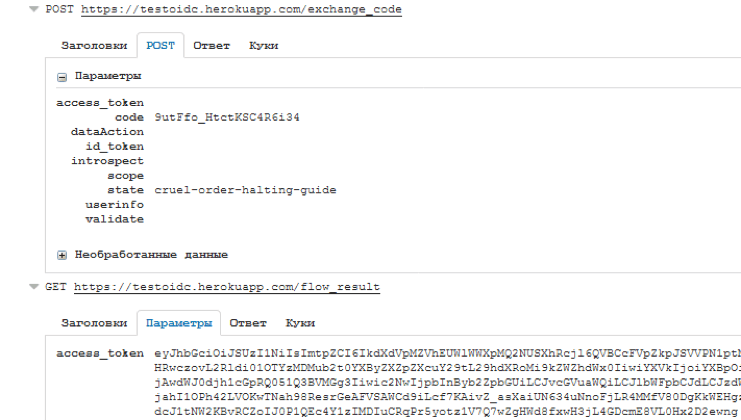
You already know which actions will follow, so let’s proceed to modifying the script for this case.
Back to top
Load Testing the Authorization Code Flow with JMeter
Since the build is similar to the previous flow, we will take the test we created and adjust it.
1. First of all, we will replace the value of the response type parameter with the code, in the sampler that is responsible for the transition to the OP page.
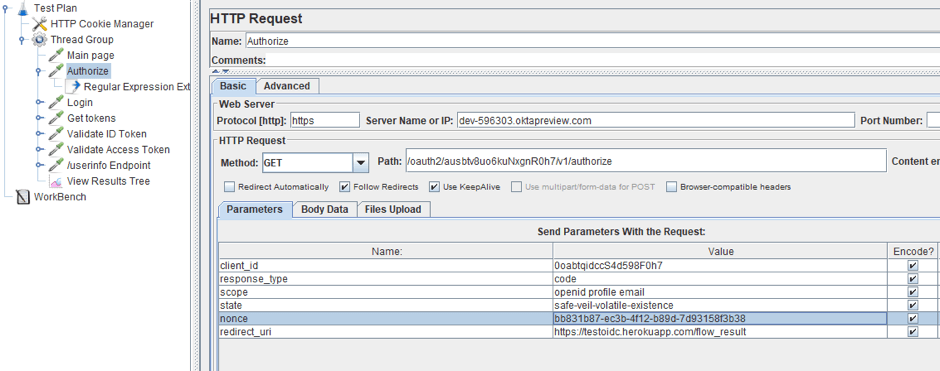
2. Where we used to get tokens, we will now get the code. Let’s change the name of the sampler and replace the regular expression to an expression that extracts the code from the page. In our case, it is “code=(.*)&state=(.*)”.

3. Now, add the HTTP Request sampler that will be responsible for getting tokens by using the code.
It is also necessary to replace the regular expression to extract the tokens, because the response structure has changed. For Okta, it looks like “state=(.*)&access_token=(.*)&token_type=(.*)&id_token=(.*)”.
4. Now you can run the script and look at the result of your work. As you can see in the screenshot below, we have successfully validated both tokens and got the information from the Endpoint.

Conclusion
In this article, we have studied passing the authorization through OpenID Connect using the example of one of the OpenId providers. Do not forget that the URL and the parameters you send may be different from those we have studied, so use the Developer Console in the browser to specify this information.
Learn more advanced JMeter from BlazeMeter University or try BlazeMeter today to experience our continuous testing platform in action.