Blog
October 11, 2020

If you have already tried Locust performance testing, then you should know it’s a really great code-based framework that provides outstanding capabilities for writing your tests in the Python scripting language. In one of our previous articles, which has a quick comparison of JMeter and Locust, we presented Locust as a wonderful tool for engineers who have some Python scripting experience.
In this article, we will demonstrate how to use Java and Kotlin for implementing your Locust performance tests. We will use the Java client but you can apply the same steps for Golang language as well because the principles are the same.
Back to topLocust Performance Testing with Custom Languages
Even if you do not use or like Python, the Locust framework gives you the option to run its custom slaves in other programming languages! If you have programming experience, you can implement your own custom client to support the custom language you are using.
It is worth mentioning that there are already two ready clients implementations that allow you to create Locust slaves using Golang and Java programming languages.
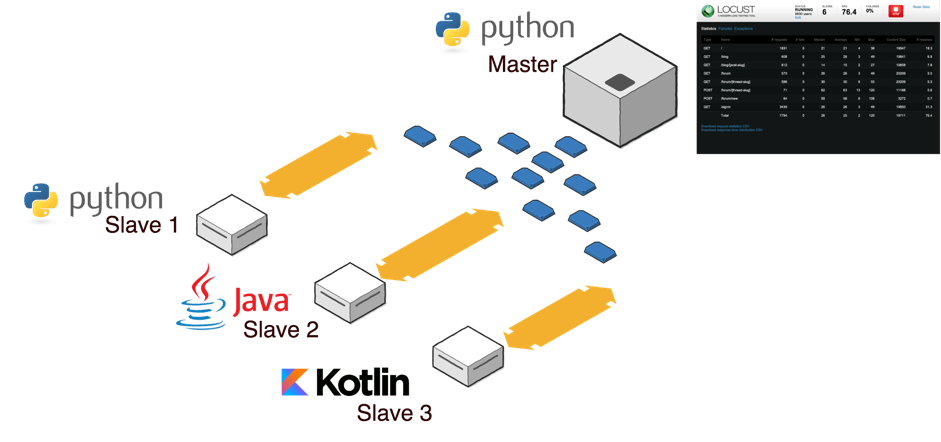
The main idea behind the approach for using a custom programming language in Locust performance tests, is that you have the Locust master service running in Python and any number of slave nodes that can be run using any programming language. Each of the Locust slaves sends the metrics to the master, which aggregates the data and runs the Locust web application, which you can use to view the metrics:
Creating a Load Test in Java for Locust
First, let's start with a project that will contain the load tests written in Java programming language. In this article, our examples will be based on API HTTP requests against the http://blazedemo.com web app. In order to make API calls we can use REST Assured, one of the best Java frameworks for API testing.
Adding Dependencies
As we need to run written tests as Locust performance scripts, we also need to have the dependency for the Locust4j Java library, which creates all the magic for the Locust integration. To download and use the mentioned libraries in our project we will use Maven. All you need is to create a Maven project in your favorite IDE and use this pom.xml file:
<?xml version="1.0" encoding="UTF-8"?>
<project xmlns="http://maven.apache.org/POM/4.0.0" xmlns:xsi="http://www.w3.org/2001/XMLSchema-instance" xsi:schemaLocation="http://maven.apache.org/POM/4.0.0 http://maven.apache.org/xsd/maven-4.0.0.xsd">
  <modelVersion>4.0.0</modelVersion>
  <groupId>com.bushnevyuri</groupId>
  <artifactId>locust-java-kotlin-performance-tests</artifactId>
  <version>1.0-SNAPSHOT</version>
  <dependencies>
    <dependency>
      <groupId>com.github.myzhan</groupId>
      <artifactId>locust4j</artifactId>
      <version>1.0.0</version>
    </dependency>
    <dependency>
      <groupId>com.jayway.restassured</groupId>
      <artifactId>rest-assured</artifactId>
      <version>2.9.0</version>
    </dependency>
  </dependencies>
  <build>
    <plugins>
      <plugin>
        <artifactId>maven-assembly-plugin</artifactId>
        <configuration>
          <archive>
            <manifest>
              <mainClass>com.bushnevyuri.Main</mainClass>
            </manifest>
          </archive>
          <descriptorRefs>
            <descriptorRef>jar-with-dependencies</descriptorRef>
          </descriptorRefs>
        </configuration>
      </plugin>
    </plugins>
  </build>
</project>
The provided pom file contains REST Assured and Locust4j dependencies, plus it contains a configuration that allows creating a Java jar file with all the dependencies packed inside. This jar file is important in order to run the project as a Locust slave, without using the IDE environment later.
Running the Locust Master
As we explained above, we need to run Locust performance testing master if we want to use custom programming languages on Locust slaves.
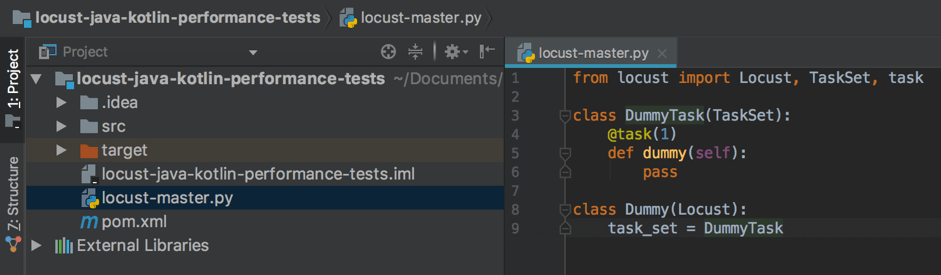
To run the Locust master, let us start by creating a simple script with a dummy task inside. We will start by creating a Python file that we can place in the root of our test project and calling it “locust-master.py”.
from locust import Locust, TaskSet, task

class DummyTask(TaskSet):
    @task(1)
    def dummy(self):
        pass

class Dummy(Locust):
    task_set = DummyTask
You can run the master service by this command:
Locust -f locust-master.py --master --master
-bind-host=127.0.0.1 --master-bind-port=5557
This command says that we are going to run the script in master mode on the local machine and the 5557 port (you can use any other free port on the machine). As a result, you should see something like this:

Now the Locust master is running and ready to get some slaves on board.
Creating the Main Class for the Locust Slave
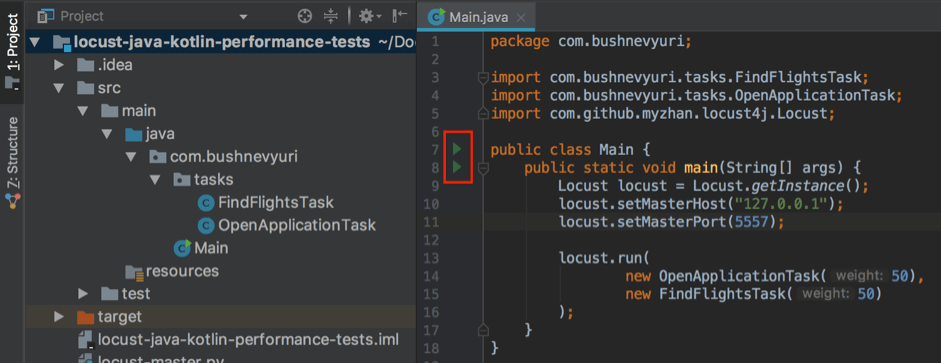
Let’s create the main class that will be used to run the Locust Java slave. The code is very simple. You just need to create the Locust object and specify which host and port are being used to run the master service:
package com.bushnevyuri;

import com.github.myzhan.locust4j.Locust;

public class Main {
    public static void main(String[] args) {
        Locust locust = Locust.getInstance();
        locust.setMasterHost("127.0.0.1");
        locust.setMasterPort(5557);
//some free port to run the Locust slavelocust.run(...........);//
        <- You custom performance tasks should be here}}
    }
}
Inside the locust.run(...) function you need to provide the list of tests that you are going to run. Let’s run a small test that just opens the http://blazedemo.com application:
package com.bushnevyuri.tasks;

import com.github.myzhan.locust4j.AbstractTask;
import com.github.myzhan.locust4j.Locust;
import com.jayway.restassured.response.Response;
import static com.jayway.restassured.RestAssured.given;

public class OpenApplicationTask extends AbstractTask {
    private int weight;

    @Override public int getWeight(){
        return weight;
        }

    @Override
    public String getName() {
        return "Open application task";
    }

    public OpenApplicationTask(intweight){
        this.weight=weight;
        }

    @Override public void execute(){
        try{
            Response response=given().get("http://blazedemo.com");
            Locust.getInstance().recordSuccess("http",getName(),response.getTime(),1);
            }
        catch(Exceptionex){
            ex.printStackTrace();
            }
        }
}
Implementing Locust Performance Tests
As you can see, Locust performance test implementation is also relatively simple. All you need to do is to extend the new class from the “AbstractTask” class located inside the Locust4j framework and override some of the functions:
- getWeight() - should return the weight of the task. This represents how often a specified task is going to be used. In other words, a task with weight 2 will run twice as often as a task with weight 1.
- getName() - should return the name of the task that we will see in the Locust monitoring and report, to identify the task.
- execute() - contains the body of the test that you should use to put your task logic inside.
In addition, we made the custom class constructor for the task to accept the task weight as an argument.. Using this approach, we can configure the weights of the implemented tasks from the main class, which contains all the tasks that are going to be executed, separated by commas.
Creating Assertions
If you need to create some assertions, you can put them inside the same execute() function that contains the main logic of the task. Let’s create one additional task that simulates a flights search between Paris and Buenos Aires. In the same task we will verify that the response code is 200, which means that request has been executed successfully:
package com.bushnevyuri.tasks;

import com.github.myzhan.locust4j.AbstractTask;
import com.github.myzhan.locust4j.Locust;
import com.jayway.restassured.response.Response;
import static com.jayway.restassured.RestAssured.given;

public classFindFlightsTask extends AbstractTask{
    private int weight;

    @Override public int getWeight(){
        return weight;
        }

    @Override public String getName(){
        return"Find flights task";
        }

    public FindFlightsTask(int weight){
        this.weight=weight;
        }

    @Override public void execute(){
        try{
            Response response=given().parameters("fromPort","Paris","toPort","Buenos Aires").when().post("http://blazedemo.com/reserve.php");
            assert response.getStatusCode()==200;
            Locust.getInstance().recordSuccess("http",getName(),response.getTime(),1);
            }
        catch(Exception ex){
            ex.printStackTrace();
            }
        }
    }
As soon as our tasks are implemented, we can specify them inside the locust.run() function separated by a comma:
package com.bushnevyuri;

import com.bushnevyuri.tasks.FindFlightsTask;
import com.bushnevyuri.tasks.OpenApplicationTask;
import com.github.myzhan.locust4j.Locust;

public class Main{public static void main(String[]args){
    Locust locust=Locust.getInstance();
    locust.setMasterHost("127.0.0.1");
    locust.setMasterPort(5557);
    //some free port to run the Locust slavelocust.run(newOpenApplicationTask(50),newFindFlightsTask(50));}}
}
Running the Locust Performance Test
After that you can run the Locust Java slave right from the IDE:
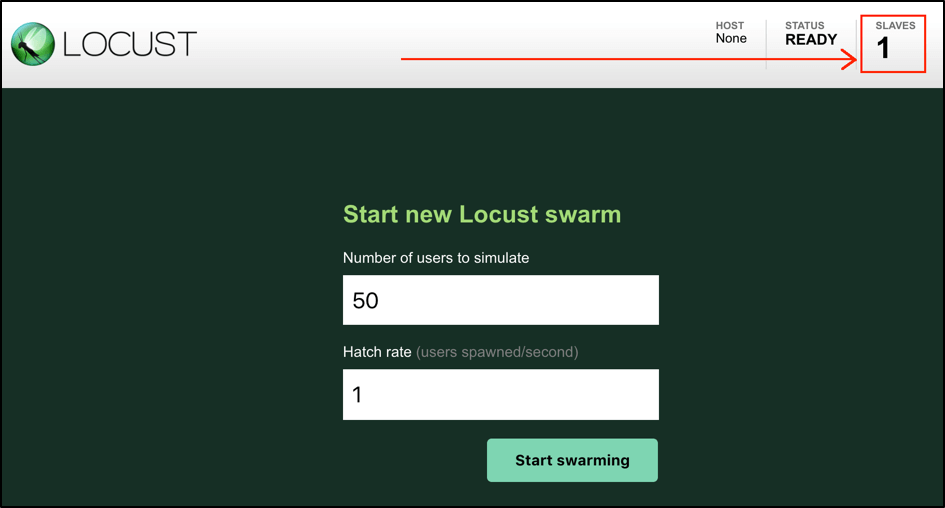
After the script has started, the master should show you the message:
[2017-12-1623:09:35,182]Yuris-MBP-2.home/INFO/locust.runners:….Currently1clientsreadytoswarm.
What if you want to run the same slave but via the console? First, you need to create the jar file with all the dependencies packed inside. If you are following our steps, you should already have the pom.xml file with the correct configuration to create the jar file. Use this command:
mvn clean compile assembly:single
After that, you can run the Locust Java slave using this command (assuming that your console is opened at the root of our test project):
Java -cp target/locust-java-kotlin-performance-tests-1.0-SNAPSHOT-jar-with-dependencies.jar com.bushnevyuri.Main
Now, if you run the locust UI (http://localhost:8089), you should see that you have one slave:
Congratulations! You are running your first Locust performance testing script written in pure Java.
Back to topCreating a Locust Performance Test in Kotlin
But what about Kotlin? As for me, I personally love Kotlin as the main language for all kinds of testing activities. It has all the benefits provided by Java but at the same time, it is much faster to write the tests because of the simplicity of syntax and different syntax sugar.
We are not going to compare these two wonderful programming languages. We will provide you with some steps explaining how you can use Kotlin instead of Java to implement Locust performance scripts.
Installing the Kotlin Runner
First, you need to install the Kotlin runner to execute the Kotlin scripts. You can easily do this by using the brew package manager:
brew install kotlin
Adding Dependencies and Plugins
<?xmlversion="1.0"encoding="UTF-8"?>
<project xmlns="http://maven.apache.org/POM/4.0.0" xmlns:xsi="http://www.w3.org/2001/XMLSchema-instance" xsi:schema Location="http://maven.apache.org/POM/4.0.0 http://maven.apache.org/xsd/maven-4.0.0.xsd">
<model>
<Version>4.0.0model</Version>
<groupId>com.bushnevyuri</groupId>
<artifactId>locust-java-kotlin-performance-tests</artifactId>
<version>1.0-SNAPSHOT</version>
<dependencies>
<dependency>
<groupId>com.github.myzhan</groupId>
<artifactId>locust4j</artifactId>
<version>1.0.0</version>
</dependency>
<dependency>
<groupId>com.jayway.restassured</groupId>
<artifactId>rest-assured</artifactId>
<version>2.9.0</version>
</dependency>
<dependencies><build><plugins><plugin><artifactId>
maven-assembly-plugin<artifactId>
…
After that, you need to create the list of updates in our pom.xml to add the Kotlin dependencies and plugins that will be used to compile the Kotlin scripts:
Converting Tests from Java
If you use the Idea IDE programming environment, then in order to create the same tests in Kotlin, all you need is to create empty files with the same names (It’s better to add a prefix like ‘Kotlin’ in order to differentiate the Kotlin tests from the existing Java tests). Then, just copy and paste the Java code inside accordingly.
The conversion from Java to Kotlin will be done automatically. This is an example of the task that finds the flights between Paris and Buenos Aires, but written on Kotlin this time:
package com.bushnevyuri.tasks

import com.github.myzhan.locust4j.AbstractTask
import com.github.myzhan.locust4j.Locust
import com.jayway.restassured.RestAssured.given

class FindFlightsKotlinTask(private val weight:Int): AbstractTask(){
    override fungetWeight():Int{
        return weight
                }
    override fungetName():String{
        return"Find flights task"
                }
    override funexecute(){
        try{
            val response=given()
                    .parameters("fromPort","Paris","toPort","Buenos Aires")
                    .`when`().post("http://blazedemo.com/reserve.php")
                    assert(response.getStatusCode()==200)
            Locust.getInstance().recordSuccess("http",getName(),response.getTime(),1)
            } catch(ex:Exception){
                ex.printStackTrace()
                }
        }
    }
As soon as all tasks and the main runner function are converted, you need to package the jar file one more time by using this command:
mvn clean compile assembly:single
Running the Locust Performance Test
After that, the Locust Kotlin slave can be run by this command:
Kotlin -cp
target/locust-java-kotlin-performance-tests-1.0-SNAPSHOT-jar-with-dependencies.jar com.bushnevyuri.KotlinMainKt
As you can see, there is nothing difficult about using Locust with other programming languages. Powerful extensibility is one of the main distinctive features of the Locust framework.
So, if you have some programming experience, you should be able to extend the Locust framework with any custom functionality, to achieve any kind of specific goals for your software performance testing suite. Couldn’t find Locust integration with your favorite programming language? You can be the person who can creates your own and shares with a grateful Locust community.
As always, you can check out the whole project based on provided snippets in the git repo.
Back to topBottom Line
That’s it! You now know how to do Locust performance testing with custom languages like Java or Kotlin.
Another way to simplify your Locust performance testing is by running your scripts with BlazeMeter. With BlazeMeter's intuitive UI, you can upload and configure your Locust scripts in minutes while also controlling factors such as:
- Threads
- Hits/second
- Arrival rates
- And more!
Try BlazeMeter to scale your Locust performance testing today.