Blog
August 3, 2021

BlazeMeter allows users to run K6-based test suites through Taurus. By tracking their test results in BlazeMeter, K6 users can identify regressions and new problems, so they can resolve performance bottlenecks before releasing a new version into production. This blog post will explain how to easily run your K6 load testing in BlazeMeter with just a few steps.
Back to topWhat is K6 Load Testing?
K6 is an open-source tool that does load and performance testing for websites, APIs, and microservices.
Developed by Grafana Labs, K6 is supported by an active user community. Organizations looking into K6 for load testing also explore other open-source solutions like JMeter and Gatling. Teams also use K6 for performance and synthetic monitoring, as well as reliability and chaos testing.
Back to topBenefits of K6 Load Testing
There are many benefits to K6 load testing. Teams opt to use K6 because it is:
- Free. Since K6 is open-source, it does not cost anything to start trying it right away.
- Developer-centric. Key to K6’s popularity is its developer-friendly APIs as part of its CLI tool. It is intuitive and simple for developers to get started with K6 right away.
- Extensible. You can use K6 load testing with other platforms, such as BlazeMeter.
Getting Started with K6 and BlazeMeter
K6 is one of many open-source load testing tools that is supported as an executor in BlazeMeter, through Taurus. The Open Source test automation framework Taurus consumes configuration files written in JSON or YAML, and it can reference K6 scripts written in JavaScript. The K6 test creation is quite similar to creating a Taurus Test, so if this is your first time executing a K6 script with BlazeMeter, I recommend reading that article for more information, too.
1. Create your K6 configuration script.
This is ours, k6_example.js. It is just a simple example of the K6 file structure that demonstrates how to open a web page. You will replace this file with one of your existing K6 scripts.
import http from 'k6/http';
import { sleep } from 'k6';

export default function () {
  http.get('https://blazedemo.com/');
  sleep(1);
}
2. Write your Taurus test in a text editor. You can learn more about Taurus testing here, or you can just use this example script with the simplest configuration as a template:
execution:
- executor: k6
  concurrency: 100
  hold-for: 1m
  scenario: simple

scenarios:
  simple:
    script: k6_example.js
Make sure to set the executor name to ‘K6’. Here I set the number of concurrent users to 100 and the test will run for one minute. You can set those two parameters to any numbers of your choice. And don’t forget to put your K6 script name (here k6_example.js) into the scenario section of the file.
3. Save this code in a YAML file, here we will save it as ‘k6_example.yml’.
4. Make sure you have both files - the Taurus test and the K6 script. These two files are necessary for the performance test run.
5. Login to BlazeMeter. You can create a free account if you don’t have one.
6. Create a new Performance Test by clicking on “Performance” -> Create Test -> Performance Test.
7. Upload both files by clicking the “+” sign to upload your script and any additional test files. You can also drag the files over to the Upload Script box.
Note that when you are running a Taurus test, you must configure the Load Configuration and Load Distribution options directly via the YAML, not via the UI. Otherwise, you may notice that these options disappear from the UI.
It is also important to keep in mind that Taurus uses different terminology for certain settings. For example, the Hold-for setting in a Taurus YAML is the same thing as the Duration setting in the Load Configuration section of BlazeMeter UI.
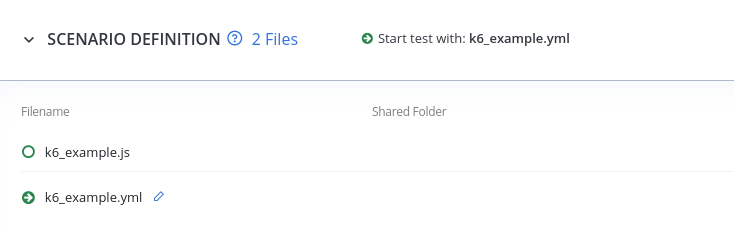
8. After the files are uploaded, the ‘Scenario Definition’ section should look like this:
9. Click 'Run Test' on the left side and wait for it to finish.
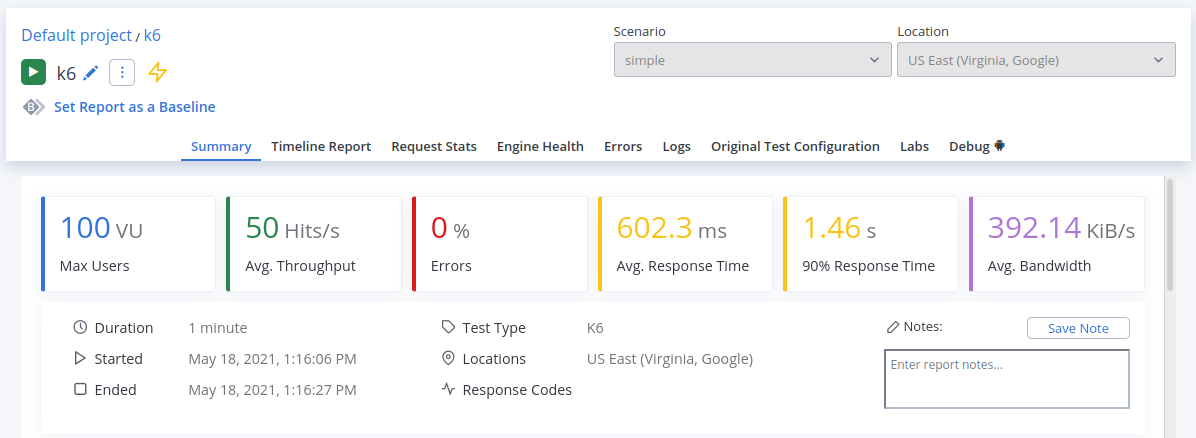
10. After the test is done, you will see results in the table form that are similar to the following screenshot:
Managing Labels in BlazeMeter for K6 Tests
When running K6 tests in BlazeMeter, every unique request generates a corresponding label in the Performance Report's Request Stats. To ensure optimal performance and readability, it's essential to minimize the number of labels created. Although BlazeMeter supports hundreds of labels, exceeding 300 will lead to labels being combined into a single Aggregated Label. Additionally, generating excessive labels can consume significant memory from the Test Engine, potentially leading to test failures.
Best Practices for Grouping Labels
K6 offers built-in functionality, supported by BlazeMeter, to group requests using "tags," specifically the `name` tag. This allows you to customize label names and combine similar requests.
Group URLs using a tags: {name: 'value'}
```javascript
import http from 'k6/http';

export default function () {
    for (let id = 1; id <= 100; id++) {
        http.get(`http://example.com/posts/${id}`, {
            tags: { name: 'PostsItemURL' },
        });
    }
}
In this example, instead of creating 100 labels due to varying URL parameters, all requests are grouped under the label `PostsItemURL`.
Alternative: Grouping URLs using the `http.url()` function
The `http.url()` function can obfuscate parameterized values, keeping them in raw string format. For instance:
```javascript
http.get(http.url`http://example.com/posts/${id}`);
This approach consolidates all requests under a single label like `http://example.com/posts/${id}`, without using the parameterized `id` values.
Learn more on URL grouping here.
Back to topBottom Line
That’s it! You now know how to run K6 load testing in BlazeMeter.
This tutorial showcases one of the many ways that BlazeMeter offers unparalleled load testing capabilities. Scale your load testing by simulating thousands or millions of virtual users from across the globe through your preferred cloud provider. Plus, use BlazeMeter’s Dockerized private agents to drive load from behind your firewall.
See Load Testing in Action
Whether you are looking for scriptless or code-based load testing, BlazeMeter is the platform for your team. Get started with BlazeMeter today.