Blog
March 11, 2021

This blog post will take you through a step-by-step guide demonstrating how to run a JUnit Selenium test with. JUnit has proven itself as a light-weight and “easy to start” testing framework that helps you to prepare, execute and verify your tests in fast and reliable manner.
When used with Selenium, JUnit provides tools to start and manage Selenium WebDriver. WebDriver is an interface that enables interacting with a web browser in a user-friendly manner, like clicking on buttons, entering text into fields, etc. To learn more about WebDriver you can refer to the official page. To learn how to integrate WebDriver into your Continuous Testing process check out this blog post “How to Automate Testing Using Selenium WebDriver, Jenkins and Allure“.
With JUnit, you can manage user sessions and assert expectations and conditions, which together allow you to run comprehensive UI tests with Selenium.
Back to topHow to Run a Selenium JUnit Test
Prerequisites
To create a test with the JUnit framework we will need the following:
- Maven as a build tool. To download, follow this link. Maven is a project management tool that helps you build your project and manage documentation and resources. In terms of this blog we will use Maven to compile the Java code, download libraries like JUnit and Selenium and run tests.
- Java version 1.8 or above. You can download it from the official site.
To make development easier, code will be developed with the usage of IntelliJ IDEA IDE. You can download it from the website. However, you can use any other IDE of your choice. Code snippets can be easily migrated to any platform.
Creating a Project in Intellij IDEA
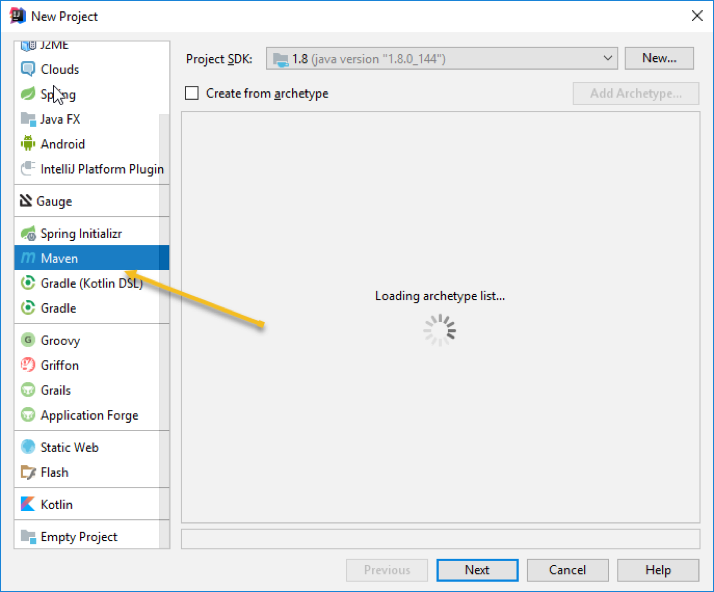
To create a project in Intellij IDEA select: File -> New -> Project. Select maven. Click on Next.
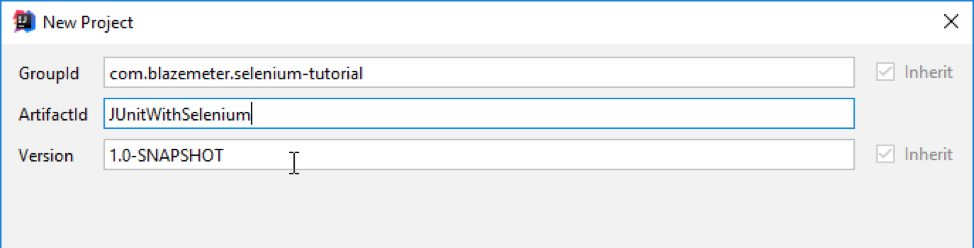
In the next step, specify a unique group id (consider a group as a tree of folders for your project), an artifactId (project name) and version.
Now we have a created project with the following structure:
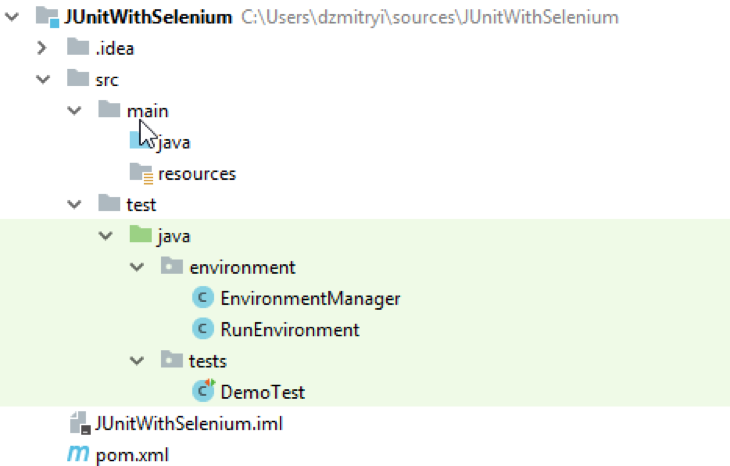
In the src/test/java/environment package there are 2 classes: the EnvironmentManager class is designed to initialize and shut down WebDriver, and the purpose of the RunEnvironment class is to keep the WebDriver instance and control access to it.
The package test/java/tests includes a single class DemoTest that includes a test method to verify the homepage of blazemeter.com.
pom.xml is the configuration file of the project and includes sections for declaring project dependencies. Selenium dependency:
<dependency>
    <groupId>org.seleniumhq.seleniumgroupId>
    <artifactId>selenium-javaartifactId>
    <version>3.9.0version>
dependency>
Also, we need to add a JUnit dependency. However there is one additional point here: there are two major versions of JUnit - 3 or 4 (similar versions), and 5. Depending on the version, the way dependencies are loaded and tests are executed differs. Later on in the blog we will come back to this point but for now let’s take a closer look at how to initialize and shut down a web driver.
Initializing Selenium
In this blog post we are going to run our demo test in the Chrome browser. In order to run a test in Chrome browser you need to download ChromeDriver executable from the official website.
Once downloaded, the ChromeDriver location (absolute path) should be added to your PATH environment variable. This can be done either programmatically or via OS tools. We will do it programmatically as shown in the code snippet below from test/java/environment/EnvironmentManager.
public static void initWebDriver() {
    System.setProperty("webdriver.chrome.driver", "C:/chromedriver.exe");
    WebDriver driver = new ChromeDriver();
    RunEnvironment.setWebDriver(driver);
}
Note: if you are using a Unix-based OS system, the path to chromedriver will be different!
And to shut down a webdriver:
public static void shutDownDriver() {
    RunEnvironment.getWebDriver().quit();
}
Once we are done with developing a code for WebDriver instance manipulation, we are ready to create our first test in JUnit.
import environment.EnvironmentManager;
import environment.RunEnvironment;
import org.junit.After;
import org.junit.Before;
import org.junit.Test;
import org.openqa.selenium.By;
import org.openqa.selenium.WebDriver;
import static org.junit.Assert.assertEquals;

public class DemoTest {

    @Before
    public void startBrowser() {
        EnvironmentManager.initWebDriver();
    }

    @Test
    public void demo() {
        WebDriver driver = RunEnvironment.getWebDriver();
        driver.get("https://www.blazemeter.com/selenium");
        String homeUrl = driver.findElement(By.cssSelector("div#logo> a#logo_image ")).getAttribute("href");
        assertEquals(homeUrl, "https://www.blazemeter.com/");
    }

    @After
    public void tearDown() {
        EnvironmentManager.shutDownDriver();
    }
}
To identify that a method is a test, the annotation @Test is used. To start WebDriver with Chrome before the tests start, the method startBrowser() was marked with the @Before annotation, which ensures this method is executed before each test. The method tearDown() annotated with @After will be executed after every test. The test will throw an AssertionError if the link to the homepage doesn’t equal to https://www.blazemeter.com/.
Executing Tests
Now it’s time to define the correct dependencies and the way tests are executed for the different versions of JUnit.
For JUnit 4
You can find the complete code repository here on GitHub.
Declare the dependency in pom.xml under tag:
<dependency>
    <groupId>junitgroupId>
    <artifactId>junitartifactId>
    <version>4.11version>
    <scope>testscope>
dependency>
To run a single test, execute a command via the command line:
‘mvn -Dtest=DemoTest test’.
To run all the tests in a batch, execute ‘mvn test’ in the command prompt. Please note that all the test classes you would like to run should be prefixed with *Test in this case, like the DemoTest class (if the class name had the name Demo, it would not be executed by maven).
You can see the results of the execution as a console output:
-------------------------------------------------------
 T E S T S
-------------------------------------------------------
Running tests.DemoTest
Starting ChromeDriver 2.34.522940 (1a76f96f66e3ca7b8e57d503b4dd3bccfba87af1) on port 22656
Only local connections are allowed.
org.openqa.selenium.remote.ProtocolHandshake createSession
INFO: Detected dialect: OSS
Tests run: 1, Failures: 0, Errors: 0, Skipped: 0, Time elapsed: 13.167 sec
Results :
Tests run: 1, Failures: 0, Errors: 0, Skipped: 0
JUnit doesn’t have built-in reporting tool. If you want to view results of tests in a html report you need to add reporting section to your pom.xml
<reporting>
    <plugins>
        <plugin>
            <groupId>org.apache.maven.pluginsgroupId>
            <artifactId>maven-surefire-report-pluginartifactId>
            <version>2.20.1version>
        plugin>
    plugins>
reporting>
This will produce an xml report in your build output directory in the surefire-reports directory. The XML format is not user-friendly so instead you can execute your tests with the ‘mvn surefire-report:report’ command. This will run your tests and generate an HTML report in the site directory of your build output directory.

For JUnit5
You can find the complete code repository here on GitHub.
Instead of the JUnit 4 dependency, declare the following dependency in pom.xml under the tag:
<dependency>
    <groupId>org.junit.jupitergroupId>
    <artifactId>junit-jupiter-apiartifactId>
    <version>5.0.1version>
    <scope>testscope>
dependency>
To execute a JUnit5 test, the maven-surefire-plugin needs to be configured with the dependency to junit-jupiter-engine:
<plugin>
<groupId>org.apache.maven.pluginsgroupId>
<artifactId>maven-surefire-pluginartifactId>
<version>2.19.1version>
    <dependencies>
        <dependency>
            <groupId>org.junit.jupitergroupId>
            <artifactId>junit-jupiter-engineartifactId>
            <version>5.0.1version>
        dependency>
    dependencies>
plugin>
Also a few modifications need to be made to the test class:
import org.junit.jupiter.api.AfterEach; //has been changed from org.junit.After

import org.junit.jupiter.api.BeforeEach; //has been changed from org.junit.Before

import org.junit.jupiter.api.Test; //has been changed from org.junit.Test

import static org.junit.jupiter.api.Assertions.assertEquals; //has been changed from org.junit.Assert.assertEquals;

import org.openqa.selenium.By;
import org.openqa.selenium.WebDriver;

public class DemoTest {

    @BeforeEach //has been changed from @Before
    public void startBrowser() {
        EnvironmentManager.initWebDriver();
    }

    @Test
    public void demo() {
        WebDriver driver = RunEnvironment.getWebDriver();
        driver.get("https://www.blazemeter.com/selenium");
        String homeUrl = driver.findElement(By.cssSelector("div#logo> a#logo_image ")).getAttribute("href");
        assertEquals(homeUrl, "https://www.blazemeter.com/");
    }

    @AfterEach //has been changed from @After
    public void tearDown() {
        EnvironmentManager.shutDownDriver();
    }
}
To generate a html report as we did for Junit4, we need to add additional dependency to maven-surefire-plugin:
<dependency>
    <groupId>org.junit.platformgroupId>
    <artifactId>junit-platform-surefire-providerartifactId>
    <version>1.0.1version>
dependency>
So, the complete plugin configuration will look like this:
<plugin>
<groupId>org.apache.maven.pluginsgroupId>
<artifactId>maven-surefire-pluginartifactId>
<version>2.19.1version>
    <dependencies>
        <dependency>
            <groupId>org.junit.jupitergroupId>
            <artifactId>junit-jupiter-engineartifactId>
            <version>5.0.1version>
        dependency>
        <dependency>
            <groupId>org.junit.platformgroupId>
            <artifactId>junit-platform-surefire-providerartifactId>
            <version>1.0.1version>
        dependency>
    dependencies>
plugin>
Following this guide, you can create and execute tests in the JUnit framework with Selenium and maven. JUnit also is a good choice if you need to run parameterized tests, dynamic tests (whose behavior differs on different conditions) and make assumptions on conditions.
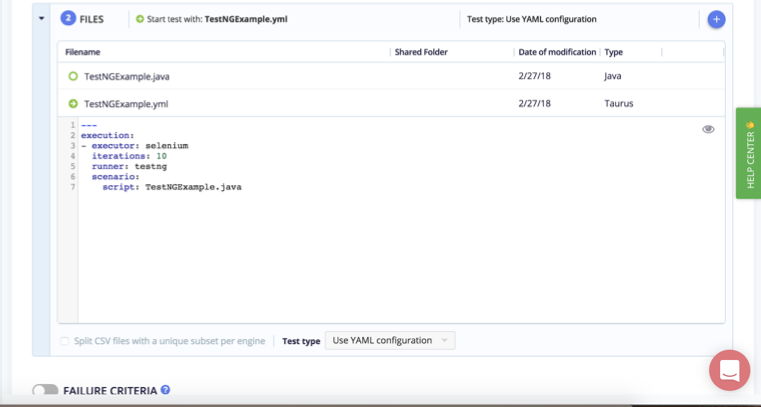
You can also skip all these steps and upload your functional test script (in java and yaml) to BlazeMeter, and easily run it.