Blog
March 30, 2020

What is OCSP? And how do you test OCSP? Find out in this blog!
What is OCSP?
OCSP, or the Online Certificate Status Protocol, is a protocol for obtaining the X.509 certificate revocation status. Over this protocol, the Certification Authority (CA) is inquired about the provided certificate status.
Reasons for revocation include certificate expiry time or when the private key of the CA or the CA itself has been compromised. OCSP is an application level protocol that gets the certificate revocation status in one of three states: good, revoked, or unknown.
Back to topWhat Are X.509 Certificates?
X.509 certificates are part of the public key infrastructure that has components and policies for creation, storage and management of digital certificates. Connected to the TLS protocol, they are proven technologies in the security architecture.
The X.509 certificate has two principal purposes. First, it is a container of the public key that can be used for control or validation of the end subject, such as the web service. Besides the public key, the certificate contains other attributes, such as information about the issuer, certificate serial number, validity period and information about the certificate subject.
Second, the X.509 certificate is signed with the digital signature of the CA, which serves as a confirmation that a public key, transferred with the certificate, is the public key of this certificate subject. Information about the signature and the signature algorithm is conveyed in the certificate as well. The specification of the X.509 certificate is described in RFC 5280 standard, that determines certificate format and requirements for the public key infrastructure that manages X.509 certificates.
Who Uses X.509 Certificates?
Public Key Infrastructure (PKI) is complex and may include a number of CAs of a certain hierarchy, responsible for creating and managing the certificates. They may service a lot of clients that use certificates to establish connection and sometimes to encode traffic to network resources.
For instance, corporate systems, billing systems and e-banking systems might all use X.509 certificates for security assurance, and one may consider that a flow of OCSP requests from servers or clients for the discovery of the certificates’ statuses can represent a significant load for a CA.
Back to topHow OCSP Handles PKI Loads
To take off the excessive load from the CA, the PKI has a designated server that provides the certificate status to the OCSP requests, called the OCSP responder. Since OCSP requests may represent a significant load either for the CA or for the OCSP responder, the performance testing has to be conducted against them.
The OCSP protocol works per request-response basis, and uses the HTTP protocol as transport. A client or server generates the OCSP request and sends it to the server, responsible for processing such requests. The latter receives this request, checks the certificate status, generates the OCSP response and transmits it back to the requested party. According to the RFC 6960 that describes OCSP, the OCSP requests are transmitted in the encoded form in the body of the POST HTTP request. The OCSP responses are transmitted in the body of the corresponding HTTP response and have to be digitally signed.
The structure of the OCSP request is simple. It consists of the protocol version number, type of requested service, one or a few certificates identificators and several extended parameters. The latter may include the hash codes of the name and the open key of the certificate issuer and the certificate serial number. The OCSP request is composed in the ASN.1 notation and DER encoded, before it is placed in the body of the HTTP request.
The OCSP response consists of the certificate identificator, certificate status - good, revoked or unknown, validity period and other optional parameters. It’s DER encoded and written in the ASN.1 notation as well.
Back to topHow Do You Test For OCSP?
The best way to test for OCSP is to use JMeter. Here's how to test for OCSP in nine simple steps:
- Create Certificates
- Download the Public Key Infrastructure
- Add a Thread Group
- Add a CSV Data Set Config
- Add a HTTP Request
- Add the HTTP Header Manager
- Add a BeanShell PreProcessor
- Add the BeanShell Assertion
- Scale the Script
JMeter can load test OCSP responders or services responsible for providing certificate statuses, by checking the status of X.509 certificates. The JMeter script takes each certificate according to the provided path in the script, forms OCSP requests and turns them into HTTP requests that are directed to the OCSP responder. The responses are then decoded and analyzed.
The straight way for the script implementation is to use the BeanShell preprocessor with the HTTP sampler to compose a OCSP request and encode it. The BeanShell code has to form the ASN.1 notation of the OCSP request and encode it. The composition of the request is done with the help of the third party java library Bouncy castle, that is an open project.
Here’s how to do it:
1. Create Certificates
First, create the certificates that will be used in tests, even before the implementation of the script. These certificates have to be created in the certification authority (CA) of the tested environment. I used PEM certificates.
2. Download the Public Key Infrastructure
Download the public key infrastructure and provider package files from the resource and place them to the ‘/lib’ JMeter installation directory. As the certificate files are required to conduct the test, it’s necessary to provide a path to the certificate files, that will be used in the script.
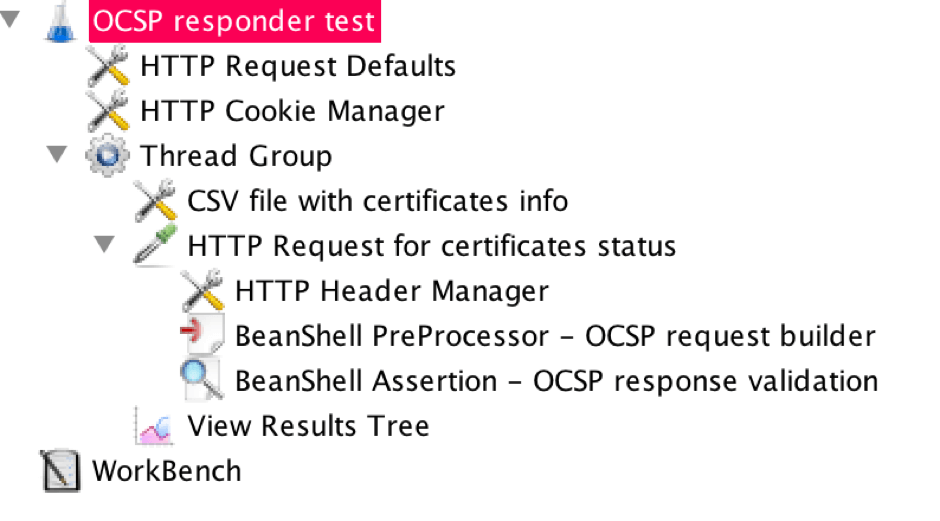
3. Add a Thread Group
Go to JMeter.
Right click -> Add -> Threads -> Thread group
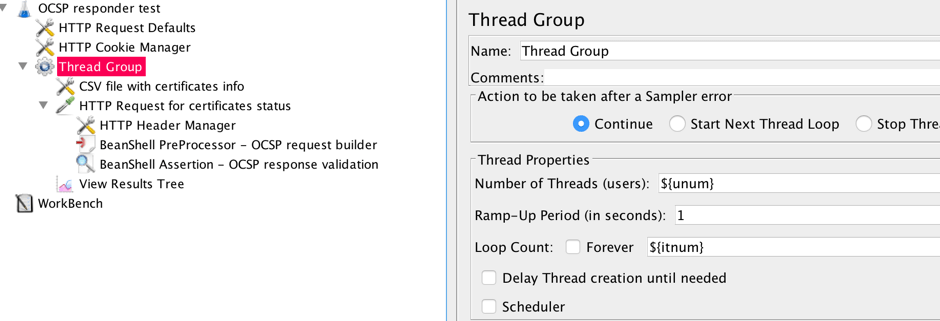
4. Add a CSV Data Set Config
Add a CSV data set config element under the thread group: On the Thread Group right click -> Add -> Config Element -> CSV Data Config.
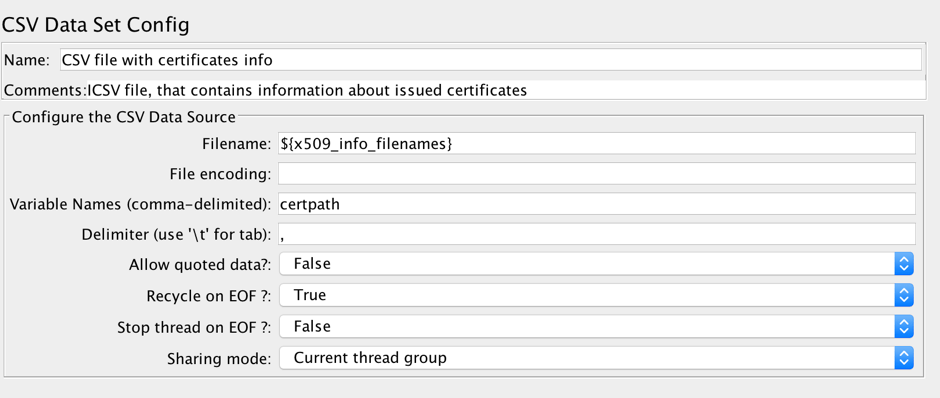
In the filename field of this element, provide the path to the CSV file that contains a list of paths to the certificate files that will be used in the test. The usage of the CSV configuration element will allow you to use different certificates in each request and scale up the script later.
5. Add a HTTP Request
Add a HTTP Request under the thread group: On the Thread Group right click -> Add -> Sampler -> HTTP Request.
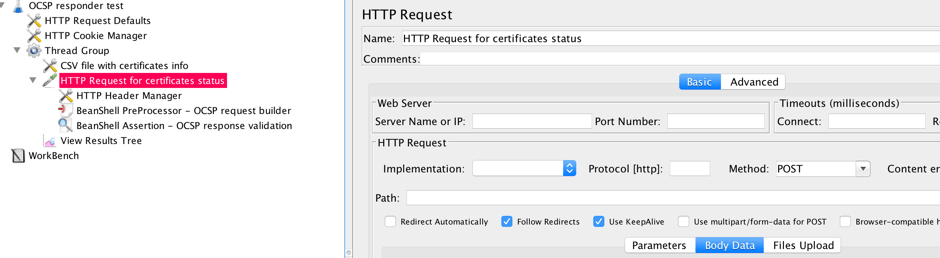
This sampler will convey the OCSP request to the OCSP responder. The URL of the responder is defined in the variable section of the script. As it has already been said, the HTTP request method is POST. The body of the HTTP request is the byte sequence, that represents OCSP request and this byte sequence is formed with the BeanShell preprocessor.
6. Add the HTTP Header Manager
Add the HTTP Header Manager config element as a child to the HTTP request. Right click on the HTTP Request -> Config Element -> HTTP Header Manager

Add two values, as shown in the screenshot below: Content-Type; application/ocsp-request and Accept; application/ocsp-response.
7. Add a BeanShell PreProcessor
Add a BeanShell PreProcessor as a child element to the HTTP request. Right click on the HTTP Request -> Add -> PreProcessors -> BeanShell PreProcessor
The PreProcessor script is:
import java.io.*;
import java.math.BigInteger;
import java.util.*;
import org.bouncycastle.cert.*;
import org.bouncycastle.cert.ocsp.CertificateID;
import org.bouncycastle.cert.ocsp.OCSPReq;
import org.bouncycastle.cert.ocsp.OCSPReqBuilder;
import org.bouncycastle.asn1.*;
import org.bouncycastle.openssl.*;
import org.bouncycastle.openssl.PEMParser;
import org.bouncycastle.util.io.pem.*;
import org.bouncycastle.pkcs.*;
import org.bouncycastle.operator.DigestCalculatorProvider;
import org.bouncycastle.operator.jcajce.JcaDigestCalculatorProviderBuilder;


	String BC = "${securityProvider}";
	String fName = "${certpath}";

	Reader fR = new BufferedReader(new FileReader(fName));
	PEMParser pPar = new PEMParser(fR);

	X509CertificateHolder obj = (X509CertificateHolder)pPar.readObject();

	DigestCalculatorProvider dCP = new JcaDigestCalculatorProviderBuilder().setProvider(BC).build();

	CertificateID cId = new CertificateID(dCP.get(CertificateID.HASH_SHA1), obj, obj.getSerialNumber());

	OCSPReqBuilder oRB = new OCSPReqBuilder();
	oRB.addRequest(cId);
	OCSPReq oReq = oRB.build();

	byte[] asn1seq = oReq.getEncoded();

	String sb = new String(asn1seq);

	sampler.getArguments().getArgument(0).setValue(sb);
As shown in the screenshot below:
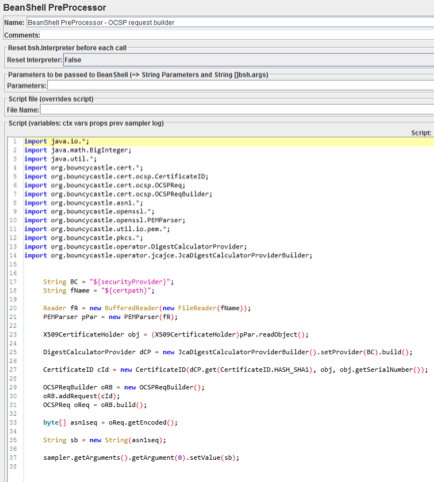
It’s necessary to add import directives to include classes of the downloaded Bouncy castle packages and the java security provider class in the PreProcessor BeanShell code.
At the first step the certificate file is read and represented as ‘X509CertificateHolder’ object. This object, the default java security provider and the checked certificate serial number are parameters of the method of the ‘OCSPRequestBuilder’ object, that forms the OCSP request. The ‘build’ method of this instance constructs the OCSP request object. The ‘encode’ method of the OCSP request object forms the ANS.1 DER encoded byte array. The encoded bytes are added to the body of the HTTP sampler in the last two strings of the preprocessor.
The response of the HTTP request contains the OCSP response about the certificate status. Besides the certificate status, the OCSP response itself contains the information as to whether the OCSP request is built correctly and can be serviced at all. In order to verify the OCSP response, it has to be parsed, and the status code has to be extracted and verified. This can be done with the BeanShell assertion element.
8. Add the BeanShell Assertion
Add the BeanShell assertion as a child element to the HTTP sampler. Right click on the HTTP Request -> Assertions -> BeanShell Assertion
The assertion script is:
import java.io.*;
import org.apache.jmeter.threads.JMeterContext;
import org.apache.jmeter.protocol.http.Sampler.HTTPSamplerProxy;
import org.apache.jmeter.samplers.SampleResult;
import org.bouncycastle.cert.*;
import org.bouncycastle.cert.ocsp.OCSPResp;


	SampleResult sR = ctx.getPreviousResult();
	byte[] instream = sR.getResponseData();

	OCSPResp oResp = new OCSPResp(instream);

	Failure = false;

	if(oResp.getStatus() !=0){
		Failure = true;
	}
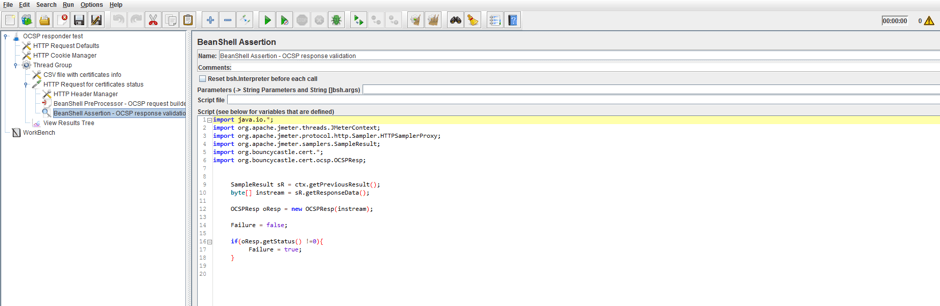
The same Bouncy castle library is used here. The steps are the following: we have to extract the body of the HTTP response, extract the OCSP response status and assert against it. At the first approximation, we can stop at this step and don’t extract the certificate status itself.
9. Scale the Script
Now all you need to do it to scale the script up to the required amount of threads.
Congratulations! The script is ready. As you can see it is not a long or complicated JMeter script.
The way to build the script for testing OCSP responders demonstrated above is not the only one. There are other ways to complete this task. For example, the OCSP request may be generated in OS process sampler, by calling openssl application, passing to it parameters, such as the certificate path and OCSP responder URI. The response of this request can be parsed and asserted in the BeanShell assertion, attached as a child element to this sampler. In order to do it, the openssl package has to be installed on the workstation or instance with the JMeter.
You are welcome to ask questions in the comments section below. Click here to request a demo and learn more about using BlazeMeter for complex load testing scenarios.