Blog
January 6, 2021

A good GUI (graphical user interface) automated test simulates the actions of a manual tester. In such a test, the automated test interacts with the buttons, text fields, and other elements in the same way as a manual user would do, to follow the real scenario.
In this blog post, we are going to talk about how to create an automated Selenium UI test with WebDriver, combining the Java programming language, the executable WebDriver and the selectors we need to interact with on the web page. We will extract the selectors by inspecting the DOM (Document Object Model) for HTML and CSS attributes. In order to validate the results, we will use TestNG as the framework and make the assertions to compare the actual result with the expected result.
Configuring Your Selenium UI Testing Environment
Let’s get started. You can follow the example here from these links on GitHub: SeleniumWebDriverProject, AssignmentQAPets.
1. Install Your Favorite IDE
Choose your favorite IDE (mine is IntelliJ IDEA) for writing code.
2. Create a New Maven/Gradle Project
If you are familiar with Java, building a Maven or Gradle project is pretty straightforward. Learn more from here: Maven, Gradle.
3. Download the Correct WebDriver
When running a Selenium UI test, one has to decide on which browser to test, as each browser behaves differently. To test the web page on a browser, a WebDriver has to be downloaded. The most popular browsers are Chrome and Firefox, whose WebDrivers are ChromeDriver and geckodriver, respectively. Each web driver can also be found here on Selenium.
Copy the WebDriver into the project’s resources directory.
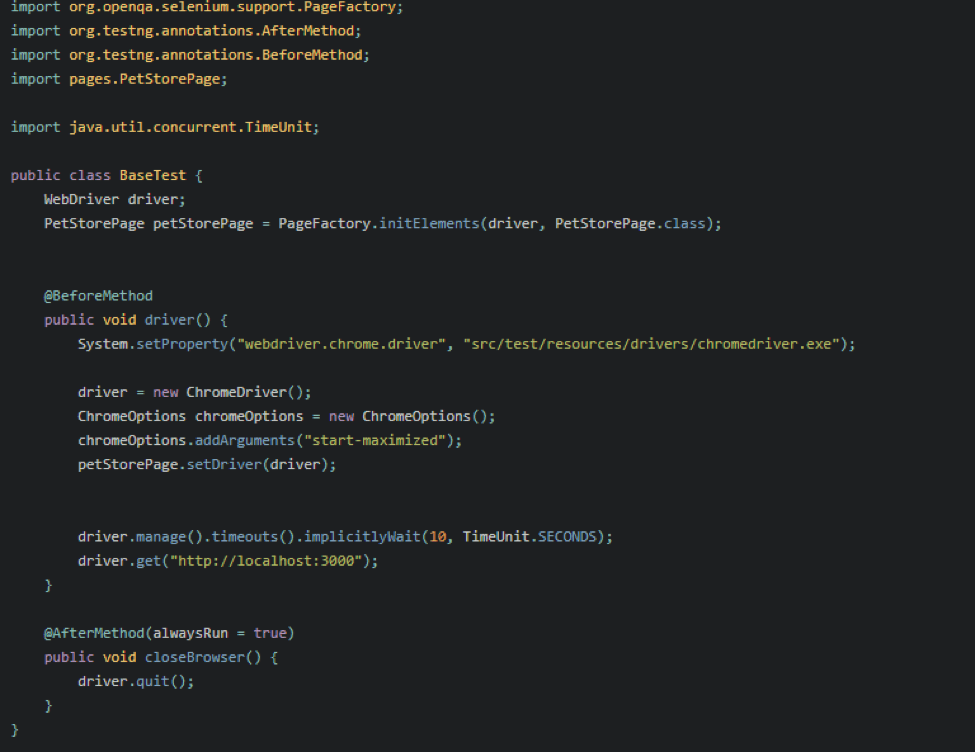
4. Set the System Property
To tell the project where the web driver is located:
System.setProperty("webdriver.chrome.driver", "src/test/resources/drivers/chromedriver.exe")
I usually create a BaseTest class where I put my initialized driver object and that’s where I put other properties. This can also be handled by managing the config file separately.
5. Download Selenium WebDriver
6. Add Dependencies
Bring your dependencies to your project in the pom.xml file with org.seleniumhq.selenium.
Here is a sample from my pom.xml:
<dependency>
    <groupId>org.seleniumhq.seleniumgroupId>
    <artifactId>selenium-javaartifactId>
    <version>3.4.0version>
    dependency>
    <dependency>
    <groupId>org.testnggroupId>
    <artifactId>testngartifactId>
    <version>6.11version>
    dependency>
Now, we can start creating automation tests by using JUnit or TestNG (a layer built on JUnit).
7. Create a New Test Class
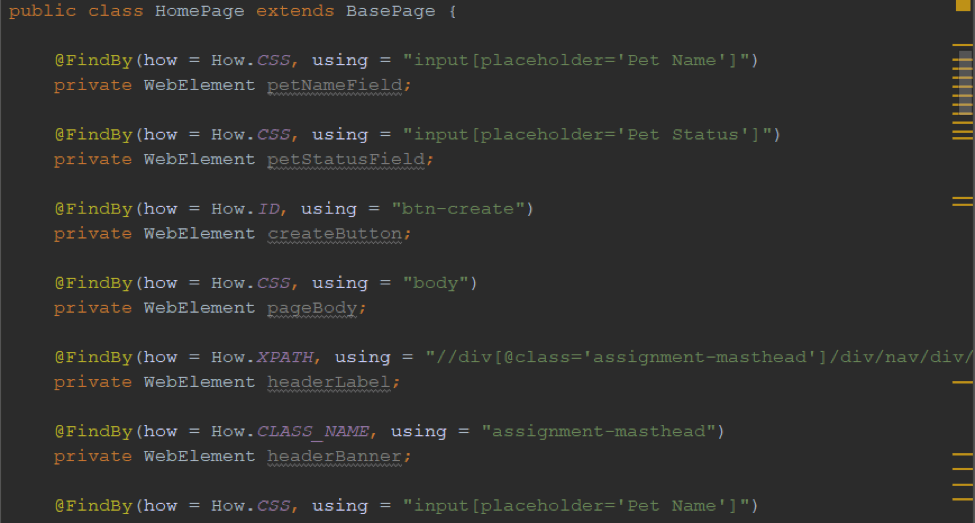
To create a new test, create a new Java file (class) and resolve the mappings between the web page displayed and the written selectors. Selectors usually are written in a separate file (class) so the code is organized. The classes used for this are named page object classes.
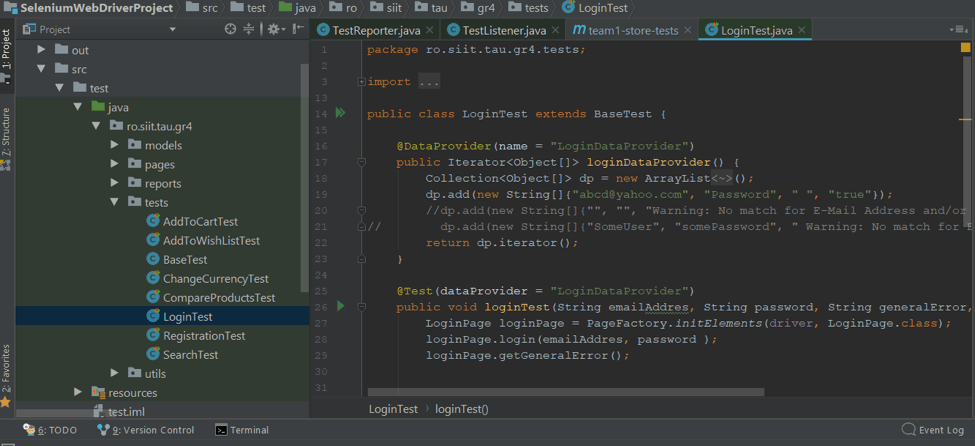
When creating the test, switch between the page object and the test to bring the web element objects you are working with. A page object class looks something like this.
Every test or set of tests that are related should have their own class.
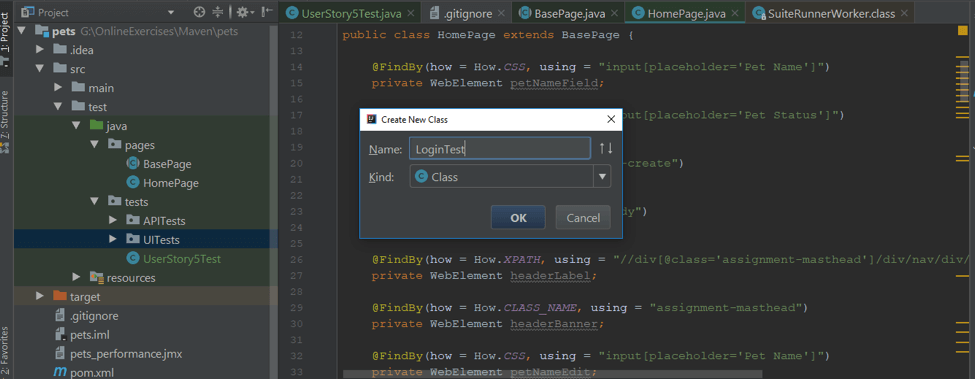
Test may be grouped with the name of the user story:
e.g: LoginTest:
8. Identify Web Elements and Create Java Objects
To run web GUI automated tests, you have to identify the web elements (like buttons and input fields) on the page and build the algorithm code while using those web elements. The code can include actions like finding the expected value in a table, clicking on the next page when the values are displayed on multiple pages, waiting for an element to be displayed in a drop down list or waiting for a loading dialog to disappear.
You can transpose the web element from the browser by using one of these methods(functions):
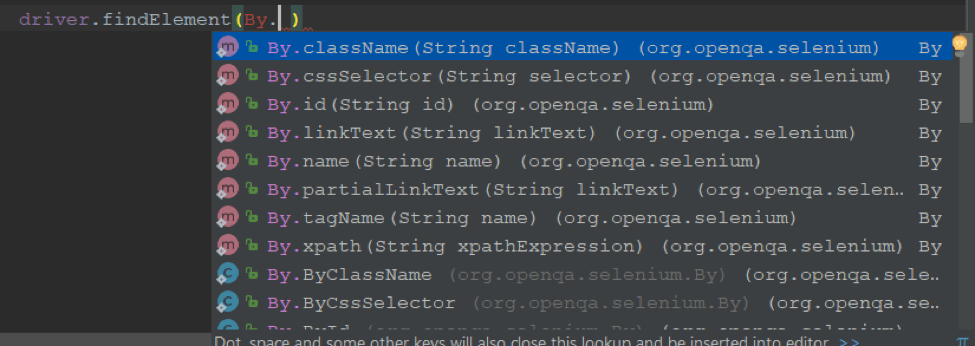
You can find a web element in Java by using the methods from the “By” class like:
- className(String className)
- cssSelector(String selector)
- id(String id)
- name(String name)
- partialLinkText(String linkText)
- tagName(String name)
- xpath(String name)
- ClassName(String className)
- ByCssSelector(By by)
- ById(By by)
- ByLinkText(By by)
- ByName(By by)
- ByPartialLinkText(By by)
- ByTagName(By by)
- ByXPath(By by)
So you can either pass in a selector as a string or by passing a By instance, considering that selector was already created.
So you give that function the type of the selector (xpath, css or shorter forms like by id, linktext [one can use only xpath or css]) and the selector written in text “//div[@class=’table_row’]”, and java will will convert it to java object.
The function will look like this:
WebElement ourIdentifiedElement = driver.findElement(By.xpath("“//div[@class=’table_row’]”")).
When having a Java object, you can use the methods supported by the interface of WebElement and perform actions.
Actions on the object will look like this:
ourIdentifiedElement.click();;
    ourIdentifiedElement.getText();
    ourIdentifiedElement.sendKeys("Type text");
Of course, actions depend on what type of web element it is (button, box from writing text (editBox), label, dropdown List, etc.).
Back to topIdentifying Web Elements In Chrome
The Chrome Browser has the capability to highlight the identified object (web element) by either entering the selector in the search area or by using JQuery functions. This can be done without having to install any plugin. To see the HTML source code one has to right click on the page and click “inspect”. For creating the selectors one should have a good understanding of HTML.
An example would be to enter the XPath selector “//div[@class=’table_row’]” in the search area at the bottom, or $x(“//div[@class=’table_row’]”) in the console area, or the CSS selector “div[class=’table_row’] in the search area and $$(“div[class=’table_row’] ) in the console.
Writing a CSS selector in the search area in Chrome:
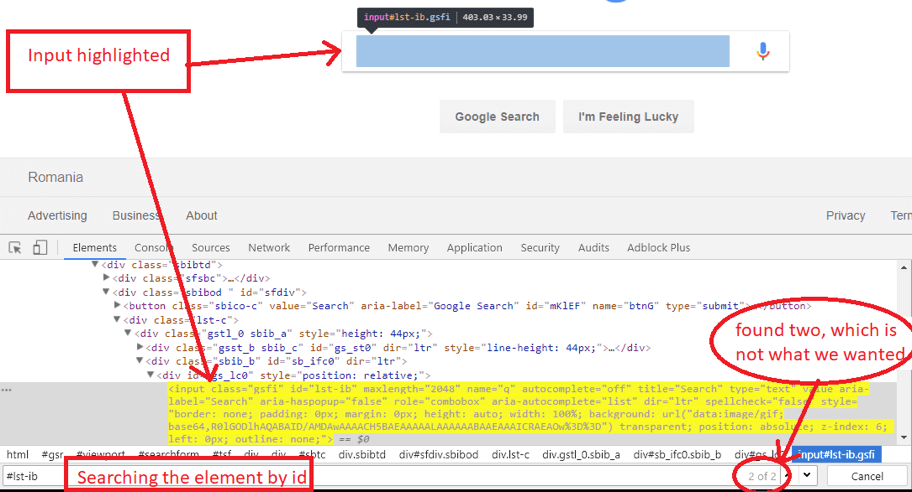
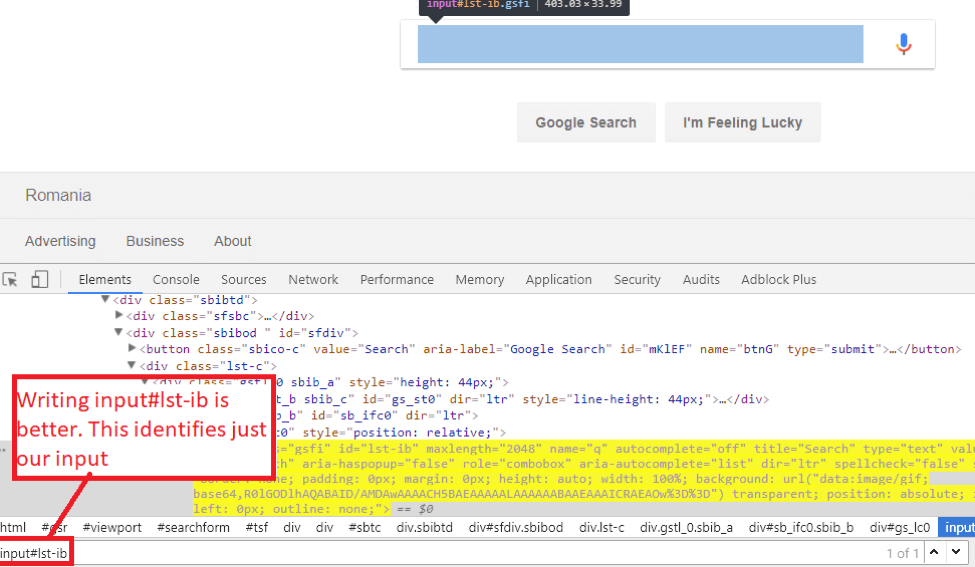
Here we see the input being highlighted after we searched for the CSS selector - id (#lst-ib), but it is found twice. We want our web element to be uniquely found, so I added the input in front of the id:
Writing an XPATH selector in the search area in Chrome:
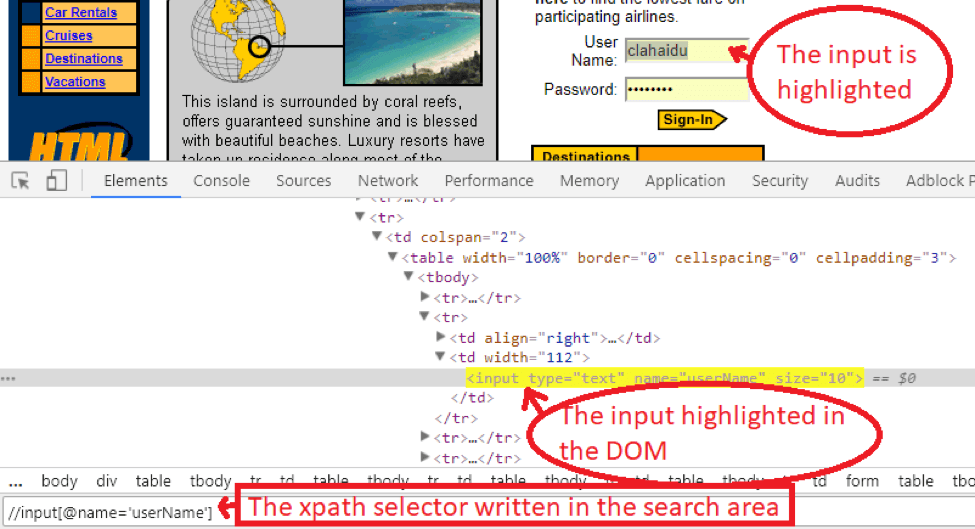
Writing the XPath selector in the console:
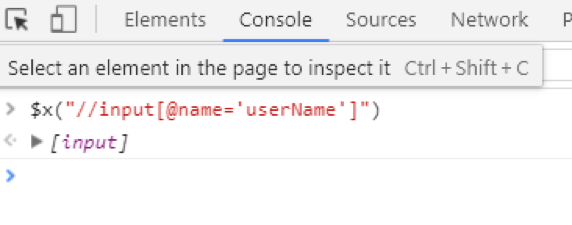
After writing the $x(“our selector”) and pressing enter, we will get a result where we can see that our selector is working fine and we can use it in our code.
Back to topIdentifying Web Elements in Firefox
In a similar way, web elements can be identified on Firefox when running Selenium UI tests. In the past, Firebug and Firepath were used to identify web elements, but they are no longer used. Firefox Developer Editions took their place, so now Firefox has the main functionalities for inspecting web elements, just like Chrome does.
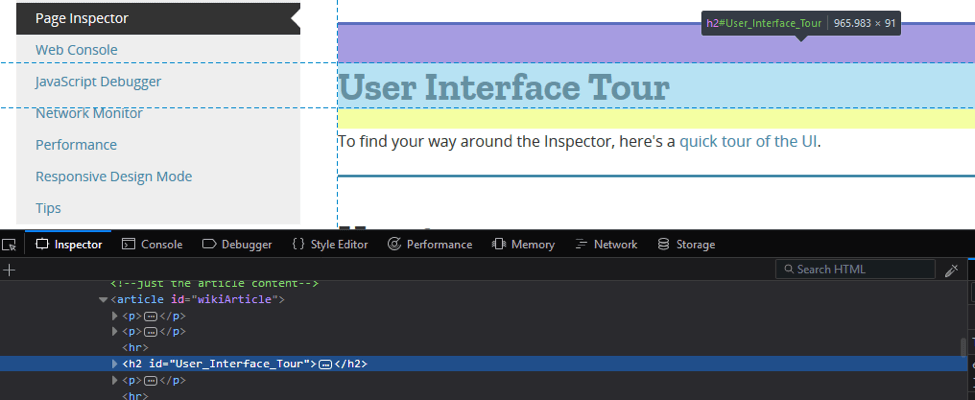
Web elements are highlighted in Firefox developer tools without using the Firebug. This is done by right-clicking on the page and clicking on “inspect”. The web element you right clicked on and inspected, will be highlighted below.
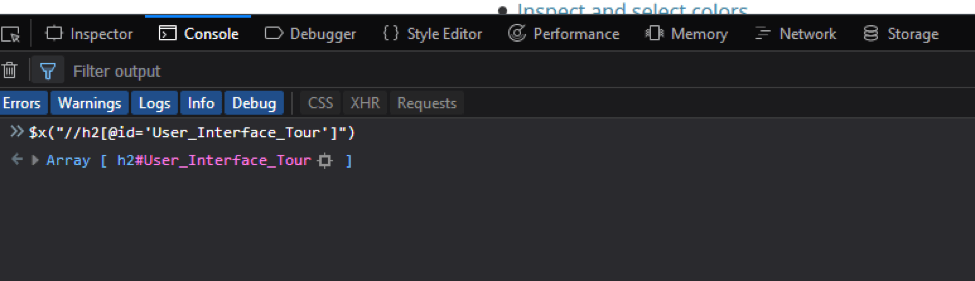
After clicking on the Firefox Console tab, we can write the name of the selector we are looking for by using the same commands as in chrome: $("User_Interface_Tour").
Writing the CSS selector is shown below. After writing the selector, pressing the "Enter" key will show the found web elements. If you hover over the results, the web element will be highlighted on the web page.
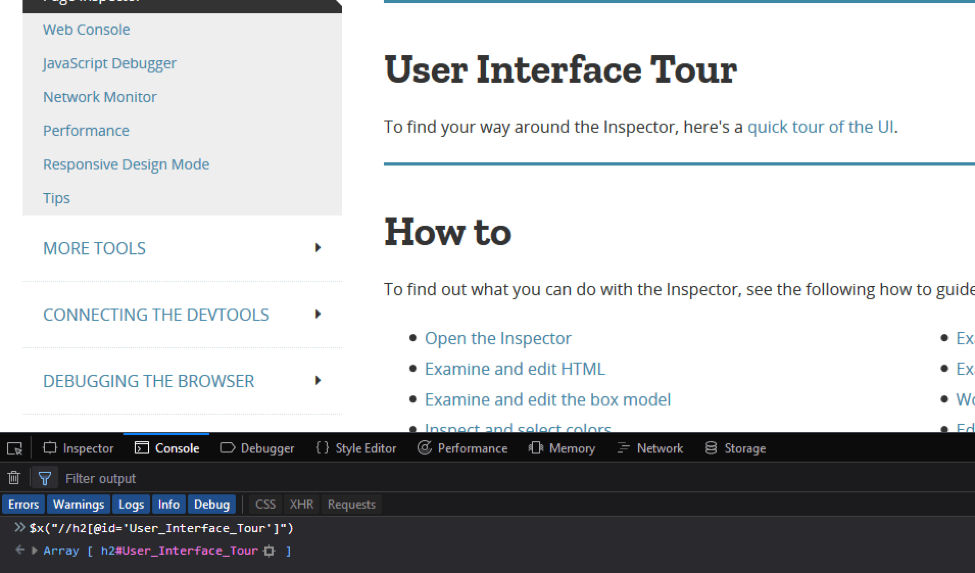
Writing the XPath selector in the console is shown below:
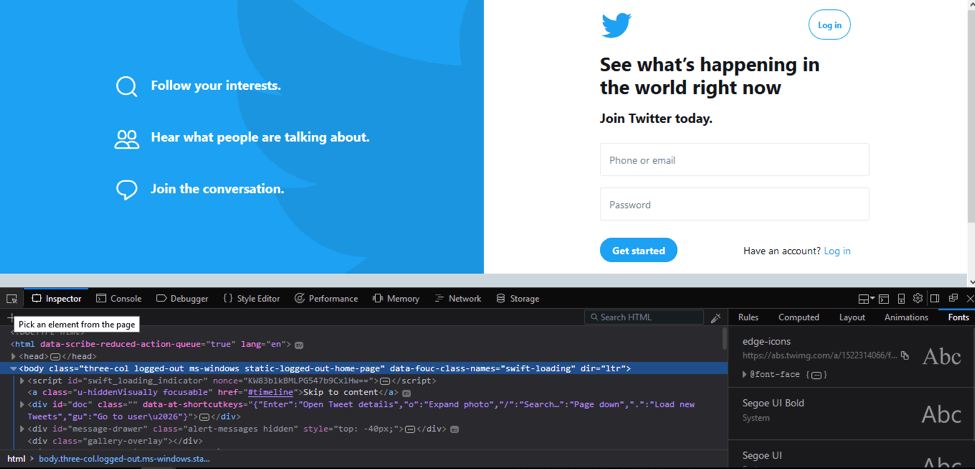
Another way to get a web element highlighted is to press the F12 key from the keyboard and “pick an element from the page” by clicking the leftmost button. This is shown in the screenshot below:
Comparing CSS and XPath Selectors - Which One Should You Choose?
- CSS selectors are significantly faster than XPath on Internet Explorer
- CSS selectors tend to be shorter than XPaths, although they usually have the same capabilities
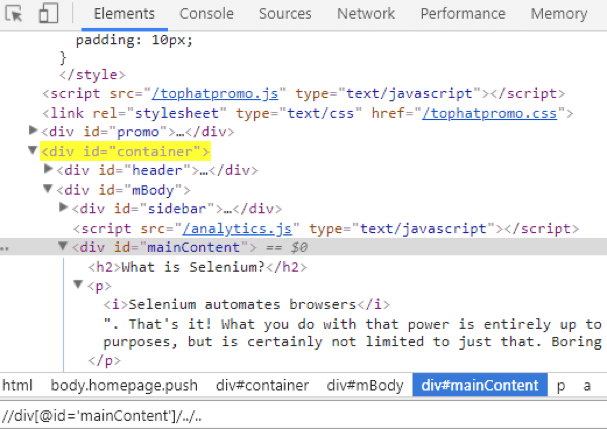
- XPath has the advantage when having to traverse the DOM ( Document Object Model) upwards from a web element (e.g. div[@id=’user1’)/../../td[@class=’actions’]/@class=’delete-user’] – this looks for the div tag that has id=user1 and then goes up two nodes and looks up in the td tag) because only XPath enables identifying an element that is higher in the hierarchy.
Another example is shown in this screenshot:
- Similar to the previous capability, the XPath selector knows how to handle Parent, Child and Siblings elements
- //*[title="50"]/parent::store select anything with the title 50 and the parent stor tag
- child::* selects all element children of the context node
- child::text() selects all text node children of the context node
- child::node() selects all the children of the context node, whatever their node type
- //tr/td[text()='ancestor']/following-sibling::td gets the next td that is after the td with the text= 'ancestor'
- //tr/td[text()='Selects all children of the current node']/preceding-sibling::td gets the previous td after finding the td with the innertext = 'Selects all children of the current node'
- The syntax for identifying a web element using parent and siblings is done in the following manner:
- descendant selector (space)
- child selector (>)
- adjacent sibling selector (+)
- general sibling selector (~)
Although CSS selectors are becoming more popular, XPath is still widely used in automation projects as it is easier to use. Nevertheless, we recommend using CSS Selectors because:
- CSS selectors can do almost everything XPath can
- CSS selectors are typically faster than XPath
- CSS Selectors are used a lot on the development side
- JQuery uses CSS extensively
- CSS is used to style web pages
After finding the selector that identifies the web element (highlighted), create a WebElement object (the WebElement class is part of the seleniumhq library). The WebElement object enables you able to perform all the possible actions on that web element (that a normal manual user could do).
9. Perform Actions on Web Element Objects
Once you have an object, you can perform multiple actions on it, like: click, type text, right click, double click, get the text, hover over it, check if it's clickable and visible, call the findElement method again (from the WebDriver class) and find another element that is found below our previously identified web element (surrounded within the tags).
These actions will be executed when the user starts the automated test.
Back to topCreating and Running Your Automated Selenium UI Tests
10. Writing your Tests
Every test, be it manual or automated, usually has the following structure:
Preconditions
Before executing a test, one has to bring the application to a state that the test can be executed from. For example, changing the process status. This is usually done by altering values in the database instead of making hundreds of clicks on the website.
Create Test Steps
The core of every test, or the body of a test, describes the flow that is required to follow the target. A way is to cover everything while passing through each web page section that is tested in one test based on the user story (end to end testing). Thus, one has to validate all the fields, dialogs, etc. that may appear. An example could be that when testing a login function for a negative response, is a good idea to test each error message in the same test class, and not create a different test class for each error message.
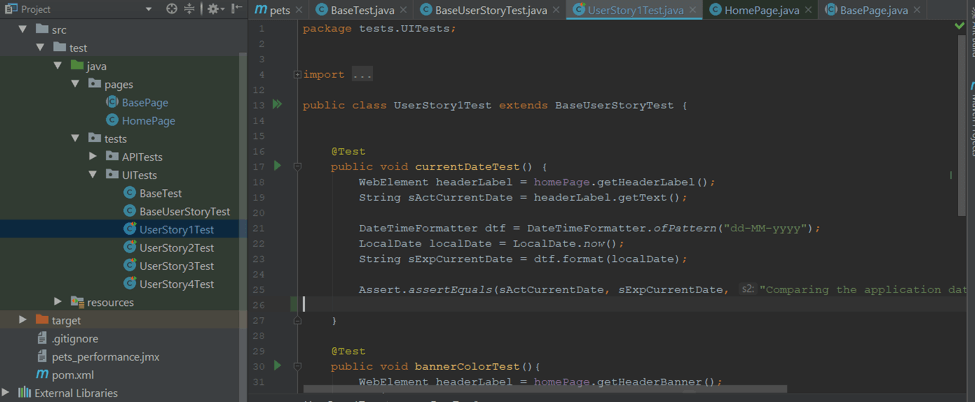
11. Create Assertions
Each step should also have the actual and expected result side by side, thus the tester can compare if the actual result is the same with the expected result. This applies for the manual and the automated test, since a test automation engineer should make as many assertions (which are relevant to the test) as possible.
So, add assertions to each actions to make sure it works properly. E.g:
Assert.assertEquals(loginPage.getGeneralError(),
    generalError,
    "Warning: No match for E-Mail Address and/or Password.")
12. Execute Your Test
After the automated tests are written, you can run your tests in different ways: directly from your favorite IDE by selecting the class with all the tests or just one test, from the command line (with TestNG or JUnit), with Jenkins, or any other continuous integration tool, when you create your job that also runs based on a command line or with BlazeMeter.
TestNG Run Configurations
The TestNG library provides these functionalities when imported and used.
- Package => Specify a package to run. All tests in this package and below will be included
- Group => Specify a TestNG group to run
- Suite => Specify an external testng.xml file to run
- Class => Run all tests in a single class
- Method => Run a single test method
- Pattern => All tests matching a pattern
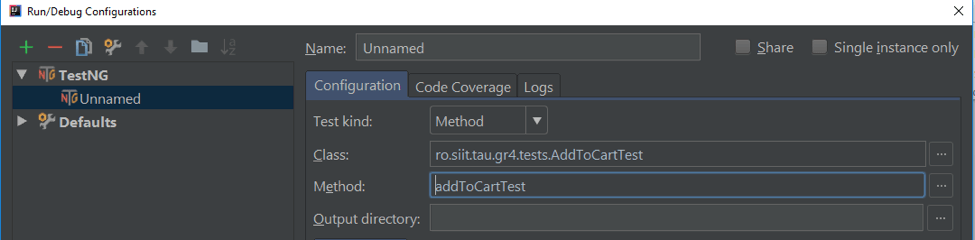
Running the specific methods from a specific class can be done from the edit configuration section (the screenshot is from Intellij Idea).
Running Tests from the Command Line
These tests are in the src/test/java folder.
Maven
- By class: mvn test -Dtest=TestClassB
- By method: mvn test -Dtest=TestClassB#testB1
- By methods: mvn test -Dtest=TestClassB#testB1+testB2
Gradle
- By class: gradle test --tests your.package.TestClassName
- By method: gradle test --info
- By methods: gradle test --tests your.package.TestClassName.particularMethod
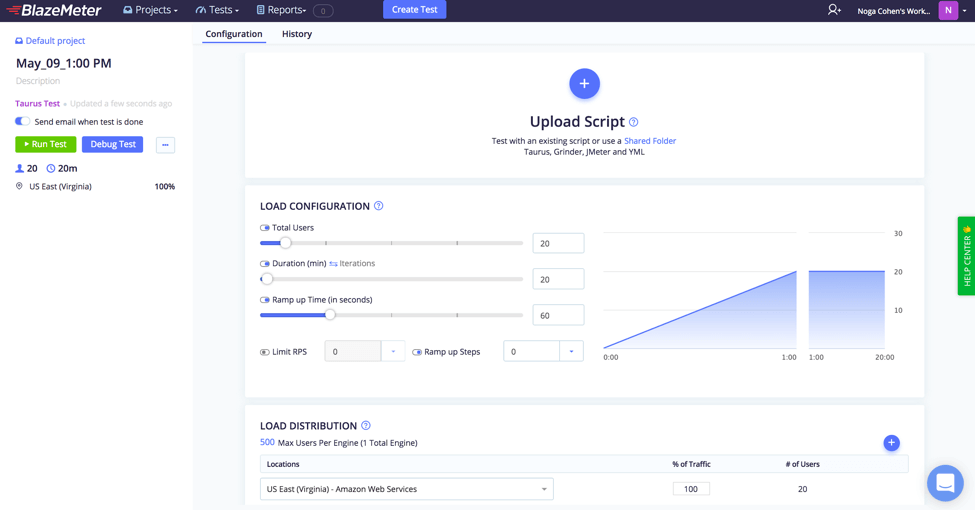
Running Your Tests with BlazeMeter
To run your Selenium UI test in BlazeMeter, just upload it and run:
Analyze Test Results in Reports
13. Create a Test Report
To create a custom Selenium UI test report with Selenium WebDriver in Java, import a reporting library like the Extent library. Create a test listener class like this one that extends the TestListenerAdapter class (this helps in the creation of the report).
public class TestListener extends TestListenerAdapter {
        private ExtentReports extentReports = new ExtentReports();
        @Override
        public void onStart(ITestContext iTestContext) {
            super.onStart(iTestContext);
            extentReports.init("extent-report.html",true);
        }
Then override the methods onTestStart, onTestSuccess, onTestFailure, onTestSkipped, onFinish to set your own functionality requirements.
If we don’t override a method like onTestFailure or onTestSkipped, our report will show that there were no failed, skipped tests, when in fact some tests didn’t pass.
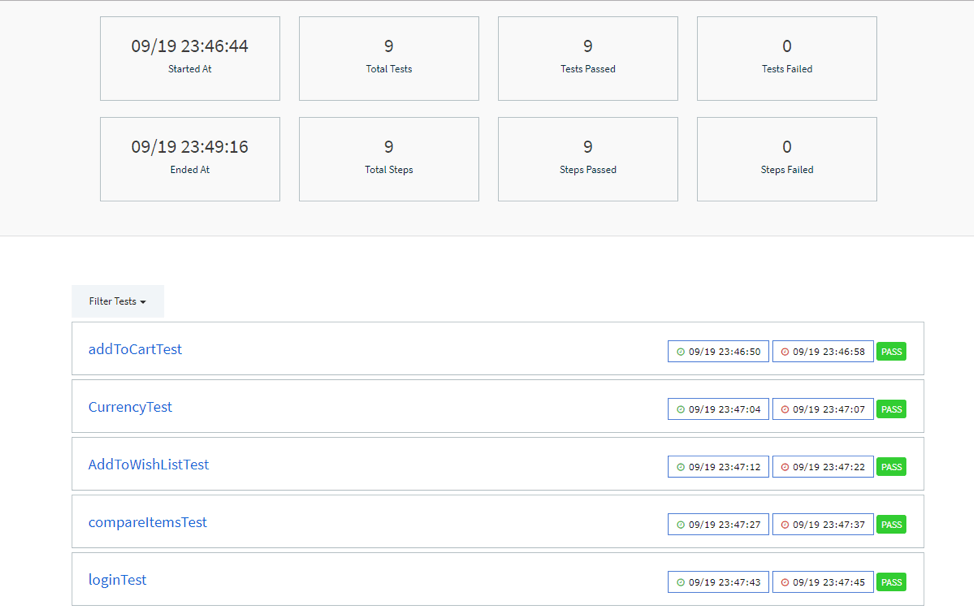
This report, in the Execution tab, shows when was the last test suite ran and the number of tests run (passed, failed). It also has the capability to show how many steps from each test passed, failed or had another status (the LogStatuses are: ERROR, FAIL, INFO, PASS, SKIP, WARNING (written in capital letters as they are constants).
Let’s say a test has 10 steps. It may be relevant to see that 9 steps out of 10 passed, although, the test is considered failed.
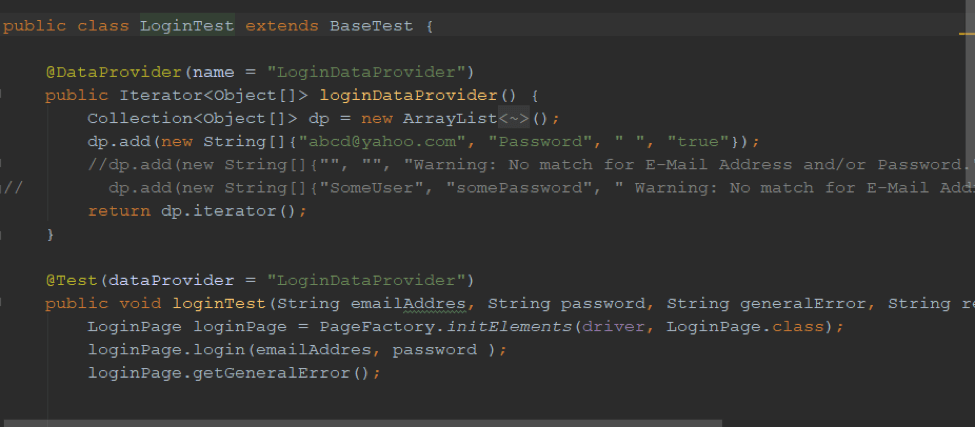
All classes and methods must have the word “test” in their name so they are included in the report after test execution has been completed. Here is the code for a login test with inputs for username (email), password, Expected Error, positive test = true, negative test = false.
Such reports are generated after every run in the target directory. This can be saved on the test execution server along with the screenshots of the tests. It is recommended to have screenshots taken after each relevant step of the test for better debugging of the tests. This will help us see why the test failed by just viewing the pictures taken in our web application.
This report shows the dashboard tab, which shows the pie charts, containing just the failed/passed tests and the steps with their logs (chosen by the automated tester):

Evey test in the Extent reports can be expanded for the user to see the logged details. After each important step, alongside the screenshots, the description of the steps should be added to the logs. This way the tester will not only see the where the test failed with the help of the screenshot, but also what caused the error or bug to happen by having the logs collected.
This will help every tester who runs the tests, as sometimes the stack trace is not clear enough because it may show on which step the test failed, but not the actual cause. An example would be that one may enter the wrong user or password to login, and after that click on the profile/account button. The stack trace will show that the element could not be identified or pressed, when actually the login failed.
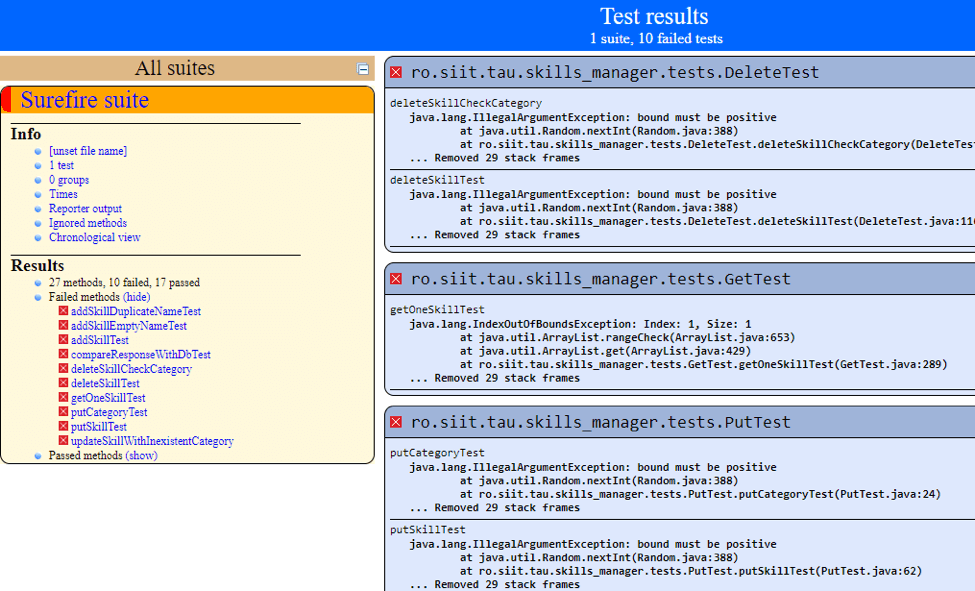
Here is an example of test results in Surefire. Surefire can be added as a plugin in the pom.xml.
The Surefire report shows only the test/failed tests and the errors (stack trace) of the failed tests. It is easier to integrate than the Extent report.
Integrating Selenium UI Tests With Git
I also recommend you integrate your project with Git and Jenkins. That way, when the code is modified, an automatic build will start in Jenkins to check the integrity of the code. Thus you can quickly know if the modifications made in the project affected the integrity of the test automation project.
Every popular IDE can be integrated with Git. The most popular IDEs for Java development are Intellij, Eclipse and Netbeans. The recommended way to have your code up and running on the server is to type the commands in the command line.
Doing so you have more control over which files are committed and will actually land on the main branch (master) of the test development.
Related Resources
- How to Automate Testing Using Selenium WebDriver, Jenkins and Allure
- How to Understand Your Selenium WebDriver Code and Run it with Taurus
- How to Run a Selenium Test with JUnit
- How to Run a Selenium Test with TestNG
- What is Scriptless Test Automation?