Blog
February 14, 2023

By using BlazeMeter API Testing and Monitoring, teams can understand exactly how their API behaves. These capabilities are critical for user and business success.
In this blog post, we explain everything you need to know to do successful API testing with BlazeMeter, as well as important API monitoring best practices to keep in mind.
Back to topWhy is API Monitoring Important?
API monitoring ensures that the API you or your customers are using is providing the correct response in the right amount of time. If it doesn’t, this could mean the system is having issues that need to be fixed immediately.
See BlazeMeter API Monitoring and other critical features in this short, expert-led video series. Watch now >>
Back to topBlazeMeter API Monitoring Overview
Now, let’s dive into BlazeMeter’s API Monitoring and learn about best practices for using it to monitor your APIs.
Step 1: Login
You can find the API Monitoring capability through the BlazeMeter app’s top nav:
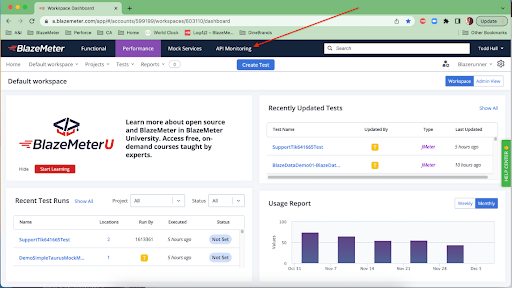
By clicking on ‘API Monitoring’ you will get to the following screen:
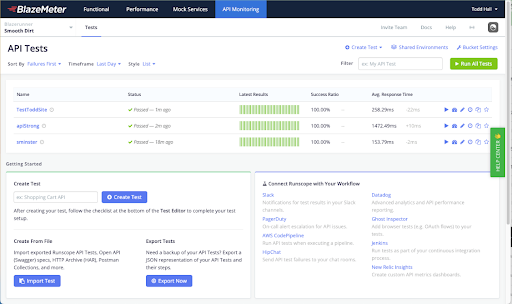
This screen is where you set up and manage your API tests. You can choose whether to view the tests as cards or in a list.
The main screen lets you update your profile, view the Runscope changelog, read the docs, invite team members, connect services, and, of course, create a test.
If you’ve already run a few tests, the main API Monitoring screen will show you your latest results, success ratios, average responses, and additional metrics.
Step 2: Setting Up a Test Environment: Your Test Settings
When creating a test, the first thing to do is set up your environment. The four main settings that need to be configured when creating a test are:
- Locations
- Variables
- Notifications
- Integrations
Let us dive deeper into each setting.
Locations
Tests can be run against various globally available locations. There are approximately 19 locations you can choose from. These locations are hosted mainly on Google Cloud (GCP), but there are also a few on additional cloud providers like AWS.
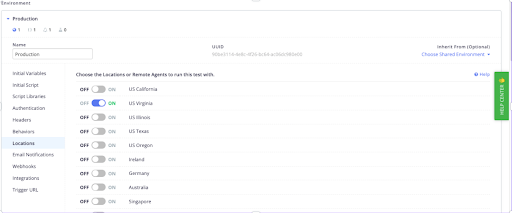
API Monitoring also supports running the test from within your network by using an on-premise agent, to support network policies that require locking down activities behind a firewall.
Pro tip: You can turn off a test by turning off all the locations. With no chosen locations, the test will not run!
Variables
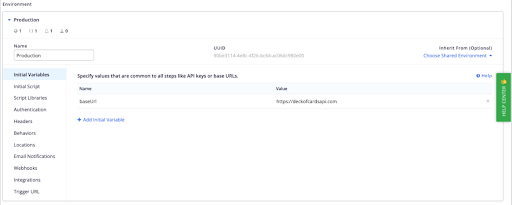
Variables define the parameters or the characteristics of your environment. These values can then be referenced later across your environments and tests. Variables save you time and prevent test failures that can happen when using static values.
Pro tip: Don’t just list your variables, include JavaScript libraries with functions that can be reused across environments and tests.
Notifications

Notifications let you determine who will receive email alerts and under what conditions. For example, you can configure the notifications to send you an email every time you run a test, when there’s a failure, after X number of failures. etc.
Integrations
BlazeMeter API Monitoring supports multiple integrations. Some of the main examples include Slack, Datadog, PagerDuty, and more. Integrations are used to enhance capabilities, like advanced alerts, integrating API Monitoring into your CI/CD pipeline, or webhooks.
Pro tip: You can also validate your cookie behavior in the Environments (settings) of a test. With the cookie behavior enabled, the test will automatically handle Cookies between steps.
Step 3: Setting Up Your API Monitoring Test Steps
Now, it’s time to set up the test steps. In API Monitoring, your steps will be run sequentially. Only once one step is completed, the step after begins.
1. Add your request. For example, you might call the API of your program.
Pro tip: For more advanced requests, use JavaScript to customize and define the steps or a cURL expression.
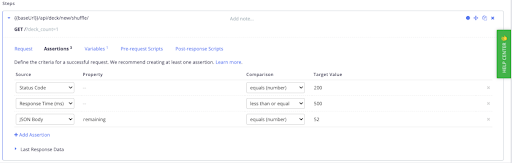
2. Now, configure the request by adding assertions. Assertions can help check the test. For example, validating that the status code is 200, examining the response time, checking the response payload to make sure certain parameters are there with expected values, or anything else you define in your JSON.
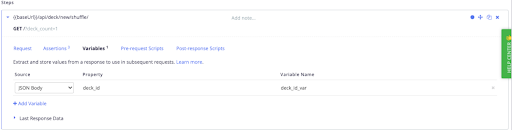
3. Then, you can add variables. Variables allow passing data from one request to another and chaining them together. You can make a request, look at the response payload, extract various values from it and store them in special "Runscope variables". Those variables can then be referenced (using double-curly braces syntax) in later steps of the test as needed.
For example, you make one request that returns some ID in its payload. Save that ID to a Runscope variable and then make another API request that uses that ID as input.
4. Finally, you can define your pre-request scripts and post-response scripts for the test. For example, as a pre-request script, you can construct the requests so they all have the same default header.
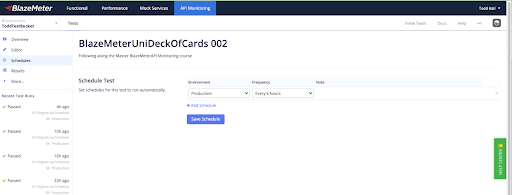
5. Once your test is defined, it’s time to schedule your tests. Set which environment the test is run against and the test frequency (e.g, every five minutes, six hours, 24 hours, etc.).
6. Now it’s time to run your test. In API Monitoring, you can configure a test to rerun if it fails by enabling "Retry on Failure". This is intended to mitigate any kind of network blips or anomalies. API Monitoring will take a snapshot of the test, including the environment, and rerun the test. The "Run Again" button in the UI directly on a test results page has the same effect -- it literally runs the test again with the same parameters.
You can also configure the test to move on to the next step if it fails. Or, you can configure the test to stop in such a case with “Stop on Failure”. For example, in Production, it is probably a good idea to stop executing if a test fails.
Pro tip: If your test fails check if you used a static variable or an authorization token that caused the test to fail.
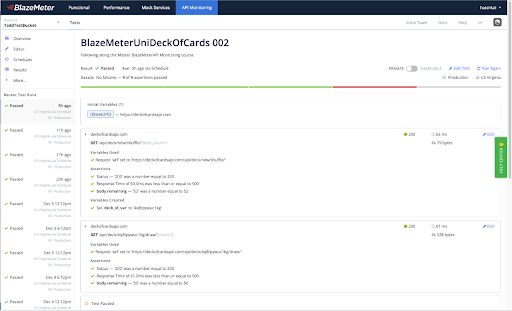
Step 4: Review Test Results
Finally, it’s time to review the test results. You can see how long each response took and many additional metrics. You can also see the test history. Data is kept for no more than 90 days and includes the 100 most recent successes and the 100 most recent failures.
5 API Monitoring Best Practices
Congratulations! You now know how to set up tests. Before you go and start running your tests, here are five API monitoring best practices to consider:
1. Identify Use Cases
Before you start, make sure you know where you are heading with your API testing. Answering the following questions is an important API monitoring best practice:
- What are your specific needs for running API Monitoring?
- Which APIs should you monitor?
- Why do you need to monitor them? (If you monitor the API that controls your payroll, for example, then you need to alert finance as soon as there is an issue).
2. Run API Monitoring on Proper Frequency
Next, define how often tests are run. This will be derived from your business use case and SLAs. Is your API mission-critical and needs to be monitored every minute? Or is testing continuously every sixty minutes or 24 hours enough?
3. Validate Response Data
Once your test has been completed, another top API monitoring best practice is to make sure you are getting the right and relevant response data.
4. Include Integrations with Third-Party Partners and APIs
Make your API Monitoring as comprehensive as possible by augmenting the data and response metrics with third parties.
5. Review Recent Historical Trends for Performance and Success
By analyzing your tests over time you will be able to identify trends, which can help you understand when you have issues and pinpoint what causes those issues. These will help you optimize and improve.
Back to topBottom Line
By combining these API monitoring best practices with the right API testing solution, you can rest assured that your team will be set up for API monitoring success.
In addition to its simple setup, BlazeMeter Enterprise API Monitoring offers even more exciting features, such as Secrets management, RBAC (Role-based Access Control), additional space for file uploads, SSO, client certificate authentication, and more.
Try BlazeMeter API Testing & Monitoring today with our free trial.