Blog
November 29, 2020

How to Execute JMeter Tests in Non-GUI Mode
Back to topThis blog will give an overview of five ways to execute JMeter tests:
1. The JMeter Command Line
You can execute a test from the JMeter command line. It is as simple as
jmeter -n -t your_script.jmx
where
- -n - tells JMeter to run in non-GUI mode
- -t - specifies the path to source .jmx script to run
We often use these minimal options in combination with -l switch, which tells JMeter where to store test results. If a results file already exists, it will be appended. After the test execution you can open the resulting CSV file with any Listener, Excel, or any other analytics software.
If you want more details, use the -h parameter to quickly view all possible command line options.
📕 Related Resource: JMeter Tutorial: Getting Started With the Basics
Back to top2. Use Apache Ant
You can integrate JMeter with Apache Ant using the JMeter Ant Task. Once you have properly formed an Ant build XML configuration file, you can initiate the JMeter testing script using Ant. (To see a sample JMeter test plan, look in the /extras folder of your JMeter installation. It’s called Test.jmx. The example build.xml Ant configuration file is in the same location.)
Assuming Apache Ant is properly installed, go to the /extras folder and invoke an Ant command there. Ant looks for a build.xml file under the current directory and processes it.
As shown above, Ant picks up the Test.jmx file, executes it, and generates an easily-readable HTML report.
Back to top3. Apache Maven
You can integrate JMeter with Apache Maven using the JMeter Maven Plugin. Maven uses a pom.xml file where POM stands for “Project Object Model” as a fundamental unit of work to be done. To enable JMeter integration, you must add a event to pom.xml. The Maven project structure should look like the following:
JMeter can be integrated with Apache Maven via the JMeter Maven Plugin. Maven uses a pom.xml file where POM stands for “Project Object Model” as a fundamental unit of work to be done. To enable JMeter integration you need to add a event to pom.xml file. The Maven project structure should look as follows:
Folder structure:
- root folder
- src
- test
- jmeter
- Test.jmx
- jmeter
- test
- pom.xml
- src
Where:
- Test.jmx – can be copied???? from jmeter/extras
- pom.xml - see the minimum listing below?
xsi:schemaLocation="http://maven.apache.org/POM/4.0.0 http://maven.apache.org/maven-v4_0_0.xsd">
4.0.0
com.blazemeter
mvn-jmeter
jar
1.0-SNAPSHOT
maven-jmeter-demo
http://maven.apache.org
com.lazerycode.jmeter
jmeter-maven-plugin
1.4.1
jmeter-tests
verify
jmeter
To kick off the test, type mvn verify or mvn install in the root folder. You should see some Maven output in the command prompt:
For basic and advanced configuration options, consult the Maven JMeter Plugin Project Wiki.
The HTML report that’s created is identical to the one generated by Apache Ant.
Back to topHowever you choose to run your JMeter tests, BlazeMeter has you covered. Start testing with the industry leader in performance testing for FREE today!
4. Run a JMeter Test from Java Code
Another option is to run a JMeter script from Java code. To execute an existing JMeter test from Java code or to create one through programming, basic Java knowledge is a must, and the following are mandatory:
- Have JMeter installed somewhere
- Have the required JMeter jars from /lib and especially /lib/ext folders of your JMeter installation in your project or module class path.
4.2 Running an existing JMeter Test from Java code
The main class, which is the “heart” of JMeter is StandardJMeterEngine. If you must execute a JMeter test from Java code, this is the best option. Alternatively, you can extend this class or implement your own version of the JMeterEngine interface.
The absolute minimal code to read the existing .jmx file (again we’re referring to Test.jmx from the /extras folder of the JMeter standard installation) and execute it will be as follows:
package com.blazemeter.demo;
import org.apache.jmeter.engine.StandardJMeterEngine;
import org.apache.jmeter.save.SaveService;
import org.apache.jmeter.util.JMeterUtils;
import org.apache.jorphan.collections.HashTree;
import java.io.FileInputStream;
public class JMeterFromExistingJMX {
public static void main(String[] argv) throws Exception {
// JMeter Engine
StandardJMeterEngine jmeter = new StandardJMeterEngine();
// Initialize Properties, logging, locale, etc.
JMeterUtils.loadJMeterProperties("/path/to/your/jmeter/bin/jmeter.properties");
JMeterUtils.setJMeterHome("/path/to/your/jmeter");
JMeterUtils.initLogging();// you can comment this line out to see extra log messages of i.e. DEBUG level
JMeterUtils.initLocale();
// Initialize JMeter SaveService
SaveService.loadProperties();
// Load existing .jmx Test Plan
FileInputStream in = new FileInputStream("/path/to/your/jmeter/extras/Test.jmx");
HashTree testPlanTree = SaveService.loadTree(in);
in.close();
// Run JMeter Test
jmeter.configure(testPlanTree);
jmeter.run();
}
}
Easy enough, isn’t it?
4.3 Creating a New JMeter Test Purely in Java
Here's how to build a JMeter Test Plan from scratch using Java code only. The key classes to look into are:
- StandardJMeterEngine - The main class that which configures the Test Plan and executes it.
- HashTree - A special collection that holds Test Plan elements.
- A minimum of JMeter Controllers necessary to run the test:
○ TestPlan - The root container for all below plus the place where all test properties can be specified
○ ThreadGroup - A pool of users to execute the test. A test must have at least one Thread Group with at least one thread and one loop.
○ LoopController - Since you must have at least one loop, it’s essential to have a Loop Controller instance set as a main Sampler controller for a Thread Group.
○ A Sampler to do the actual work.
This demo uses all of the above to send one GET request with one user in one loop using the HTTPSampler to the example.com domain.
This example is minimalistic and doesn’t have any extras. This simply gives you an idea of how to start. The code should be self-explanatory.
package com.blazemeter.demo;
import org.apache.jmeter.control.LoopController;
import org.apache.jmeter.engine.StandardJMeterEngine;
import org.apache.jmeter.protocol.http.sampler.HTTPSampler;
import org.apache.jmeter.testelement.TestPlan;
import org.apache.jmeter.threads.ThreadGroup;
import org.apache.jmeter.util.JMeterUtils;
import org.apache.jorphan.collections.HashTree;
public class JMeterFromScratch {
public static void main(String[] argv) throws Exception {
//JMeter Engine
StandardJMeterEngine jmeter = new StandardJMeterEngine();
//JMeter initialization (properties, log levels, locale, etc)
JMeterUtils.loadJMeterProperties("/path/to/your/jmeter/bin/jmeter.properties");
JMeterUtils.initLogging();// you can comment this line out to see extra log messages of i.e. DEBUG level
JMeterUtils.initLocale();
// JMeter Test Plan, basic all u JOrphan HashTree
HashTree testPlanTree = new HashTree();
// HTTP Sampler
HTTPSampler httpSampler = new HTTPSampler();
httpSampler.setDomain("example.com");
httpSampler.setPort(80);
httpSampler.setPath("/");
httpSampler.setMethod("GET");
// Loop Controller
LoopController loopController = new LoopController();
loopController.setLoops(1);
loopController.addTestElement(httpSampler);
loopController.setFirst(true);
loopController.initialize();
// Thread Group
ThreadGroup threadGroup = new ThreadGroup();
threadGroup.setNumThreads(1);
threadGroup.setRampUp(1);
threadGroup.setSamplerController(loopController);
// Test Plan
TestPlan testPlan = new TestPlan("Create JMeter Script From Java Code");
// Construct Test Plan from previously initialized elements
testPlanTree.add("testPlan", testPlan);
testPlanTree.add("loopController", loopController);
testPlanTree.add("threadGroup", threadGroup);
testPlanTree.add("httpSampler", httpSampler);
// Run Test Plan
jmeter.configure(testPlanTree);
jmeter.run();
}
}
To verify the code actually sends GET request to example.com, a sniffer tool like Wireshark can be used.
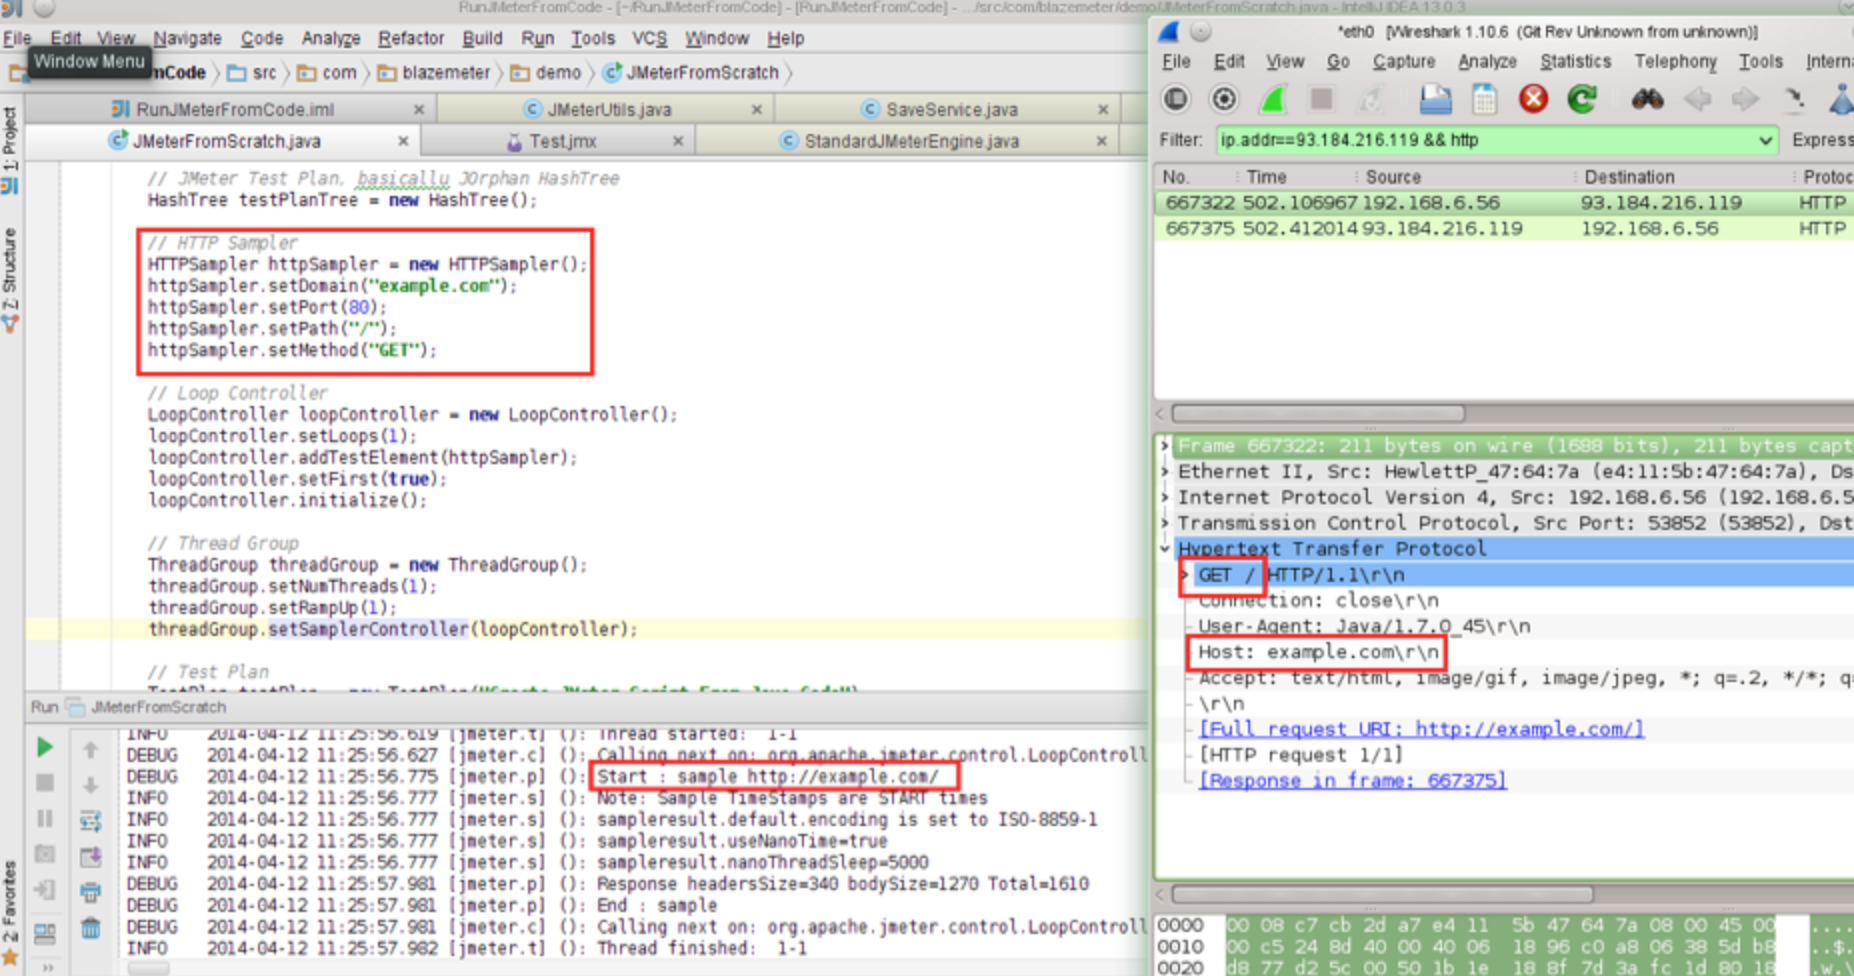
Similarly, you can add any listener to your test to verify the output with JMeter GUI Listeners or third-party tools.
Back to top5. Run a BlazeMeter Test
BlazeMeter provides a REST API that enables you to perform various tasks in an unattended manner using any tool, library, or software capable of sending HTTP requests. That means you can do the following actions by sending a single request to one a BlazeMeter API endpoint:
- Create a test
- Upload new or update existing script file
- Start the test
- Get test status
- Stop the test
All these tasks assume a user_key mandatory parameter. The user API key is available on the Profile Page. To reach the Profile Page, click your user name in the top right corner of the screen, to the left of the Logout link, and expand the User Key section at the Profile page.
This demo uses the curl command-line utility (a free, open-source, cross-platform and multi-protocol utility for transferring data to and from endpoints with a URL syntax).
Create the Test
Creating a new BlazeMeter test is as easy as sending a GET request to a REST URL. See details below:
Parameters:
| URL | https://a.blazemeter.com/api/rest/blazemeter/testCreate |
| Method | GET |
| user_key | API user key available at the Profile page |
| test_name | any meaningful string |
Example:
:~>curl "https://a.blazemeter.com/api/rest/blazemeter/testCreate?user_key=blazemeter_demo_key&test_name=MyFirstTest"
---
response_code: 200
error: null
test_id: 525901
test_name: null
The request goes before the three dashes (“---”). The response comes after the three dashes. As you see, the response code is HTTP 200, which is OK. The ID of the test is returned. Mentioning the ID is a must to start or stop the test and to get its status and report link.
Upload a JMeter .jmx Test Script
Adding a new .jmx file to an existing test or replacing an old one with a newer version can be done as follows:
| URL | https://a.blazemeter.com/api/rest/blazemeter/testScriptUpload |
| Method | POST |
| user_key | API user key available at Profile page |
| test_id | ID of test available as createTest response or at Test page after Test Name |
| Path to JMeter .jmx file to be uploaded |
:~>curl -X POST "https://a.blazemeter.com/api/rest/blazemeter/testScriptUpload?user_key=blazemeter_demo_key&test_id=525901" -H "Content-Type: application/json" --data-binary "/path/to/your/jmeter/script/Test.jmx"
---
response_code: 200
error: null
Starting a Test in BlazeMeter
You can initiate a Blazemeter test by issuing a request in the following structure:
| URL | http://blazemeter.com/api/rest/blazemeter/testStart/ |
| user_key | API user key available at Profile page |
| test_id | ID of test available as createTest response or at Test page after Test Name |
:~>curl "https://a.blazemeter.com/api/rest/blazemeter/testStart?user_key=blazemeter_demo_key&test_id=525901"
---
response_code: 200
error: null
test_id: 525901
type: null
test_name: MyFirstTest
session_id: r-ec53490fab83a51
:~>
Getting the Test Status in BlazeMeter
You can obtain the test status by sending a proper GET request to the getTestStatus endpoint.
| URL | https://a.blazemeter.com/api/rest/blazemeter/testGetStatus |
| user_key | API user key available at Profile page |
| test_id | ID of test available as createTest response or at Test page after Test Name |
:~>curl "https://a.blazemeter.com/api/rest/blazemeter/testGetStatus?user_key=blazemeter_demo_key&test_id=525901"
---
response_code: 200
error: null
test_id: 525901
session_id: r-ec534910ae2407d
status: Running
test_name: MyFirstTest
:~>
As we’ve just kicked off the test it’s currently in “Running” state.
Stopping a Test in BlazeMeter
Just like starting a test, you can also issue a command to stop test execution.
| URL | https://a.blazemeter.com/api/rest/blazemeter/testStop |
| user_key | API user key available at Profile page |
| test_id | ID of test available as createTest response or at Test page after Test Name |
:~>curl "https://a.blazemeter.com/api/rest/blazemeter/testStop?user_key=blazemeter_demo_key&test_id=525901"
---
response_code: 200
error: null
session_id: r-ec53490fab83a51
:~>
You can verify that the test has been actually stopped by querying the test status one more time:
:~>curl "https://a.blazemeter.com/api/rest/blazemeter/testGetStatus?user_key=blazemeter_demo_key&test_id=525901"
---
response_code: 200
error: null
test_id: 525901
session_id:
status: Not Running
test_name: MyFirstTest
:~>
As this confirms, the test is in a “Not Running” state.
Back to topBottom Line
In this article, we’ve highlighted the most common options for executing a JMeter test, including the JMeter Command Line, using a tool like Apache Maven, and setting up the BlazeMeter API. For additional information and other techniques, consider such as:
- The Jenkins Performance Plugin which can trigger JMeter test execution as a goal in the Jenkins Continuous Integration system.
- A JMeter plugin for IntelliJ Idea which integrates JMeter with the Idea Java IDE.
Regardless of which method you chose to match your environment and infrastructure, be sure to never use JMeter GUI for anything but test development and/or debugging.
Learn More About JMeter & Load Testing
While JMeter represents a strong and compelling way to perform load testing, of course, we recommend supplementing that tool with BlazeMeter, which lets you simulate up to millions of users in a single developer-friendly, self-service platform. With BlazeMeter, you can test the performance of any mobile app, website, or API in under 10 minutes. Here’s why we think the BlazeMeter/JMeter combination is attractive to developers:
- Simple Scalability – It’s easy to create large-scale JMeter tests. You can run far larger loads far more easily with BlazeMeter than you could with an in-house lab.
- Rapid-Start Deployment – BlazeMeter’s recorder helps you get started with JMeter right away, and BlazeMeter also provides complete tutorials and tips.
- Web-Based Interactive Reports – You can easily share results across distributed teams and overcome the limitations of JMeter’s standalone UI.
- Built-In Intelligence – BlazeMeter provides on-demand geographic distribution of load generation, including built-in CDN-aware testing.