Blog
September 25, 2021

Endurance testing is a great way to catch things that your short sequence tests may have missed. This blog will show you how to do endurance testing effectively with BlazeMeter in four steps.
Read along, or skip to the section that interests you the most.
Back to topWhat is Endurance Testing?
Endurance testing involves long sequence tests, that is, tests that run overnight or for several days. The objective of these tests (also known as soak, reliability or, simply, duration tests) is to find errors that short sequence tests may miss.
One of the most typical errors found in endurance testing is memory leaks. The main challenge while running these tests is to monitor the SUT (system under test) over that long period of test execution.
Back to topHow to Do Endurance Testing
When performing this type of test with Apache JMeter™, there are certain settings that you should have in mind. In this post, I’ll show you some of them in the hope that these tips will come in handy for your next endurance tests:
1. Setting the Thread Group Properties
To start with your endurance testing, you should create your script according to your business objectives. You might want to run tests for 2 users for 10 days, or 100 users for 7 days. You should determine this information with your product manager and marketing team.
After you finish your script, the next step is configuring the Thread Group settings, before running the tests.
On a “normal” load test you would just set the Number of Threads, Ramp-up Period and Loop Count values and that’s it, you are ready to go. But when running endurance tests, which implies running the test for long periods of time, how would you configure those values if you need to run the test for, let’s say, 12 hours? It can be a complex task and you would probably spend too much time on that.
So, the first thing you should have in mind when running endurance tests that it is known as a good approach is to set the Loop Count to Forever and use the Scheduler functionality to determine when to start and finish the test.
Let’s have a look at the Scheduler Configuration interface:

As you can see, there are four configurable fields: Duration, Startup Delay, Start Time and End Time, but they do not work all together. Duration works combined with Startup Delay, and Start Time with End Time, which means there are two ways of setting this configuration. See the examples below:
Setting Duration and Startup Delay:
Simply set the duration you want the thread group to run and how much time it should wait before starting. If you want your test to start right after clicking run, just set this value to zero.
So, with this combination of values you can determine when would you like your test to start and for how long.
Setting Start Time with End Time:
Alternatively, you can use this approach and set the test Start Time and End Time (in the format yyyy/MM/dd hh:mm:ss). So, after clicking on start test, JMeter will wait until the value defined in Start Time has been reached, and in the same way, after finishing each iteration it will check if the End Time has been reached. If so, it will end the test, and if not, it will iterate again.
It is very important to note that Startup Delay overrides Start Time, and Duration Overrides End Time, because as we said earlier, they do not work together. You can read more about this in the JMeter documentation.
2. Run the Test in Non-GUI Mode
Although this should be taken for granted when running load tests with JMeter, it is always worth repeating. You should not run the tests in GUI mode, remember that your goal is to stress your system under test, not your load generator!
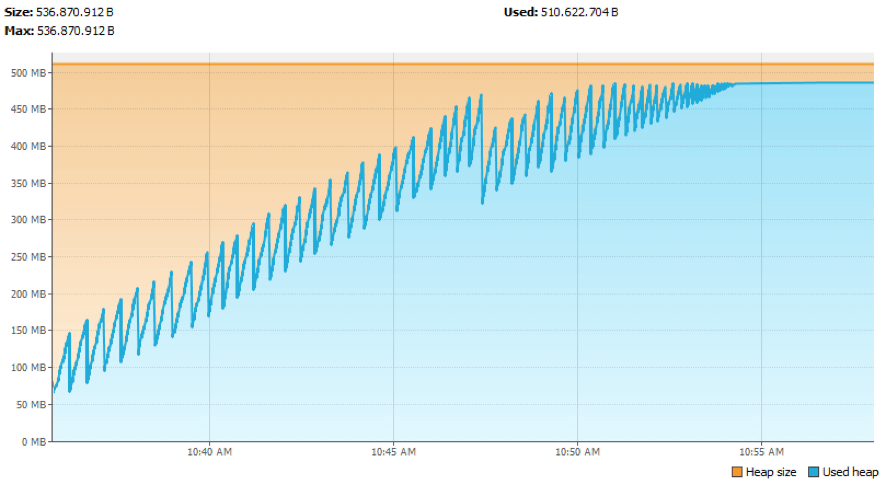
Let’s see what could happen if you don’t take this into account. We ran a very simple test in JMeter from its GUI, with 5 listeners enabled, and the maximum memory heap size by default (512MB). The following chart shows the behavior of the memory heap during the execution of the test. You can see that the maximum was reached after only 20 minutes of test execution, which resulted in JMeter getting hanged. This happens because the listeners and the GUI use lots of memory to display the information in real time.
So, again, GUI mode should be used only for test creation and test debugging.
Also, in order to be really sure that the load generator is not going to be overloaded, a good practice is to delete, or at least disable, all the listeners in the tests, since they are very demanding in resources. Worried about your reports? there is a more efficient way to generate them! Simply add -l command-line flag, as below:
jmeter -n -t D:\EnduranceTest\script.jmx -l D:\EnduranceTest\scriptResults.jtl
After the test, you can load the generated log with the results of the execution in the listener that you want for processing and analyzing this data.
3. Monitor Your Load Generator
Running the test in Non-GUI mode does not guarantee that the load generator will not be overloaded, so during the test execution pay attention to at least the CPU, memory, disk and network usage.
How to do this for long hours? You have to prepare in advance according to the tool you use, which depends on your OS. For instance, if you are running on a Unix based environment, you can use NMON for this, and you have to pass the appropriate parameters in order to have the monitor running during the whole test execution.
It’s also a good practice to increase the Java Heap Size to prevent the “Out of Memory” Failure, as JMeter’s default value is set to 512 MB only.
4. Run Your JMeter Script with Taurus and Use the BlazeMeter Reporting Feature
Last but not least, you will have to monitor your test in real time but also avoid stressing your load generator. But, don’t worry! You can easily achieve this by running your existing JMeter script using Taurus, which also allows you to generate real time BlazeMeter reports enabling in-depth analysis.
That’s it! You now know how to run your endurance tests in a better way.