Blog
December 8, 2020
Jenkins + Kubernetes: How to Set Up Jenkins on Top of a Kubernetes Cluster

Open Source Automation
When Jenkins instances grow quickly as part of your CI server, teams can suffer from redundant resources consumption and slowness of the delivery pipeline. Is there a way out of this situation? Sure there is, and the answer is simple — scalability.
This step-by-step guide will show you how to scale Jenkins with Kubernetes by setting up Jenkins on top of a Kubernetes cluster. Read along or skip to the section that interests you most.
Back to topWhat is Kubernetes?
Kubernetes is an open source containers orchestration tool created by Google to manage containers where you usually run your applications. By orchestration we mean the ability to deploy, scale, and operate with multiple containers from one place.
📕 Related Resource: Learn more about How to Scale Selenium Tests in a Kubernetes Cluster
Back to topBenefits of Running Jenkins on Kubernetes
The best way to scale Jenkins is on top of Kubernetes. Kubernetes, an open source containers orchestration tool offers a lot of flexibility. This capability makes it one of the best tools to manage scalable solutions.
Scalability is a measure that shows the ability of a system to expand its capabilities to handle an additional load. One of the strongest sides of Jenkins is that it has a scaling feature almost out-of-the-box. Jenkins scaling is based on the master/slaves model, where you have a number of agent instances (called slaves) and one main Jenkins instance (called master), which is responsible mainly for distributing jobs across slaves. Sounds simple right?
Jenkins scalability gives you lots of benefits:
- The ability to run many more build plans in parallel.
- Automatically replacing corrupted Jenkins instances.
- Automatically spinning up and removing slaves based on need, which saves costs.
- Distributing the load across different physical machines while keeping required resources available for each specific build plan.
Well, even if the scalability feature is available in Jenkins out-of-the-box, this doesn’t mean that the process of making Jenkins scalable will be fun and easy. First, it will be challenging, after that it will be hard and only then will it be fun, when you will finally see the number of slaves that are coming on board each time you run your builds.
📕 Related Resource: Learn more about Jenkins + Selenium: How to Setup and Run Tests
Level up your Jenkins + Kubernetes game with BlazeMeter — the testing platform designed by developers for developers. The best part? You can start FREE today!
Enter Kubernetes
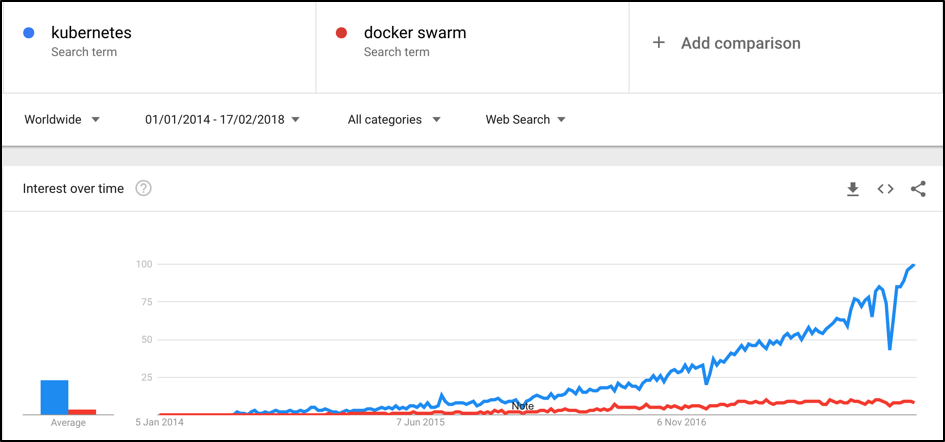
If you are trying to keep up with trends you should have definitely heard about Kubernetes, whose popularity is growing in huge steps, day by day. You might be surprised about how fast Kubernetes’s popularity pattern has been growing, if you try to compare it with similar containers orchestration tools like Docker Swarm (Docker's first container orchestration project):
So, how can Kuberenetes help us with scaling Jenkins?
Kubernetes is one of the best tools for managing scalable solutions. Practically anything can be placed inside the containers. Jenkins can be as well, and that’s why it makes Kubernetes a very nice option to use for our needs.
However, Kubernetes is not a tool that you can just install in an evening and wait for it to solve all of your problems. It's more like a way to build and deploy your software in general. In fact, it changes the usual ways we have been deploying our applications until previously. But you definitely shouldn’t go there just because it is a trend. Instead you should clearly understand which exact problems Kubernetes would help you resolve and which efforts you would have to spend to make it happen. But this is a question for a separate article. Our article is mainly for those who suddenly started using the Kubernetes cluster or are maybe going to use it sooner or later.
As already mentioned, this article will help you implement a Jenkins scalable infrastructure on top of Kubernetes, in which all the nodes for running the build will spin up automatically during builds execution, and will be removed right after their completion. This article will assume that you have a basic understanding of containers and Docker, which are definitely “MUST HAVE” prerequisites for those who decided to try Kubernetes.
Back to topHow to Use Jenkins + Kubernetes
Before Jenkins: Kubernetes Sandbox Installation
To show you how to deploy Jenkins on top of Kubernetes, we definitely need to set Kubernetes in place. It is nice if you already have Kubernetes but the end-to-end setup of the Kubernetes cluster is not such a simple task. In addition to that, the usual setup of Kubernetes requires you to have a cluster. If your main goal is to setup the Kubernetes platform from scratch on top of the real cluster I would recommend you to start with the official documentation, as this article is not concentrated on the Kubernetes installation but on an implementation of the scalable Jenkins continuous integration server on top of it. But what if you don’t have the Kubernetes cluster in place? As usual, we have some easy ways for you to try this locally!
If you want to use the Kubernetes platform for test purposes (definitely not to run the production load on this setup) then you can use the Minikube tool, which has been developed to run a single node Kubernetes cluster on your local machine. The installation is very simple but you should have the VirtualBox installed on your local machine. If you have a UNIX platform, just use this command to install Minikube.
➜ curl -Lo minikube https://storage.googleapis.com/minikube/releases/latest/minikube-darwin-amd64 && chmod +x minikube && sudo mv minikube /usr/local/bin/To run the Minikube after its installation:
➜ minikube start


Starting local Kubernetes v1.9.0 cluster...
Starting VM..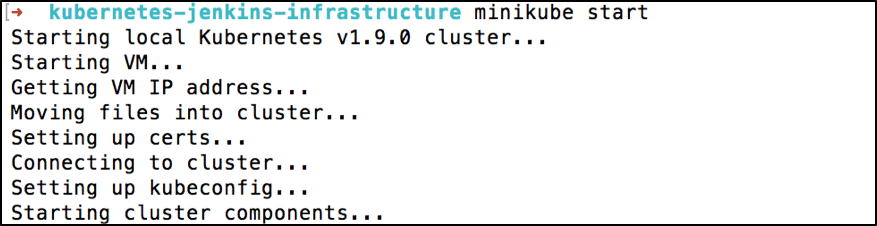
To confirm that Minikube is up and running:
➜ minikube status


minikube: Running
cluster: Running
kubectl: Correctly Configured: pointing to minikube-vm at 192.168.99.100
Also, we need to install the Kubernetes command line interface for the cluster configuration from the console. You can install it by using the specified command:
➜ curl -Lo kubectl https://storage.googleapis.com/kubernetes-release/release/v1.9.0/bin/darwin/amd64/kubectl && chmod +x kubectl && sudo mv kubectl /usr/local/bin/Jenkins Master Installation
The best way to install the Jenkins master is to create your docker image based on the base Jenkins image, which you can find in the official docker repository (keep in mind that Docker should be installed on your local machine). For this, you need to create a dockerfile. Having your Jenkins setup as a dockerfile is highly recommended to make your continuous integration infrastructure replicable and have it ready for setup from scratch. So let’s create our first example dockerfile for the Jenkins master:
➜ vim Dockerfile
Dockerfile:
from jenkins/jenkins:2.60.1

# Distributed Builds plugins
RUN /usr/local/bin/install-plugins.sh ssh-slaves

# install Notifications and Publishing plugins
RUN /usr/local/bin/install-plugins.sh email-ext
RUN /usr/local/bin/install-plugins.sh mailer
RUN /usr/local/bin/install-plugins.sh slack

# Artifacts
RUN /usr/local/bin/install-plugins.sh htmlpublisher

# UI
RUN /usr/local/bin/install-plugins.sh greenballs
RUN /usr/local/bin/install-plugins.sh simple-theme-plugin

# Scaling
RUN /usr/local/bin/install-plugins.sh kubernetes

# install Maven
USER root
RUN apt-get update && apt-get install -y maven
USER jenkins
We are not going to give detailed instructions on how to write dockerfiles.
- ‘from [image_name]:[tag]’: this line means that our dockerfile will be based on an existing image. It is obvious that for our dockerfile, we take the Jenkins base image, which you can find in the official Docker repository.
- ‘RUN [command]’: this line means that we are going to run this command inside the image during the build process. In our case we use the ‘RUN’ command to install different common Jenkins plugins, which can be required for your Jenkins master.
- ‘USER [user_name]: this command tells us that all the commands below will be run under a specific user. In our case, you need to use ‘root’ user to be able to install additional tools like maven inside the image during a build.
Most of the plugins we installed here were just to show you an example. You can install additional plugins just by adding similar commands inside your dockerfile. But one of these plugins is critical for our article. As you might guess, it is the ‘Kubernetes’ Jenkins plugin. This plugin is designed to implement Jenkins on top of a Kubernetes cluster.
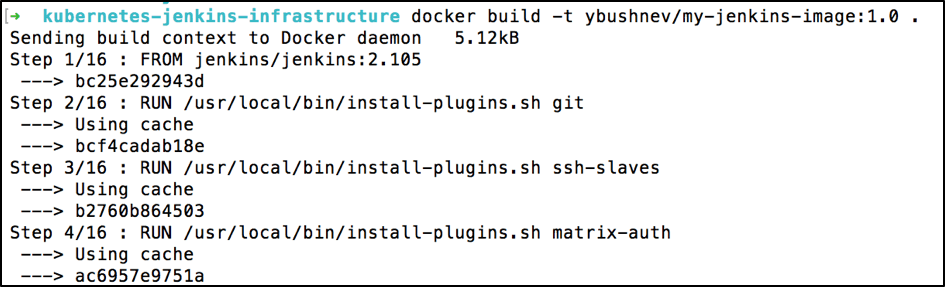
As soon as you created the dockerfile, you need to build the image that can be used and run inside the Kubernetes cluster later on. But before you build the image, if you use Minikube, then you need to keep in mind that Minikube runs on your local machine but inside a virtual machine. That’s why Minikube doesn’t see the docker images you created on your local machine. So how can you build the image and make it available inside Minikube? Quite easily! You can build your docker image right inside your Minikube virtual machine, but for this you need to execute this command:
➜ eval $(minikube docker-env)This command doesn’t show any output after execution so if you didn’t get any errors then everything should be fine. To build a docker image based on the dockerfile you created, all you need is to run this command from the same folder where you have created the dockerfile:
➜  docker build -t ybushnev/my-jenkins-image:1.0 .
Sending build context to Docker daemon   5.12kB
Step 1/16 : FROM jenkins/jenkins:2.105
………...
After the build process is finished, let’s verify that the newly created image is there:
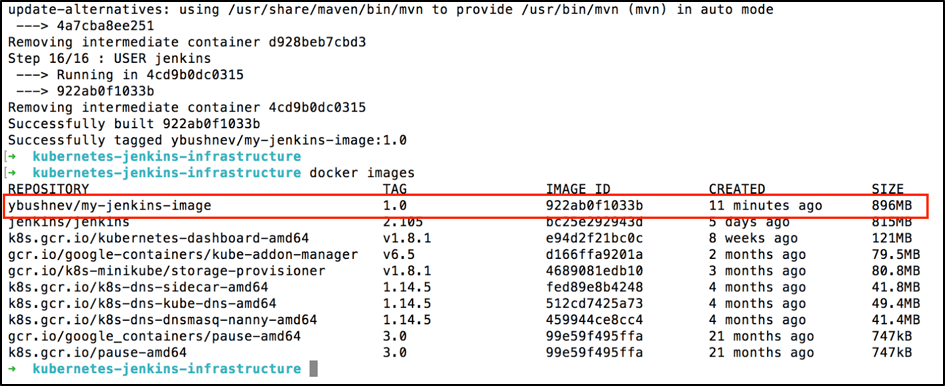
Congratulations! Your master Jenkins image is created and can be used inside your Kubernetes cluster.
Jenkins Kubernetes Deployment
As soon as you have the Kubernetes cluster in place and the Jenkins image, you can deploy this image on top of the cluster. In order to deploy any application inside Kubernetes, you need to create a deployment configuration, which will be used as the main recipe to ‘cook’ your application inside the cluster.
Kubernetes deployment is presented in a YAML format text file with all the configuration params that might be needed to run your application. Let’s have a look at the basic deployment configuration that is required to run Jenkins inside Kubernetes:
➜ vim jenkins-deployment.yaml
jenkins-deployment.yaml:
apiVersion: extensions/v1beta1
kind: Deployment
metadata:
  name: jenkins
spec:
  replicas: 1
  template:
    metadata:
      labels:
        app: jenkins
    spec:
      containers:
        - name: jenkins
          image: ybushnev/my-jenkins-image:1.0
          env:
            - name: JAVA_OPTS
              value: -Djenkins.install.runSetupWizard=false
          ports:
            - name: http-port
              containerPort: 8080
            - name: jnlp-port
              containerPort: 50000
          volumeMounts:
            - name: jenkins-home
              mountPath: /var/jenkins_home
      volumes:
        - name: jenkins-home
          emptyDir: {}
Let’s go over the main options inside this deployment file:
- ‘apiVersion’: specifies which Kubernetes API version will be used (Kubernetes supports multiple API versions to introduce new changes but still supports backward compatibility).
- ‘kind’: the main option that presents the purpose of this yaml file (in our case it is a deployment file)
- ‘name’: represents the deployment name to identify it later across different other deployments you might have (should be placed inside the ‘metadata’ section).
- ‘spec’: a section that reflects the specification of the main deployment parameters and configuration.
- ‘containers’: a section containing all the containers that should be run within the specified deployment.
- ‘containers.name’: represents the deployment container name, to identify it later across other different containers you might have for one deployment.
- ‘image’: a Docker image that will be used to spin up the container.
- ‘env’: environment variables that will be passed inside the container.
- ‘ports’: sections with ports that will be forwarded outside the containers.
- ‘volumetMounts’: shows the path by which we will mount the volume to persist the data inside the container.
Let’s install the just created deployment into our Kubernetes cluster by using the specified command:
➜ kubectl apply -f jenkins-deployment.yaml

deployment "jenkins" created
There is one more very important term inside Kubernetes that you need to be aware of, and it's named ‘Pod’. A pod is the basic building block and the smallest unit in the Kubernetes cluster. Once you perform a deployment, it creates a pod. I highly recommend going over the Pod overview if you want to get more ideas about the pod and its place inside the Kubernetes cluster.
As each deployment should create a pod, let’s verify that we have a newly created pod for the just applied deployment for our Jenkins. By running this specified command, you can get the status of the Jenkins pod and the screenshot below shows you an example of a successfully deployed pod:
➜ kubectl describe pod | grep jenkins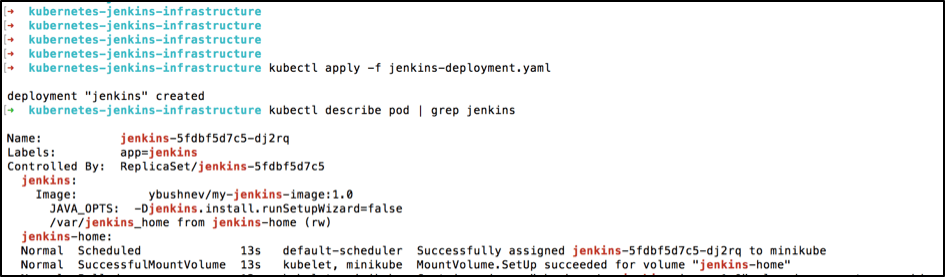
In addition to pod creation via deployment, we need to create the Jenkins service. The reason behind this is simple. To interact with a pod inside the Kubernetes cluster you need to know its IP address and in theory, we can interact with a pod directly by using its own IP address. But what if a pod goes down? One of Kubernetes’s main features is to handle such cases, and it should create a new pod instead of the one that went down. As it is a new one, it should get a new IP address.
So how we can still maintain a persist connection to the pod while its IP can be changed? This is when the Kubernetes service comes into play. The service defines an abstraction between the outside world and the pods themselves, and provides you with access no matter what. This means that it handles all the communication within a deployment.
To create the service we need to define such a yaml file:
➜ vim jenkins-service.yaml
jenkins-service.yaml:
apiVersion: v1
kind: Service
metadata:
  name: jenkins
spec:
  type: NodePort
  ports:
    - port: 8080
      targetPort: 8080
  selector:
    app: jenkins
The main options inside this service file:
- ‘apiVersion’: specifies which Kubernetes API version will be used (Kubernetes supports multiple API versions to introduce new changes but still supports backward compatibility)
- ‘kind’: the main option that presents the purpose of this yaml file (in our case it is a service file)
- ‘name’: represents the service name to identify it later across different other services you might have (should be placed inside the ‘metadata’ section)
- ‘spec’: a section that reflects the specification of main service parameters and configuration
- ‘ports’: sections with ports that will be forwarded outside the service
- ‘selectors’: here you need to specify the deployment name that is associated with this service
As soon as you have created the service file, you can run it inside the Kubernetes container by using this command:
➜  kubectl create -f jenkins-service.yaml
service "jenkins" created

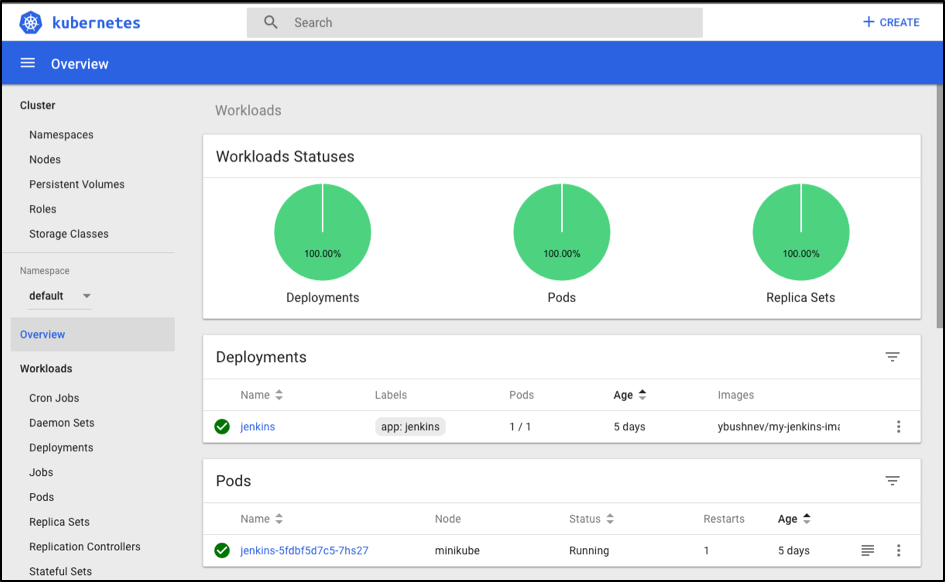
Now we have finally created the deployment and the service, and that’s basically it! Let's open the Kubernetes dashboard and verify that it is there for real! All you need is to execute this command in the command line:
➜ ~ minikube dashboardThis command will open the browser for you with the Kubernetes dashboard, where you can navigate to the ‘Overview’ section and find that your ‘jenkins’ deployment and pod are there:
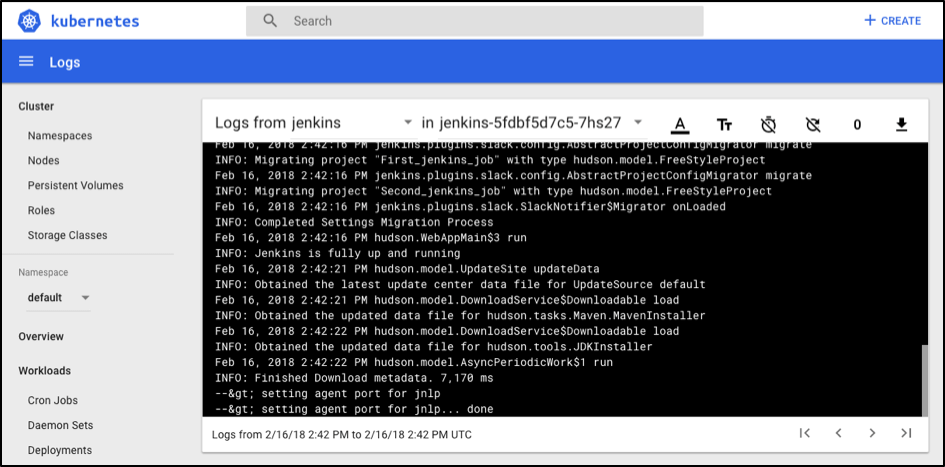
In addition to that, if you go into pod itself, you can find master Jenkins logs, which might be very useful for you if you get an unexpected issue during your Jenkins CI usage:
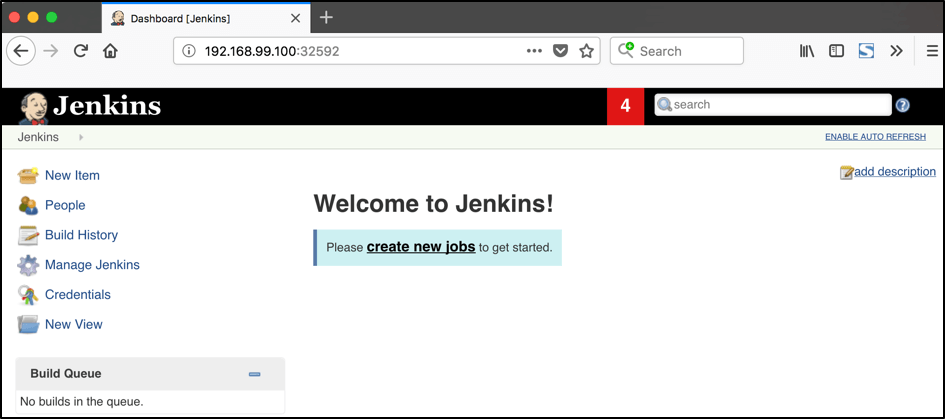
As a final verification that our Jenkins master is installed, let’s try to open Jenkins UI. First of all, we need the port that the Jenkins service extends outside the Kubernetes cluster, which can be used to access the Jenkins setup. You can get the port number by using this specified command:
➜ kubectl get service

In addition to that, you need to know the IP of the Kubernetes cluster itself. You can get it by using this command:
➜ minikube ip

192.168.99.100
As you might guess, in our case, the result Jenkins UI URL will be: 192.168.99.100: 3259.
Jenkins Slaves Configuration
Now it’s time to configure Jenkins slaves. As you might remember, we installed the Kubernetes plugin using the master dockerfile so we don’t need to install anything separately and the required plugin should be already there.
In order to configure the Jenkins slaves. We need to know the URL of the Kubernetes master and the internal cluster URL of the Jenkins pod. You can get the Kubernetes master URL by this specified command:
➜  kubectl cluster-info | grep master
Kubernetes master is running at https://192.168.99.100:8443
The Jenkins pod URL post is standard - 8080, and you can get IP address in only a few steps. First, you need to get the Jenkins pod id, which is the value of the output provided by this command:
➜  kubernetes-jenkins-infrastructure kubectl get pods | grep jenkins
jenkins-5fdbf5d7c5-dj2rq   1/1       Running   0          9m
Second, you need to run the command that describes the pods passing the pod id as an argument. You will find the IP address in the output:
➜  kubernetes-jenkins-infrastructure kubectl describe pod jenkins-5fdbf5d7c5-dj2rq
…..
IP:             172.17.0.4
Now, we are ready to fill in the Kubernetes plugin configuration. In order to do that, open the Jenkins UI and navigate to “Manage Jenkins -> Configure System -> Cloud -> Kubernetes” and fill in the ‘Kubernetes URL’ and ‘Jenkins URL’ appropriately, by using the values which we have just collected in the previous step:
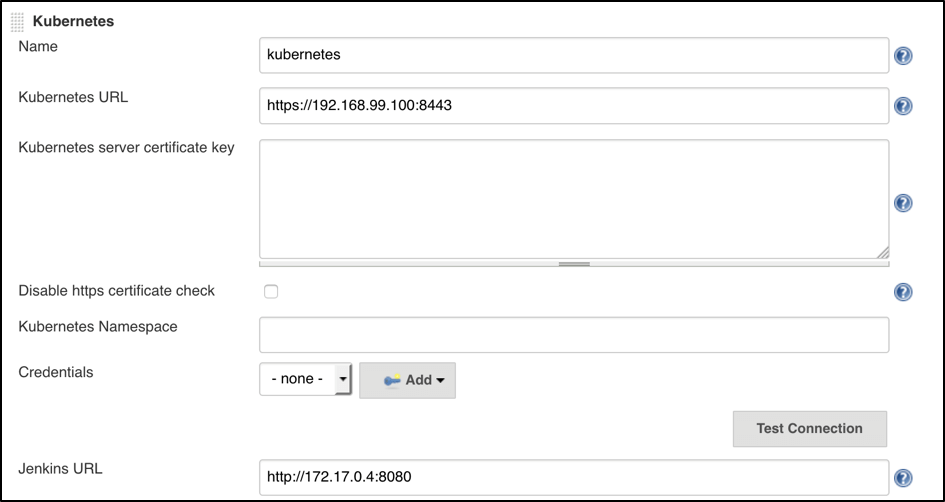
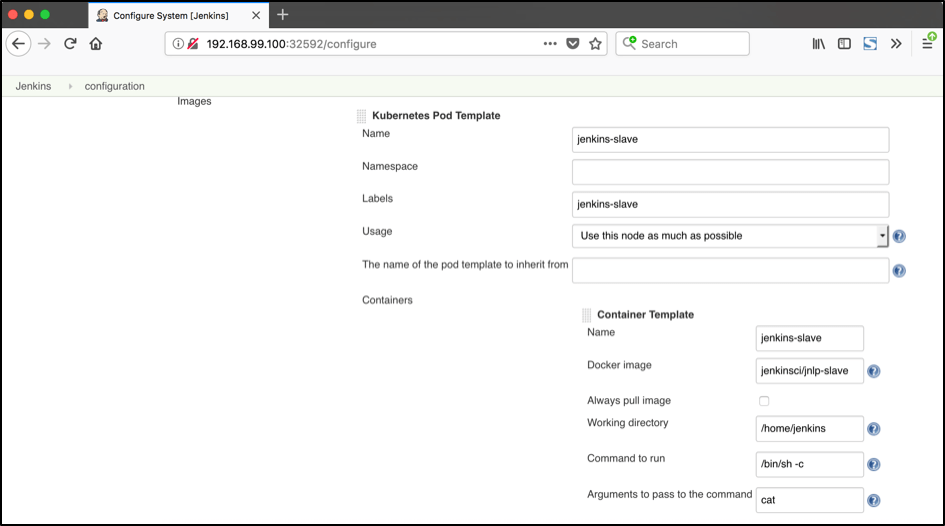
In addition to that, in the ‘Kubernetes Pod Template’ section, we need to configure the image that will be used to spin up the slaves. If you have some custom requirements for your slaves, you can build one more dockerfile with the appropriate changes the same way we did for the Jenkins master. On the other hand, if you don’t have unique requirements for your slaves, you can use the default Jenkins slave image available on the official Docker hub repository. In the ‘Kubernetes Pod Template’ section you need to specify the following (the rest of the configuration is up to you):
- Kubernetes Pod Template Name: can be any and will be shown as a prefix for unique generated slaves’ names, which will be run automatically during builds.
- Docker image: the docker image name that will be used as a reference to spin up a new Jenkins slave.
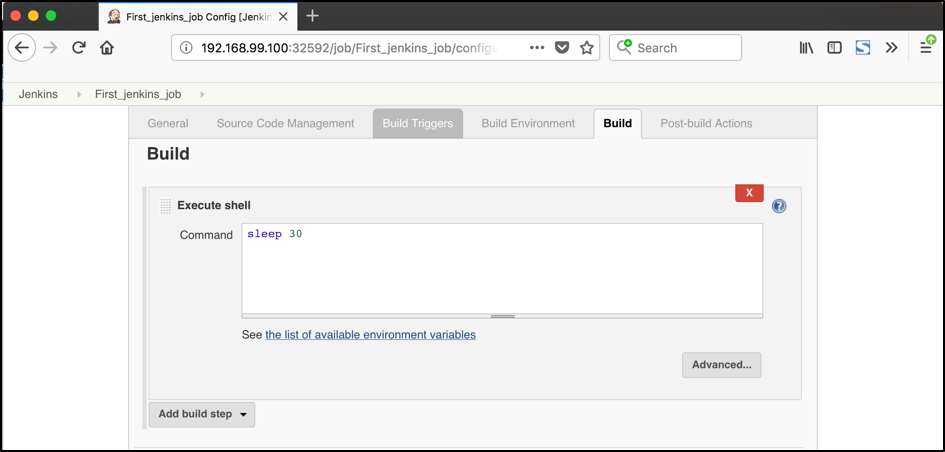
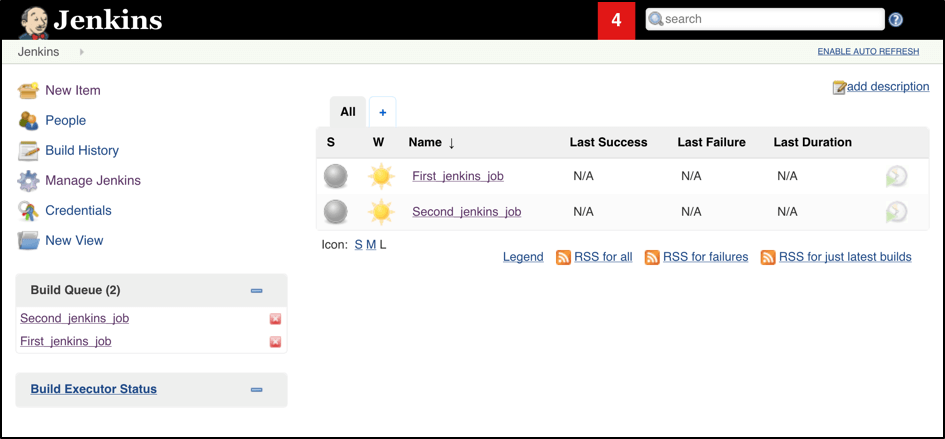
Now all the configuration seems to be in place and we are ready for some tests. Let’s create two different build plans with one step that simulates a timeout (let’s say 30 secs) just to have a long running operation:
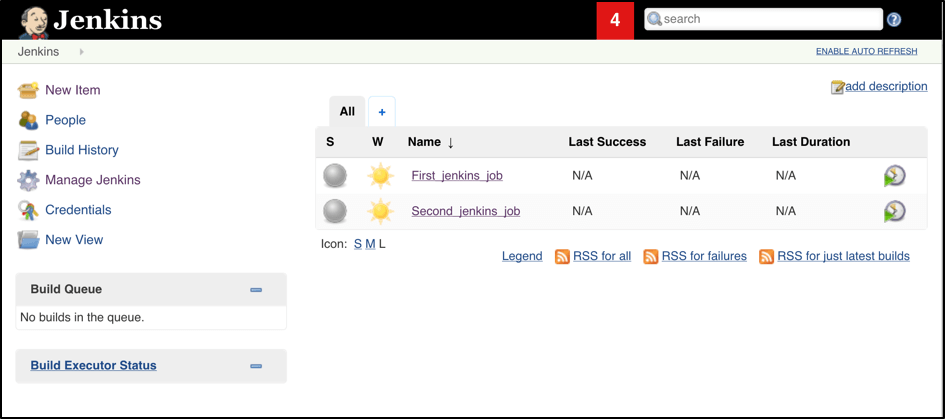
Now let’s trigger the execution for both of the builds. You should see that both build plans appear in the ‘Build Queue’ box almost immediately:
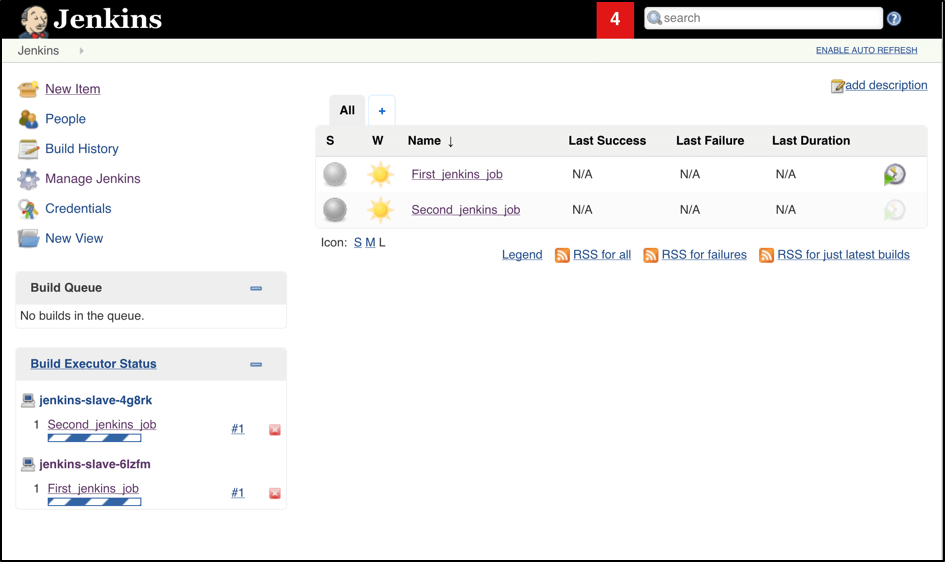
If you applied the correct configuration in the previous steps, you should see that you have two additional executors and both have the prefix ‘jenkins-slave’, in just 10-15 seconds. This means that these nodes were automatically launched inside the Kubernetes cluster by using the Jenkins Kubernetes plugin, and, most importantly, that they were run in parallel:
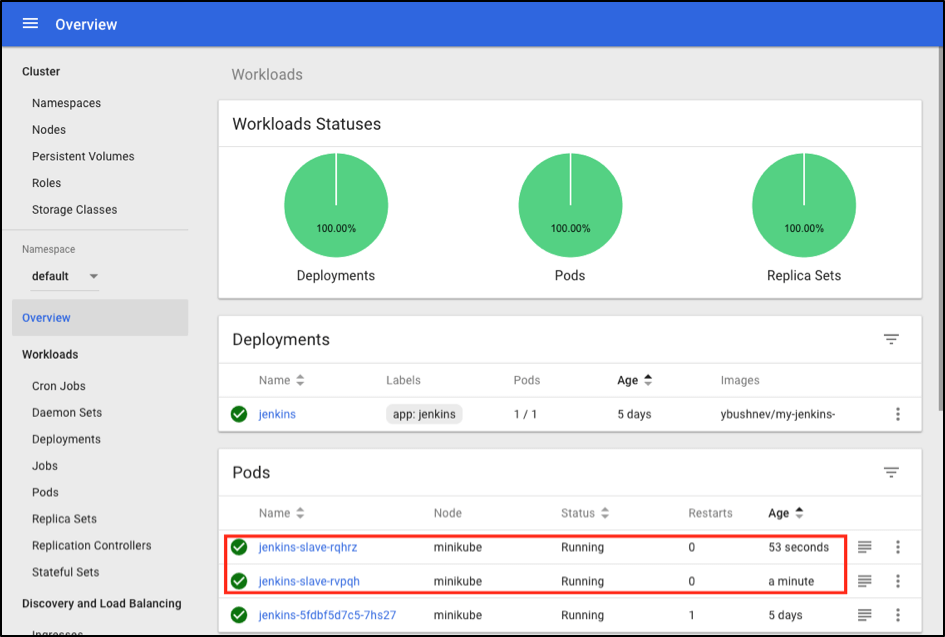
Also, you can confirm this from the Kubernetes dashboard, which will show you a couple of new pods:
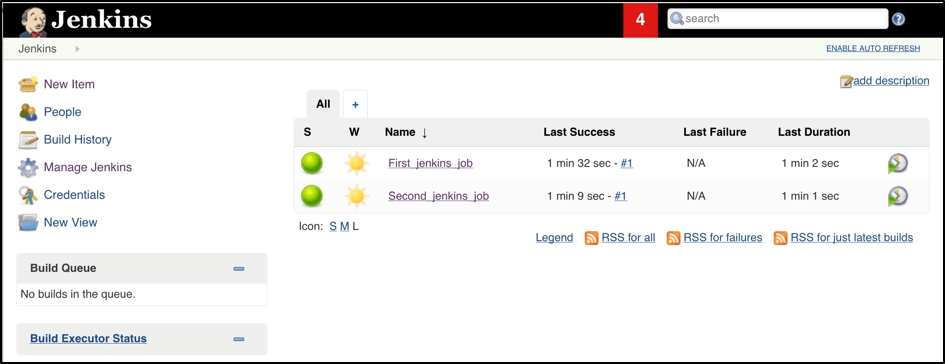
After both builds are completed, you should see that both build executors have been removed and are not available inside the cluster anymore:
Bottom Line
Congratulations! You have just seen the true power of scaling with Jenkins & Kubernetes. Jenkins can be used for adding all of your tests, including your load tests, to the Continuous Integration.